How-To
Migrating File Data to the Cloud Using AWS DataSync, Part 1
With more interest in cloud-based file servers, Brien Posey details the integral process of migrating existing files to the cloud to get started.
For many years the idea of hosting file servers in the cloud was widely regarded as impractical and cost prohibitive. More recently however, there has been a renewed interest in cloud-based file servers. Of course if an organization does opt to host its file servers in the cloud then it will need to figure out how to migrate existing files. Thankfully, Amazon offers a service called DataSync that can help with the migration process.
Before I show you how to use AWS DataSync, there are two important things that you need to know. First, in order to use the AWS DataSync service, you are going to need to set up a virtual machine (VM). This VM will run an agent that enables communications between your on-premises environment and the Amazon cloud. The required VM can either run on-premises or in the cloud. If you opt to run the VM on-premises then you will need to have a server that is running VMware ESXi, Kernes-based Virtual Machine (KVM), or Microsoft Hyper-V. If you decide to host the VM in the cloud then it will run on Microsoft Hyper-V.
The other thing that you need to know before getting started is that in order to migrate your data to the AWS cloud using DataSync, the data will need to be located in a supported location. Amazon allows you to migrate data on NFS or SMB stores, as well as self managed object storage, Amazon EFS, Amazon FSx for Windows File Server and Amazon S3.
To get started, log into the AWS portal and then select the DataSync option from the list of services (it's located in the Migration and Transfer section). Once you arrive at the AWS DataSync page, the first thing that you will need to do is to specify the type of data transfer that you want to perform. The Create Data Transfer drop-down list gives you two options. You can perform a data transfer between on-premises storage and AWS, or you can transfer data between two AWS storage services. You can see what these options look like in Figure 1.
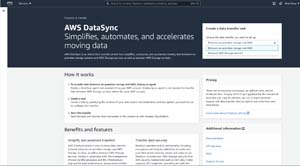 [Click on image for larger view.] Figure 1: Choose the type of data transfer task that you want to create.
Once you have made your selection, click the Get Started button (the Get Started button is hidden by the drop-down menu in the figure above). For the purposes of this blog series, I am going to walk you through the process of migrating data that is located in an on-premises SMB share. I will be hosting the VM on a Microsoft Hyper-V server.
As you can see in Figure 2, the next step in this process is to create the agent. The first thing that you will need to do is to select the hypervisor that you want to use, and then download the VM image. What you do next will vary considerably based on the hypervisor that you have selected, but I will show you the steps required by Microsoft Hyper-V.
 [Click on image for larger view.] Figure 2: You will need to choose the type of hypervisor that will host the agent VM.
The download consists of a single ZIP file, which you will need to extract to a folder on your Hyper-V server. Next, open the Hyper-V Manager and select the New | Virtual Machine commands from the Actions pane. This will cause the Hyper-V Manager to launch the New Virtual Machine Wizard.
Click Next to bypass the wizard's Welcome screen and you will be taken to a screen that asks you to provide a name and location for the VM. You can see what this looks like in Figure 3.
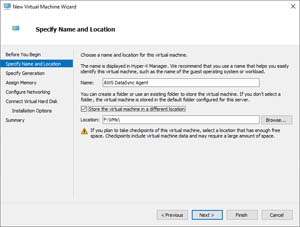 [Click on image for larger view.] Figure 3: Enter a name and path for the VM.
Click Next and you will see a prompt asking you to choose a VM generation. Choose the Generation 1 option and click Next. You will now be asked to specify the amount of startup memory to allocate to the VM. I couldn't find anything in the AWS documentation specifying the amount of memory that should be used. My experience has been that 4 GB seems to work well, but you may need to allocate more or less depending on how much data you are migrating.
Click Next, and you will be taken to the Configure Networking screen. Here you will need to select the virtual switch that you want to use. Be sure to choose an external virtual switch, because the VM will need to access the Internet.
Click Next and the wizard will display the Connect Virtual Hard Disk screen. Choose the option to use an existing virtual hard disk and then specify provide a path to the VHDX file that you extracted from the ZIP file earlier. You can see what this looks like in Figure 4.
 [Click on image for larger view.] Figure 4: You will need to tell Hyper-V to use the virtual hard disk that you downloaded from AWS.
Click Next, followed by Finish to create the VM.
Now that the required VM has been created, it is time to configure the VM to enable the data migration process. I will show you how to do that in Part 2.
About the Author
Brien Posey is a 22-time Microsoft MVP with decades of IT experience. As a freelance writer, Posey has written thousands of articles and contributed to several dozen books on a wide variety of IT topics. Prior to going freelance, Posey was a CIO for a national chain of hospitals and health care facilities. He has also served as a network administrator for some of the country's largest insurance companies and for the Department of Defense at Fort Knox. In addition to his continued work in IT, Posey has spent the last several years actively training as a commercial scientist-astronaut candidate in preparation to fly on a mission to study polar mesospheric clouds from space. You can follow his spaceflight training on his Web site.