How-To
Migrating File Data to the Cloud Using AWS DataSync, Part 2: Configuration
With more interest in cloud-based file servers, Brien Posey details the integral process of migrating existing files to the cloud to get started, here focusing on the final configuration steps.
In the previous article, I showed you how to create a virtual machine (VM) that will act as an agent to be used in the file migration process. Now that the VM is in place, let's move forward with the configuration process.
The first thing that you will need to do is to increase the VM's virtual processor count. You will see an error message later on if you don't do this. From within the Hyper-V Manager, right click on the VM and select the Settings command. When the Settings dialog box opens, select the Processor option and then increase the virtual processor count. As you can see in Figure 1, I am using four virtual processors. Click OK to continue.
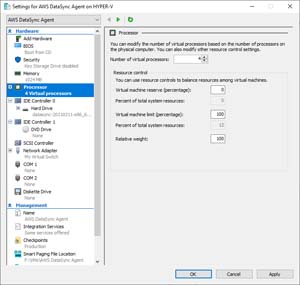 [Click on image for larger view.] Figure 1: You will need to increase the virtual processor count.
Now, open the VM's console by double clicking on the VM and then click the Power icon to boot the VM. When the VM starts, you will need to log in. The VM's default user name is admin and the default password is password. You can see the VM's console in Figure 2.
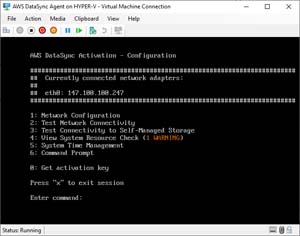 [Click on image for larger view.] Figure 2: This is what the VM looks like after you log in.
As you look at the figure above, you will notice that the VM console displays an IP address. Normally, the IP address will be assigned by a DHCP server on your network, but you can use the Network Configuration option if you need to enter the address manually. In either case, be sure to make note of the IP address that is being used.
Now, switch back over to the AWS portal and enter the VM's IP address into the Agent Address field. You can see what this looks like in Figure 3. Upon doing so, take a moment to make sure that the Service Endpoint matches your region and then click the Get Key button.
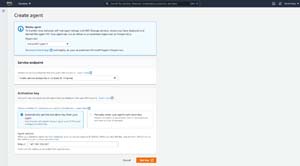 [Click on image for larger view.] Figure 3: Enter your VM's IP address.
At this point, you will be taken to a screen that confirms that the portal has successfully retrieved the activation key. You will also have an opportunity to assign an optional name to your agent, and to add any tags that you might want to use. You can see what this looks like in Figure 4.
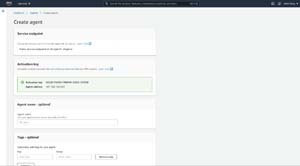 [Click on image for larger view.] Figure 4: The activation key was successfully deployed.
When you are done, click the Create Agent button. You will then see a screen confirming that the agent was created successfully.
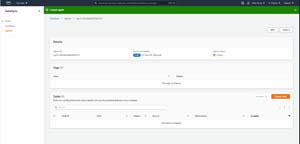 [Click on image for larger view.] Figure 5: The agent was created successfully.
Now that the agent is in place, you can create a task that will migrate data to the cloud. Click the Create Task button shown in the figure above, and then you will be taken to a screen similar to the one shown in Figure 6.
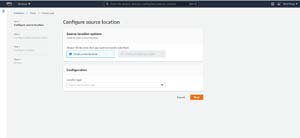 [Click on image for larger view.] Figure 6: You must begin by creating a new location.
Since this is the first data migration, you will need to choose the option to create a new location. You will also need to choose a location type from the drop down list. For the purposes of this article, I am going to be choosing the Server Message Block (SMB) option. The remaining configuration steps vary based on the location of the data. In the case of an SMB share, you will have to select an agent, specify the SMB server and share name, and then provide a set of credentials for a user who has access to the share. You can see what this looks like in Figure 7.
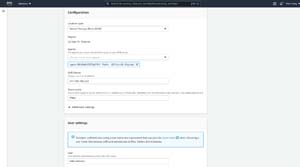 [Click on image for larger view.] Figure 7: This is how you create an SMB location.
Click Next, and you will be taken to the Configure Destination Location screen. Here you will need to choose the destination for your data. As you can see in Figure 8, you can store your files on EFS, S3 or FSx.
 [Click on image for larger view.] Figure 8: Choose where you want to migrate your files to.
The remaining steps vary based on the destination that you choose. For example, if you choose S3 then you will be asked to select an S3 bucket. When you are done choosing your destination settings, click Next.
At this point, you will be taken to the Configure Settings screen. The main thing that you will need to do on this screen is to give your new task a name. You will also need to decide whether or not you want to use Cloud Watch. There are many other settings on this screen that are also worth exploring. For example, you can optionally limit bandwidth, and you can choose what happens with deleted files, as shown in Figure 9.
 [Click on image for larger view.] Figure 9: Be sure to assign a name to your task.
Click Next and you will be taken to a summary screen. Take a moment to review the settings shown on this screen. Assuming that everything looks good, click the Create Task button to create the task and begin migrating your data.
About the Author
Brien Posey is a 22-time Microsoft MVP with decades of IT experience. As a freelance writer, Posey has written thousands of articles and contributed to several dozen books on a wide variety of IT topics. Prior to going freelance, Posey was a CIO for a national chain of hospitals and health care facilities. He has also served as a network administrator for some of the country's largest insurance companies and for the Department of Defense at Fort Knox. In addition to his continued work in IT, Posey has spent the last several years actively training as a commercial scientist-astronaut candidate in preparation to fly on a mission to study polar mesospheric clouds from space. You can follow his spaceflight training on his Web site.