How-To
Preventing Configuration Drift for AWS Resources, Part 2: Checking Compliance
After earlier explaining how to use AWS Config to create rules that could determine whether or not a given resource is in compliance with your organizational mandates, Brien Posey now shows how to check to see if a resource is in compliance.
In the previous article, I explained how to use AWS Config to create rules that could determine whether or not a given resource is in compliance with your organizational mandates. Now that I have shown you how to define these rules, I want to show you how to check to see if a resource is in compliance.
You may have noticed in the screen captures found in the first part of this blog series, that I created a rule to verify that my EC2 virtual machine (VM) instances were a part of a VPC named MyVPC. After creating this rule, I provisioned a new EC2 instance and placed that instance into the Default VPC (not the MyVPC VPC referenced by the rule). Within a few minutes of the new instance being brought online, AWS Config compared the instance to the rule that had been created. Since the instance had been placed in a VPC that was different from the one referenced by the rule, the instance was found to be noncompliant.
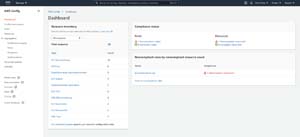
The way that AWS Config conveys noncompliance is a little bit different from what you might expect. If you look at Figure 1, you can see that the AWS Config Dashboard indicates that there is one noncompliant rule and one noncompliant resource.
 [Click on image for larger view.] Figure 1: AWS Config has identified one noncompliant rule and one noncompliant resource.
The noncompliant resource is the AWS resource (in this case, a VM instance) that is breaking one or more rules. The noncompliant rules are the rules that the noncompliant resources are breaking. In this particular case, I only have one EC2 instance and one rule, so it's easy to figure out why a resource is in a noncompliant state. However, if I had thousands or resources as so many production environments do, then having a list of the resources that are in a noncompliant state and a list of the rules being broken becomes critical to tracking down compliance violations.
As you can imagine, bringing large numbers of resources into a compliant state can be a time consuming and labor intensive process. Thankfully, you don't have to go it alone. It is possible to configure a rule to perform automatic remediation.
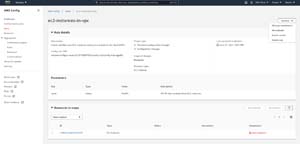
Imagine for a moment that AWS Config had identified a large number of EC2 instances that were connected to the wrong VPC. Rather than fixing this manually, we can tell the rule what to do if it encounters such a problem. To do so, go to the dashboard view shown in the previous figure, and then click on the noncompliant rule that you want to automatically remediate. This will bring you to the Rule Details screen. Select the Manage Remediation option from the Actions drop down shown in Figure 2.
 [Click on image for larger view.] Figure 2: Click on Actions and select the Manage Remediation option.
At this point, AWS will open the Edit Remediation Action screen. Set the Select Remediation Method to Automatic Remediation. Next, you will have to choose the remediation action that you want to perform. Once again, there are numerous remediation actions to choose from, you it can be helpful to use the search box to search for the remediation action that you are interested in. In the case of moving an EC2 instance to a different VPC for instance, you might search on the word VPC.
It is worth noting that automatic remediation is based on the use of AWS System Manager automation. This means that there are some rules for which automatic remediation is either unavailable or impractical.
Take, for instance, the need to move an EC2 instance to a different VPC. Since you can't just reassign an instance to a different VPC, the remediation action creates an AMI from the EC2 instance (only classic instances are supported) and then uses that AMI to launch a new instance in the correct VPC. This probably isn't the sort of action that you would want to automatically take in response to a rule because there is a lot of potential for things to go wrong.
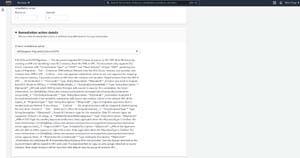
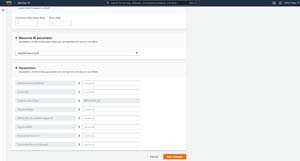
Even so, it's worth taking a look at the remediation action to get a feel for how it works. If you look at the remediation action shown in Figure 3, you can see that it provides a description of the action to be taken. As you get further into the text however, it lists a number of optional and required parameters, as well as the type of information that needs to be supplied for each. When you scroll to the bottom of the screen, you can see each of these parameters listed. There is also a field where you can assign a value to each individual parameter, as shown in Figure 4.
 [Click on image for larger view.] Figure 3: The descriptive text explains how the remediation process works and the parameters that are required.
 [Click on image for larger view.] Figure 4: You can supply parameter values at the bottom of the page.
If you decide to move forward with adding an automatic remediation action, populate the required parameters and click the Save Changes button. Once you do, you can wait for the rule to run again for the remediation to take place, or you can select a resource and click the Remediate button shown at the bottom of Figure 2.
About the Author
Brien Posey is a 22-time Microsoft MVP with decades of IT experience. As a freelance writer, Posey has written thousands of articles and contributed to several dozen books on a wide variety of IT topics. Prior to going freelance, Posey was a CIO for a national chain of hospitals and health care facilities. He has also served as a network administrator for some of the country's largest insurance companies and for the Department of Defense at Fort Knox. In addition to his continued work in IT, Posey has spent the last several years actively training as a commercial scientist-astronaut candidate in preparation to fly on a mission to study polar mesospheric clouds from space. You can follow his spaceflight training on his Web site.