How-To
Connecting an IoT Device to AWS Cloud
Brien Posey provides step-by-step instructions to install an agent onto a device so that AWS can discover and manage it.
The AWS IoT portal can be used as an interface for collectively managing your IoT devices. Although you can use this portal to create an off-line device inventory (an inventory with no actual connection to a device), it is also possible to install an agent onto a device so that AWS will be able to discover and manage the device (although not every IoT device supports agent installations). In this blog post, I will show you how.
To get started, select the IoT Device Management option from the list of services (it's located in the Internet of Things section). When the AWS IoT console opens, expand the Connect tab and then click on the Get Started sub-tab. This will cause AWS to display the screen shown in Figure 1.
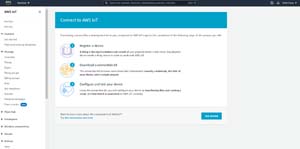 [Click on image for larger view.] Figure 1: Connecting an IoT device is a three-step process.
Registering a Device
As you can see in the figure above, connecting an IoT device is a three-step process. The first step in this process is to register a device. Click on the Get Started button. When you do, you will be taken to a screen that asks you how you are connecting to AWS IoT.
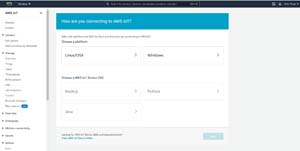 [Click on image for larger view.] Figure 2: Choose the platform and SDK that matches the IoT device.
You will need to select the operating system that is running on the device, as well as the SDK that you want to use for device management. For the purposes of this blog post for example, I am going to be onboarding a Windows device using the Python SDK.
Click Next, and you will be prompted to "give your thing a name." In AWS, a thing is defined as a digital representation of a physical IoT object. I have written a separate blog post on AWS thing management. In this case however, you will simply need to enter a name that will help you to identify the device.
Download the Connection SDK
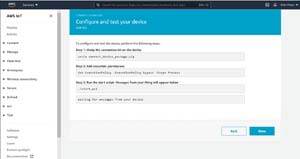
Click Next, and you will be taken to the screen shown in Figure 3. This screen allows you to download the connection SDK that is needed to link the device to AWS.
 [Click on image for larger view.] Figure 3: You will need to download the SDK in order to link the device to AWS.
Go ahead and download the SDK and open it. The SDK's contents vary based on the platform that you have selected. In the case of a Windows device, the SDK contains a PowerShell script, a PEM file (a certificate), a public key and a private key.
Before moving on to the next step, you are going to need to download and install Git for Windows. You will also need to add C:\Program Files\Git\bin\ and C:\Program Files\Git\cmd\ to the device's path and then reboot the device. While you are at it, you will also need to add the Python folder and the Python scripts folder (assuming that the device is using Python) to the system path. These paths can vary but on my system they are:
- C:\users\<user name>\AppData\Local\Programs\Python\Python39
- C:\users\<user name>\AppData\Local\Programs\Python\Python39\Scripts
Running the Script
The next step in the process is to extract the SDK's contents and copy it to a folder on the IoT device. Click Next within the AWS console and you will see instructions to help you with the process, as shown in Figure 4.
 [Click on image for larger view.] Figure 4: AWS provides instructions to help you along.
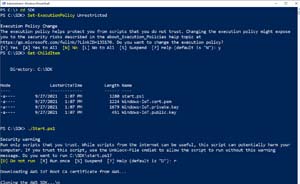
You will then need to launch the script contained within the SDK. Again, the process varies by platform. In the case of a Windows device, you will need to open an elevated PowerShell session and then launch the Start.ps1 file You can see how this works in Figure 5. Notice in the figure that I have temporarily disabled the execution policy so that the script can be run.
 [Click on image for larger view.] Figure 5: This is how you launch the Start.ps1 script.
Click Done and you should see a message like the one shown in Figure 5 indicating that the device has been successfully connected. Likewise, you will see the IoT device listed within the Things console, as shown in Figure 6. You can click on the device to see additional details or to assign the device to groups or to interact with the device in other ways.
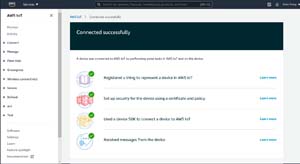 [Click on image for larger view.] Figure 6: The IoT device has been connected to AWS.
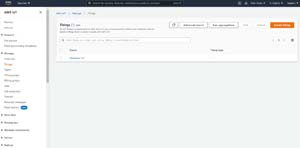 [Click on image for larger view.] Figure 7: The Windows IoT device is listed on the Things tab.
About the Author
Brien Posey is a 22-time Microsoft MVP with decades of IT experience. As a freelance writer, Posey has written thousands of articles and contributed to several dozen books on a wide variety of IT topics. Prior to going freelance, Posey was a CIO for a national chain of hospitals and health care facilities. He has also served as a network administrator for some of the country's largest insurance companies and for the Department of Defense at Fort Knox. In addition to his continued work in IT, Posey has spent the last several years actively training as a commercial scientist-astronaut candidate in preparation to fly on a mission to study polar mesospheric clouds from space. You can follow his spaceflight training on his Web site.