How-To
Using the Fault Injection Simulator to Test AWS Spot Instance Interruption
If an organization uses spot instances as a means of providing extra capacity for EC2 workloads, it must consider what will happen if a spot instance is interrupted.
Spot instances are created from Amazon's leftover EC2 capacity and are deeply discounted because spot instances are subject to interruption if the capacity is needed by an on-demand EC2 instance. Even so, spot instances do have their place. Some organizations use spot instances for dev/test workloads. Other organizations use spot instances to provide extra capacity for workloads that are running on EC2 on-demand instances. In other words, the spot instances can be used as a supplement to existing EC2 instances.
If an organization does use spot instances as a means of providing extra capacity for EC2 workloads, it must consider what will happen if a spot instance is interrupted. After all, the whole reason why spot instances are so cheap is because those instances can be interrupted at any time.
In the past, it was difficult for an organization to gauge the effects of a spot instance interruption. Recently however, Amazon has added spot instance support to its Fault Injection Simulator. This means that you can set up an experiment that will show you what would happen to a workload if a spot instance is interrupted.
To get started, log into the AWS portal and choose AWS FIS from the list of services (it's located in the Developer Tools section). When the AWS Fault Injection Simulator screen appears, click the Create Experiment Template button. This will take you to the Create Experiment Template screen, which you can see in Figure 1.
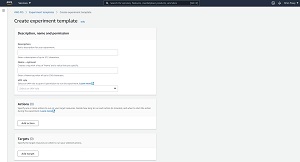 [Click on image for larger view.] Figure 1: This is the screen used to create a fault injection experiment.
Here you will need to enter a description and an optional name for the experiment that you are creating. You will also need to provide an IAM role. The role will be granted permission to run the experiment. Incidentally, the process of creating a role that will work with the Fault Injection Simulator is a little bit tricky, so I will be covering the process in a separate blog post.
The next thing that you will need to do is to specify an action that is to be run as a part of the experiment. Begin by entering a name and an optional description for the action, and then select an action type from the drop-down menu. Since the goal here is to determine what will happen in the event of a spot instance interruption, be sure to set the action type to aws:ec2:send-spot-instance-interruptions. You will also need to specify the amount of time that will elapse from the time that the experiment begins until the spot instance is interrupted. You can see what these options look like in Figure 2.
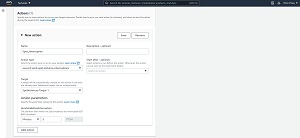 [Click on image for larger view.] Figure 2: This is how you configure an experiment's actions.
Once you have configured the action, be sure to click the Save button. You can use the Add Action button to create additional actions within the experiment if necessary. Adding additional actions can be helpful if you want to test additional conditions.
Once you have created an action, you will need to specify one or more targets. To do so, click the Edit button found in the Targets section and then choose a target. You can also use the Add Target button to select additional targets.
The next thing that you will need to configure is a stop condition. Stop conditions are based on CloudWatch alarms. If a specified alarm is triggered then the experiment is stopped.
Finally, apply any desired tags to your experiment template and then click the Create Experiment Template button, shown in Figure 3.
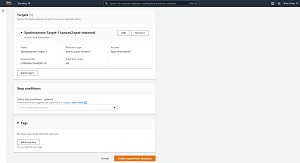 [Click on image for larger view.] Figure 3: Click the Create Experiment Template button when you ae done.
Once your experiment has been created, you can run the experiment by selecting it within the list of experiment templates and then selecting the Start Experiment option from the Actions menu. You can see what this looks like in Figure 4.
 [Click on image for larger view.] Figure 4: Select the Start Experiment option from the Actions menu.
When the experiment completes, you should see it listed on the Experiments tab, as shown in Figure 5 (although you may have to refresh the screen).
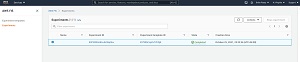 [Click on image for larger view.] Figure 5: The experiment has completed.
You can click on the experiment to see its details, but it will ultimately be the resulting instance interruption that is the most telling.
About the Author
Brien Posey is a 22-time Microsoft MVP with decades of IT experience. As a freelance writer, Posey has written thousands of articles and contributed to several dozen books on a wide variety of IT topics. Prior to going freelance, Posey was a CIO for a national chain of hospitals and health care facilities. He has also served as a network administrator for some of the country's largest insurance companies and for the Department of Defense at Fort Knox. In addition to his continued work in IT, Posey has spent the last several years actively training as a commercial scientist-astronaut candidate in preparation to fly on a mission to study polar mesospheric clouds from space. You can follow his spaceflight training on his Web site.