How-To
Setting Up iSCSI for ESXi Using Windows 2022 Server
When setting up a new VMware Horizon environment, I needed someplace to store my virtual desktops and decided to use Windows Server 2022 as an iSCSI target for my ESXi servers. Although this is a straightforward process, it isn't documented very well. In this article I will discuss what it takes to set up an iSCSI target using both the GUI (Server Manager) and PowerShell and then adding it to my ESXi server.
One thing to remember in the parlance of storage is that the iSCSI target resides on the server where the data resides, and the initiator (client) is the remote server that consumes the data stored on the target. In my case the Windows server will have the targets and the ESXi will be the initiator.
Setting up iSCSI
I will be hosting my iSCSI target on Windows Server 2022 running on a physical machine with an Intel Xeon CPU D-1541 @ 2.10GHz and 64 GB of RAM.
I will first set up the server using its GUI. In the next section I will show you how I set it up using PowerShell.
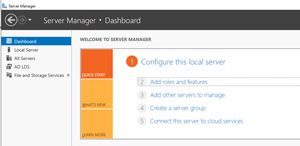
After logging into my Windows Server 2022 as Administrator, I launched Windows Server Manager by typing ServerManager.exe in the Start box.
I clicked Add Roles and Features.
 [Click on image for larger view.]
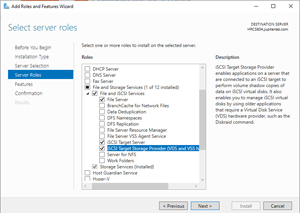
Once in the Roles and Features Wizard, I clicked Next, selected Role-based or feature-based installation, clicked Next to default to the local server, expanded the File and Storage Services, expanded File and iSCSI Services, expanded File and iSCSI services, selected iSCSI Target Server and iSCSI Target Storage Provider and clicked Next.
 [Click on image for larger view.]
I clicked Next again on the Features page. On the Confirmation page I selected the Restart the destination server automatically if required.
To install the iSCSI feature using the command line, open a PowerShell command prompt and enter Install-WindowsFeature -Name FS-iSCSITarget-Server.
Creating an iSCSI Target -- GUI
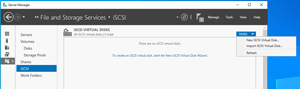
I created a 0.5TB iSCSI target using Server Manager by selecting File and Storage Services in the left navigation pane.
 [Click on image for larger view.]
From the Tasks drop-down menu, I selected New iSCSI Virtual Disk.
 [Click on image for larger view.]
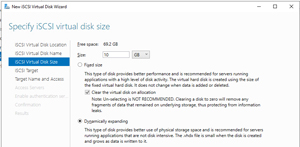
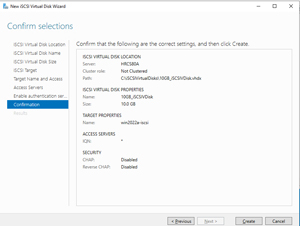
The wizard walked me through the process of creating a 10GB virtual disk called 10GB_iSCSI_VDisk (located at C:\iSCSIVirtualDisks\10GB_iSCSIVDisk.vhdx).
 [Click on image for larger view.]
The same wizard also walked me through creating an iSCSI Target called Win2022A-iSCSI target. On the target I specified that all servers could attach to my iSCSI target by specifying an IQN of "*."
 [Click on image for larger view.]
It took just a few seconds for the target and virtual disk to be created.
 [Click on image for larger view.]
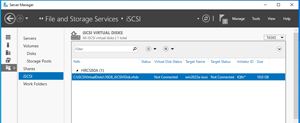
The new target and disk are seen in Server Manager.
 [Click on image for larger view.]
Creating the iSCSI Target -- PowerShell
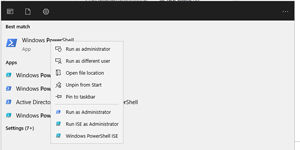
PowerShell can also be used to create an iSCSI share. I find it faster, and it can be used to programmatically create them. To do so you will need to launch PowerShell with administrator privileges. To do this I entered powershell in the windows Run box, right-clicking it and then selecting Run as administrator.
 [Click on image for larger view.]
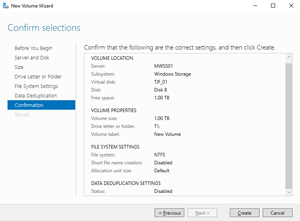
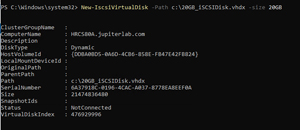
I created an iSCSI virtual disk on the C: drive with a size of 20GB called 20GB_iSCSIDisk.vhdx by entering New-IscsiVirtualDisk -Path C:\20GB_iSCSIDisk.vhdx -Size 20GB.
 [Click on image for larger view.]
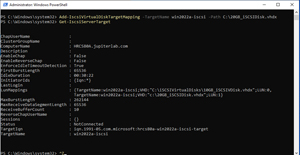
I attached it to my existing iSCSI target by entering
Add-IscsiVirtualDiskTargetMapping -TargetName win2022a-iscsi -Path C:\20GB_iSCSIDisk.vhdx
 [Click on image for larger view.]
After I refreshed Server Manager, I could see the new disk. You will not see the disk until you refresh Server Manager.
 [Click on image for larger view.]
To create an iSCSI target called TJFTarget with the IP address of the servers that will be accessing it (10.101.1.10) by entering
New-IscsiServerTarget -TargetName TJFTarget -InitiatorIds IPAddress:IPAddress:10.101.1.56, IPAddress:10.101.1.58
I mapped it to the iSCSI disk by entering
Add-IscsiVirtualDiskTargetMapping -TargetName TJFTarget -Path T:\TJF_ISCSI01.vhdx
Verifying iSCSI Using PowerShell
To verify the iSCSI targets and their properties I entered Get-IscsiServerTarget.
 [Click on image for larger view.]
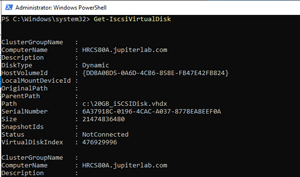
To verify the iSCSI virtual disks and their properties I entered Get-IscsiVirtualDisk.
 [Click on image for larger view.]
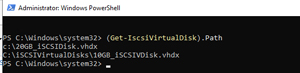
To just get the name of the iSCSI virtual disks I entered (Get-IscsiVirtualDisk).Path.
 [Click on image for larger view.]
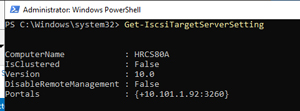
To verify the global settings or common configurations for an iSCSI target server I entered Get-IscsiTargetServerSetting.
 [Click on image for larger view.]
To limit the servers that could access the iSCSI target I entered
Set-IscsiServerTarget -TargetName win2022a-iscsi -InitiatorId "IPAddress:10.10.1.50","IPAddress:10.10.1.52","IPAddress:10.10.1.54"
When using the switch IQN * no validation is performed on the iSCSI target when an initiator makes a connection to it, so be very cautious when using this configuration. It is most useful when troubleshooting connection issues ─ removing the possibility of Target-Initiator assignment errors. To change it I entered Set-IscsiServerTarget -TargetName TJFTarget -InitiatorId "IQN:*".
 [Click on image for larger view.]
Connecting to iSCSI Using vSphere
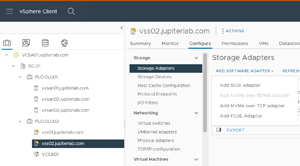
To add the iSCSI disk as a datastore, log in to your vSphere Client, right click your ESXi host, and navigate to Storage > Configuration > Storage Adapters > Add Software Adapter > Add software iSCSI adapter.
 [Click on image for larger view.]
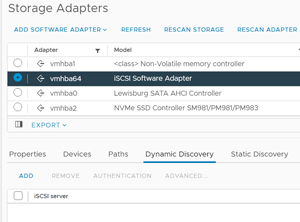
Select the new iSCSI software Adapter, click the Dynamic Discovery tab, and click Add.
 [Click on image for larger view.]
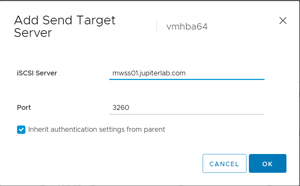
Enter the IP address or FQDN of the server that of the Windows server.
 [Click on image for larger view.]
Click Rescan Storage.
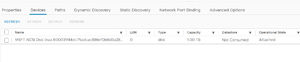
Click the Devices tab. This will list the iSCSI disk.
 [Click on image for larger view.]
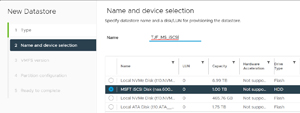
Right-click the ESXi host and select Storage > New Datastore.
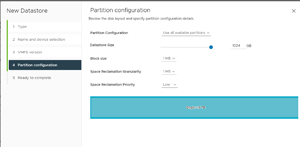
Set the new datastore to be VMFS and select the new iSCSI drive; set the VMFS version to VMF 6 and to use all available partitions.
 [Click on image for larger view.]
Set the VMFS version to VMF 6 and to use all available partitions.
 [Click on image for larger view.]
The storage view displayed it as an iSCSI-backed datastore.
Conclusion
I have set up iSCSI targets on Linux in the past and feel comfortable with the set-up process, maintaining it, and the reliability of it on Linux. There is not a lot of information on using iSCSI with Windows Server, and even less using it with ESXi, so I am interested to see how reliable and performant it is on Windows Server.
About the Author
Tom Fenton has a wealth of hands-on IT experience gained over the past 30 years in a variety of technologies, with the past 20 years focusing on virtualization and storage. He previously worked as a Technical Marketing Manager for ControlUp. He also previously worked at VMware in Staff and Senior level positions. He has also worked as a Senior Validation Engineer with The Taneja Group, where he headed the Validation Service Lab and was instrumental in starting up its vSphere Virtual Volumes practice. He's on X @vDoppler.