How-To
Using AWS Fault Injection Simulator to Test EC2 Workloads
Amazon's Fault Injection Simulator is a suite of tools that can be used to simulate various types of problems, giving you a chance to see how your workloads cope. That way, you can address any reliability issues before a real problem occurs. One of the things that you can do with the Fault Injection Simulator is to force an EC2 instance offline as a way of testing your high-availability strategy. In this article, I will show you how to use the Fault Injection Simulator with EC2.
Before I Begin
In order to perform the fault injection simulation that I will be describing in this blog post, you are going to need two things. First, you are going to need an EC2 instance that you can experiment on. You will need to know the instance ID for the instance that you create. You can find the instance ID on the EC2 dashboard on the list of instances.
The other thing that you are going to need is an IAM role with sufficient permissions to stop a virtual machine instance. If you need help creating the required IAM role, then you can consult instructions.
Setting up the Fault Injection Simulator
To configure the Fault Injection Simulator, log into AWS and open the AWS FIS console (it's in the Developer Tools section). When the console opens, click the Create Experiment Template button.
At this point, you will be taken to the Create Experiment Template screen, shown in Figure 1. Begin by assigning a name to the template that you are creating.
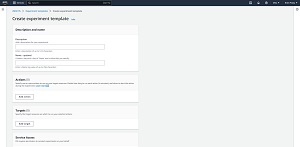 [Click on image for larger view.] Enter a Name for your Template
The next thing that you will need to do is to specify an action that will be applied to target resources (namely EC2 instances). For the purposes of this article, I will simply be setting up an action that stops the target instance. However, there are numerous other actions that you can choose from. You could even go so far as to create an action that will terminate the instance if you want to.
In the New Action section, enter a name for the action that you are creating and then select your preferred action type from the list. Again, I will be using the aws:ec2:stop-instances action. You will need to set a period of time after which to initiate the action, so set the time to one minute (or whatever is appropriate to your situation. Click the Save button to save the action.
Now, move on to the Targets section and click the Edit button to edit the existing target. When the Edit Target screen appears, set the Target Method option to Resource IDs and then enter the instance ID that is associated with your EC2 instance, as shown in Figure 2. Click the Save button to save your changes.
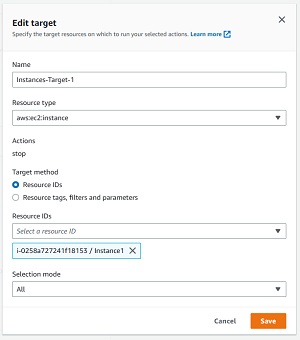 [Click on image for larger view.] Enter your Instance's ID as the Resource ID.
Now, scroll down to the lower portion of the Create Experiment Template screen and locate the Service Access section. Select the IAM role that you created earlier. There is also an option to create a new role, as shown in Figure 3. When you are done, click the Create Experiment Template button at the bottom of the page. You may see a warning message telling you that you have not specified a stop condition. Stop conditions allow you to tie your experiment to a cloud watch alarm, but are not required.
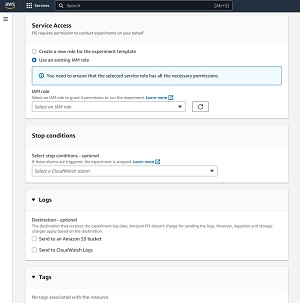 [Click on image for larger view.] Select the IAM Role that you Want to Use.
Now that the template has been created, you can run the experiment to see if it works. Before you do, I recommend opening the EC2 dashboard to confirm that your designated instance is indeed running. When you are ready to run the experiment, click the Start Experiment button, shown in Figure 4.
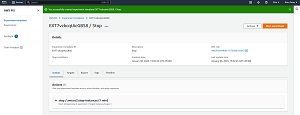 [Click on image for larger view.] Click the Start Experiment Button.
At this point, you will be taken to a screen that gives you the opportunity to add a tag to the experiment. Tags can be useful if you plan on running the experiment multiple times, as the tags give you an easy way of documenting why you are running the experiment. Even so, you don't have to add a tag unless you want to. When you are ready, click the Start Experiment button and then enter the word Start into the resulting dialog box as a way of confirming that you really do want to run the experiment.
If you switch over to the EC2 console, you should see the instance change to a state of Stopped. Remember that there is a time delay associated with the action (I set the time delay to 1 minute). You may also need to refresh your browser if nothing appears to happen. You can also use the FIS dashboard to monitor the experiment.
About the Author
Brien Posey is a 22-time Microsoft MVP with decades of IT experience. As a freelance writer, Posey has written thousands of articles and contributed to several dozen books on a wide variety of IT topics. Prior to going freelance, Posey was a CIO for a national chain of hospitals and health care facilities. He has also served as a network administrator for some of the country's largest insurance companies and for the Department of Defense at Fort Knox. In addition to his continued work in IT, Posey has spent the last several years actively training as a commercial scientist-astronaut candidate in preparation to fly on a mission to study polar mesospheric clouds from space. You can follow his spaceflight training on his Web site.