How-To
Restore Testing for AWS Backup
Amazon has recently added a testing tool to its AWS Backup. This tool allows you to create a restore testing plan that you can use for the purposes of validating your backups.
Creating a restore testing plan is a relatively simple process. To get started, open AWS Backup and then select the Restore Testing tab. Next, click on the Create Restore Testing Plan button, shown in Figure 1.
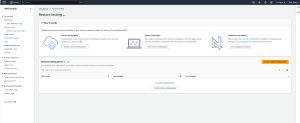 [Click on image for larger view.] Figure 1: Select the Restore Testing Tab and then Click the Create Restore Testing Plan Button.
At this point, you will see the Create Restore Testing Plan screen, shown in Figure 2.
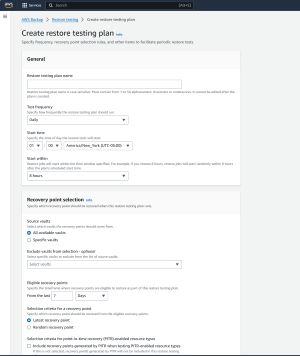 [Click on image for larger view.] Figure 2: This Is the Screen Used to Create a Restore Testing Plan.
The first thing that you will need to do is to assign a name to the restore testing plan that you are creating. It's a good idea to choose the name carefully, because you won't be able to pick a different name later on.
Next, choose the frequency with which you want to perform restore testing. By default, tests are performed daily. However, you can test as frequently as every hour or as infrequently as once a month. It is also possible to define a custom schedule.
Once you have established a testing frequency, the next thing that you will need to do is to set the start time. It is worth noting that by default, tests do not start at the designated start time. If you look at the figure above, you will notice that there is a Start Within setting that is set by default to eight hours. This setting makes it so that the test will start at a random time that is somewhere within eight hours of the designated start time. The Start Within setting is adjustable, and can be set to as little as one hour.
The next thing that you will have to do is to tell AWS which recovery points you want to test. While you do not have to specify the names of the recovery points, you do have to tell AWS which vaults you want to use. You can either test the recovery points in all of the available vaults or you can designate specific vaults to test. If you do choose to test all available vaults, there is an exclude option that you can use to exclude any vaults that you don't want to test.
After selecting the vaults to test, you will have to give AWS a bit more information about the recovery points that you want to test. This means setting a maximum recovery point age and then telling AWS whether you always want to test the latest recovery point or if you would prefer that it choose a recovery point at random from within the designated period of time. By default, tests include recovery points from the last 7 days and the most recent recovery points are tested.
Finally, if you want to test point in time recovery, then you will need to select the Include Recovery Points Generated by PITR When Testing PITR Enabled Resource Types check box.
When you are done, click the Create Restore Testing Plan button. Upon doing so, you should see a message telling you that the testing plan was created successfully and that you can now assign resources to the plan. To get started with this, click the Assign Resources button. This will cause AWS to display the Assign Resources screen, shown in Figure 3.
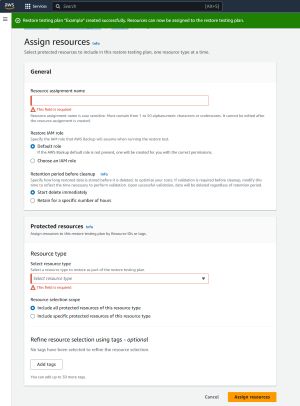 [Click on image for larger view.] Figure 3: The Assign Resources Screen Lets You Choose the Resources to Include in your Testing Plan.
To complete the resource assignment process, you will need to assign a name to the resource assignment and then select the IAM role that AWS Backup will use when performing restoration testing. You can also choose the retention period for restored data. By default, the test data is deleted immediately, but you can retain it for a number of hours if you choose. This is useful in situations where you want to inspect the restored data.
The next thing that you will need to do is to pick a resource type to associate with your restore testing plan. For example, you might choose to restore EC2 instances or perhaps EBS volumes. When you have made your selection, you can choose whether to restore all of the protected resources of the specified type or you can limit the test to specific resources (such as an individual EC2 instance).
Finally, there may be some additional restore parameters that you will need to specify. For example, if you are restoring EC2 instances then you can choose the instance type that you want to use for the restoration testing.
Click the Assign Resources button and you will be taken to a screen that shows your restore test plan. As you can see in Figure 4, this screen will show you the restore testing jobs that have been run, along with the results of those tests. You can also use this screen to modify the testing plan or to assign additional resources.
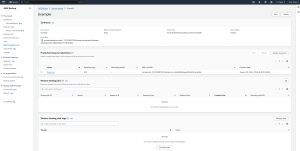 [Click on image for larger view.] Figure 4: You Can Modify the Restore Test Plan or Add Additional Resources.
About the Author
Brien Posey is a 22-time Microsoft MVP with decades of IT experience. As a freelance writer, Posey has written thousands of articles and contributed to several dozen books on a wide variety of IT topics. Prior to going freelance, Posey was a CIO for a national chain of hospitals and health care facilities. He has also served as a network administrator for some of the country's largest insurance companies and for the Department of Defense at Fort Knox. In addition to his continued work in IT, Posey has spent the last several years actively training as a commercial scientist-astronaut candidate in preparation to fly on a mission to study polar mesospheric clouds from space. You can follow his spaceflight training on his Web site.