How-To
Using PowerShell to View and Change Dell BIOS Settings
Viewing and changing your BIOS settings can be a painful experience; you need to reboot your system, hit the right key combinations at the right time to enter the BIOS, navigate around somewhat obscure menu settings, and hope you made the changes that you thought that you did and then save the BIOS settings and boot the systems. Lord, help if you are trying to walk a remote user through these steps.
Fortunately, Dell, which has a massive presence in the desktop and laptop market, felt your pain and developed Dell Command | PowerShell Provider. This module makes BIOS configuration manageable through the Windows PowerShell interface. It can be used on Windows 10, 11 and even Windows Preinstallation Environment OSes running on Dell systems.
 [Click on image for larger view.]
Using it, you can view and change access to many, but not all, features in your Dell systems BIOS, ranging from Wake On LAN/WLAN to your BIOS and HDD password features.
In this article, I will walk you through installing and using this useful tool.
Installing and Navigating Dell Command | PowerShell Provider
Dell Command PowerShell Provider is freely available to download and use.
To use it, launch the Windows PowerShell console in administrator mode, then import it by entering Install-Module -Name DellBIOSProvider. When installing it, you will be asked if you want to install NuGet, which I did. NuGet is a mechanism for developers to create, share, and consume code.
 [Click on image for larger view.]
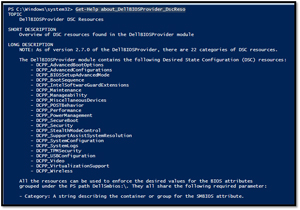
After installing the module, I entered Get-Help DellBIOSProvider to get more information about the module. It took a few seconds to retrieve and install the help files. I then entered Get-Help about_DellBIOSProvider_DscResources. This displayed the available resources.
 [Click on image for larger view.]
The key section in the help doc was "This resource provides the ability to ensure the desired values for the BIOS attributes grouped under the PS path DellSmbios:\\ in DellBIOSProvider PowerShell provider."
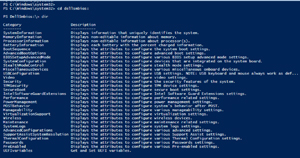
I then entered cd dellsmbios:
I entered dir, which displayed the available categories and their descriptions.
 [Click on image for larger view.]
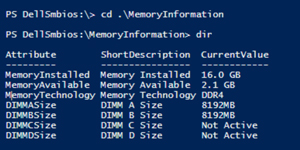
To gather information about the memory on the system, I entered cd .\MemoryInformation and then dir. This information came directly from the BIOS.
 [Click on image for larger view.]
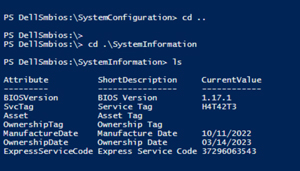
I then navigated to and looked in the SytemInformation directory. This showed me the BIOS version -- the device SvcTag and other information.
 [Click on image for larger view.]
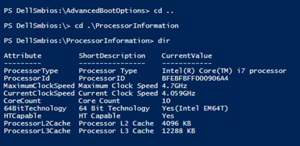
ProcessorInformation showed information about the processor.
 [Click on image for larger view.]
Finally, I navigated to the Security folder to see if the AdminPassword was set. It was not.
 [Click on image for larger view.]
Programmatically Working With BIOS Values
Not only can you navigate the folders to see the values, but you can also use Get-Item syntax with the module.
To check if the BIOS password was set, I entered Get-Item -Path DellSmbios:\Security\IsAdminPasswordSet.
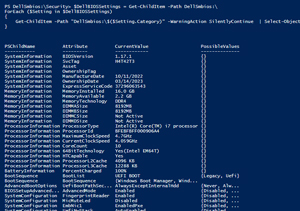
I then ran this short script to go through objects and display the attributes and their current, and possible values.
  #List all available BIOS Settings
  $DellBIOSSettings = Get-ChildItem -Path DellSmbios:\
  ForEach ($Setting in $DellSettings)
  {
    Get-ChildItem -Path "DellSmbios:\$($Setting.Category)" -WarningAction SilentlyContinue | Select-Object PSChildName,Attribute,CurrentValue,PossibleValues
  }
 [Click on image for larger view.]
Changing the Boot Order Using PowerShell
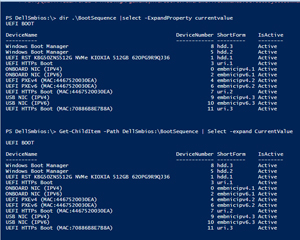
Dell has a few different examples of how to use the Module. Following the video example for changing the boot order, I entered DellSmbios:/BootSequence and entered dir. This lists the boot sequence attributes and their current value.
To see the values, I entered dir .\BootSequence |select -ExpandProperty currentvalue.
I could have also entered Get-ChildItem -Path DellSmbios:\BootSequence | Select -expand CurrentValue.
 [Click on image for larger view.]
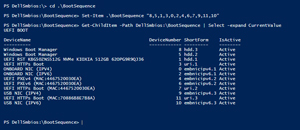
To change the boot order of the last two boot devices, I entered cd .\BootSequence and then Set-Item .\BootSequence "8,5,1,3,0,2,4,6,7,9,11,10". I verified this by reentering my previous command.
[Click on image for larger view.]
That is all I needed to do to change the boot order in the BIOS. I didn't need to reboot the system to enter the BIOS or navigate the BIOS menu to set the boot order!
Generic BIOS Attributes
PowerShell can work with BIOS attributes, but these generic commands don't expose all BIOS settings on a Dell system like the DellBIOSProvider module does.
For example, entering Get-WmiObject -Class Win32_BIOS | Format-List * will display a lot of information but not the in-depth Dell BIOS-specific information you may need.
 [Click on image for larger view.]
If you have a Dell desktop or laptop, the DellBIOSProvider module can help you easily change your BIOS settings without going through a reboot process. If you are a desktop administrator, it is a must-have tool that can save you a lot of time and aggravation. If you deal with remote users using Dell systems, it is an easy way to assist a remote users system you don't have physical access to.
About the Author
Tom Fenton has a wealth of hands-on IT experience gained over the past 30 years in a variety of technologies, with the past 20 years focusing on virtualization and storage. He previously worked as a Technical Marketing Manager for ControlUp. He also previously worked at VMware in Staff and Senior level positions. He has also worked as a Senior Validation Engineer with The Taneja Group, where he headed the Validation Service Lab and was instrumental in starting up its vSphere Virtual Volumes practice. He's on X @vDoppler.