How-To
Create a VPN Jumpbox in Less than Two Minutes
Tom didn't think remotely accessing local computing resources would be as easy as advertised, but it was: "It just worked out of the box."
Remote work has become de rigueur for many tech workers. This is great as it allows companies to select the employees with the skillsets they need without regard to their geographical location. However, remote work does have drawbacks, and in this article I will address how I overcame one of them -- accessing my local computing resources regardless of where I am located using Tailscale.

The Problem
I often need to access my home servers and desktops while working from a remote location. In the past, I set up a Jumpbox (aka "Jump Server") on a machine spanning my home network and the internet that would allow me access to them. I did this by punching a hole in the router that was exposed to the outside world. This is a terrible idea as it exposes that port to all sorts of nefarious activity. Once, I opened an obscure network port to allow SSH access, and after a few days, the logs showed that I had thousands of people in faraway countries trying to log into my system. Luckily, my security was strong enough to prevent them from entering. Needless to say, I turned off the port.
Recently, I found it necessary to access my machines from remote locations. I was looking for a better and easier way to accomplish this when a coworker suggested Tailscale, a company I had never heard of before.
Tailscale
Tailscale Inc., based in Toronto, built a zero-config virtual private network (VPN) with a web-based management portal. It uses the widely popular open source Wiregaurd for its VPN.
It was started in 2019 by five Google engineers and soon secured $12 million in Series A funding; in 2022, it secured an additional $100 million in Series B funding. So, this is not just a fly-by-night operation run by a couple of high-school kids; it is a legitimate, well-funded, enterprise-focused company.
After spending some time on Tailscale's web site, I thought it would be worth trying.
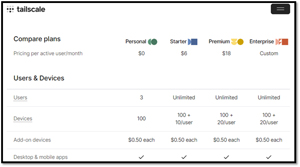
Tailscale made it very easy to try. They have a free personal plan that supports three users and 100 devices. The personal plan had all the features that I needed.
 [Click on image for larger view.]
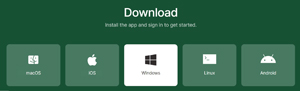
Installing Tailscale on Windows
Tailscale has a web page that walks you through the steps to set up a connection to your home lab. The steps were dead simple: sign up for a free Tailscale personal plan; install Tailscale on the devices you want on the VPN; and log into those devices using the VPN addresses provided by Tailscale. I was doubtful that it would be this easy.
The first step is to sign up for a Tailscale account. I used my Google account to do this, but they also support Microsoft, GitHub, Apple and OIDC accounts. No credit card or phone number was needed, only my personal Google account. It surprised me that it didn't even need to be a corporate Google account!
I then downloaded and installed the Tailscale client on a Windows machine in my home lab. This took less than a minute.
 [Click on image for larger view.]
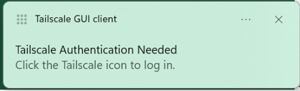
I then received a popup alerting me that I needed to authenticate the server, which I did using my Google credentials.
 [Click on image for larger view.]
I then installed it a Windows laptop and headed to the local public library to see if I could connect to my home system using their Wi-Fi.
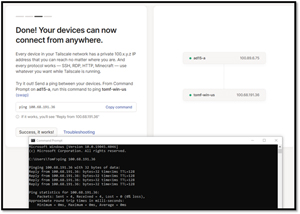
I brought up the Tailscale admin console, which presented me with a screen showing both the device at home and the laptop I was working on. The Tailscale console told me I could ping the remote system via its VPN IP address on a 100.x.x.x network. I pinged the remote device from my laptop without any issues.
 [Click on image for larger view.]
Using Tailscale for Remote RDP Access
Pinging my remote machine was one thing, but I wanted to connect to the system in my home lab using Remote Desktop Protocol. I figured this would not be easy and require me to do some configuration on both machines.
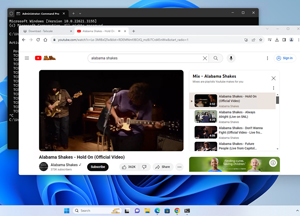
I brought up Remote Desktop Connection on my laptop and entered my Jumpbox VPN address. I was surprised that I could connect to it without any issues!
I could even play a YouTube video on my remote system and it displayed on my laptop without any issues or jitter.
 [Click on image for larger view.]
From the Jumpbox, I could access my vCenter Server and other home lab resources as if I were working from home rather than the public library.
I was impressed with its ease of setup and performance. A port scan of my WAN router showed no additional network ports exposed to the outside world.
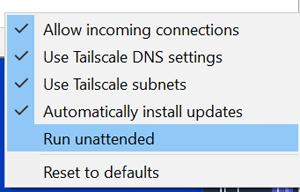
Automatically Starting Tailscale on Bootup
I wanted to use Tailscale even if the system rebooted. To enable this, I right-clicked the Tailscale icon, selected Preferences, and then selected Unattended Mode. This will make Tailscale a service that will start after the system reboots.
 [Click on image for larger view.]
Honestly, this was one of the most accessible products I have ever set up and used. It just worked out of the box, and anyone should be able to do the same in under two minutes.
If you need an easy and secure way to access your home or business systems remotely, I highly recommend Tailscale. Of course, Tailscale's business plan isn't based on its free version; instead, it is built on supplying secure, zero-trust VPNs to enterprise customers.
In my next article, I will look at the enterprise features in Tailscale.
About the Author
Tom Fenton has a wealth of hands-on IT experience gained over the past 30 years in a variety of technologies, with the past 20 years focusing on virtualization and storage. He previously worked as a Technical Marketing Manager for ControlUp. He also previously worked at VMware in Staff and Senior level positions. He has also worked as a Senior Validation Engineer with The Taneja Group, where he headed the Validation Service Lab and was instrumental in starting up its vSphere Virtual Volumes practice. He's on X @vDoppler.