How-To
Deploying the AWS Tools for PowerShell
Although Amazon has long provided various methods for accessing AWS services from the command line, one of the best options involves using the AWS Tools for PowerShell to make AWS services accessible through the PowerShell interface. Unlike the normal AWS CLI, the AWS Tools for PowerShell is object oriented, which means that you can use PowerShell cmdlets to extract, sort and parse AWS data.
To get started with deploying the AWS Tools for PowerShell, launch an elevated PowerShell session and then enter this command:
Install-Module -Name AWS.Tools.Installer
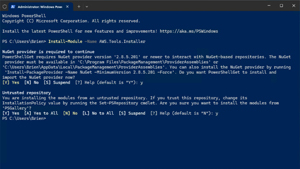
Upon doing so, you may receive a message telling you that the NuGet provider is required in order for you to continue. If you receive this message, press Y to install the NuGet provider automatically.
Once the NuGet provider has been installed, you will see a message informing you that you are attempting to install a module from an untrusted repository. Press Y to move forward with the installation process. At this point, the AWS Tools for PowerShell will be installed, as shown in Figure 1.
 [Click on image for larger view.] Figure 1: The AWS Tools for PowerShell Have Been Installed.
Although the AWS Tools for PowerShell have been installed, you really can't do all that much by using the base module alone. In order to make the AWS Tools for PowerShell useful, you will need to install some supplementary, service specific modules. For example, Amazon has created a module for EC2 and another module for S3.
Before you will be able to install any of these service specific modules, you will need to import the AWS.Tools.Installer module. In order to do so, you must ensure that your execution policy allows you to run scripts. You can use the Get-ExecutionPolicy cmdlet to view the execution policy that is currently in effect. You can use the Set-ExecutionPolicy cmdlet to switch to a different execution policy if necessary. You need only to provide the name of the execution policy that you want to use. If you wanted to disable all safeguards for example, you could type:
Set-ExecutionPolicy Unrestricted
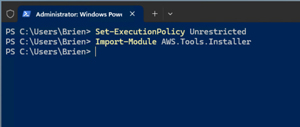
Once your system has been configured with an appropriate execution policy, you can import the AWS.Tools.Installer module. The command for doing so is:
Import-Module AWS.Tools.Installer
 [Click on image for larger view.] Figure 2: You Will Need to Import the AWS.Tools.Installer Module.
Now that you have imported the AWS.Tools.Installer module, you can move forward with installing the service specific modules. You will simply need to know the names of the modules that you want to install.
For the most part, it's easy to figure out the names of any modules that you might need to install, because the module names adhere to a common naming convention. They are called AWS.Tools.<service name>. For example, the S3 module is called AWS.Tools.S3. Of course, Amazon does not leave you to figure out the module names for yourself. You can find a full list of module names here.
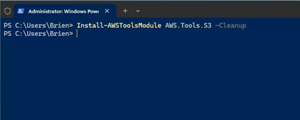
You can install the supplementary modules by using the Install-AWSToolsModule cmdlet, followed by the module name and the -Cleanup parameter. As an example, you can install the S3 module by using this command:
Install-AWSToolsModule AWS.Tools.S3 -Cleanup
Incidentally, when you install a service specific module, any required dependencies are installed automatically alongside the module. You can see what the module installation process looks like in Figure 3.
 [Click on image for larger view.] Figure 3: This Is the Command Used to Install the S3 Module.
There is one more thing that you will need to do before the AWS Tools for PowerShell are ready to use. You are going to need to create an account that will be used to supply the permissions that are required in order to access AWS programmatically. You can create the account through the AWS Identity and Access Management (IAM) console.
Creating a user account is a relatively straightforward process, but there are two things that you need to know. First, when you create the user account, you will need to assign it the required permissions, but try to avoid assigning permissions beyond those that are actually required. For example, if the account will be used solely for managing EC2 instances then you might assign the AmazonEC2FullAccess permission as opposed to the AdministratorAccess permission, which grants administrative privileges for all AWS services.
The other thing that you need to know is that after you create the account, you will need to retrieve the access key and the secret key corresponding to the account. AWS uses these keys in place of a password when accessing services from the command line. The important thing to note is that you will only have one opportunity to access the secret key, so be sure to document the key when you retrieve it, because you won't get another chance.
With the access key and secret key in hand, you will need to set up credentials for AWS to use. If you plan to use the same set of credentials to manage multiple services, then you should name the credential profile default. Otherwise, give it a name that reflects the credentials' purpose. The command used to store the credentials is:
Set-AWSCredential -StoreAs default -AccessKey <your key> -SecretKey <your key>
 [Click on image for larger view.] Figure 4: This Is How You Create a Credential Profile.
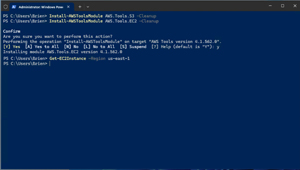
Once you have defined a set of credentials, the AWS PowerShell cmdlets are ready to use, as shown in Figure 5.
 [Click on image for larger view.] Figure 5: PowerShell Now Recognizes AWS-Related Cmdlets.
About the Author
Brien Posey is a 22-time Microsoft MVP with decades of IT experience. As a freelance writer, Posey has written thousands of articles and contributed to several dozen books on a wide variety of IT topics. Prior to going freelance, Posey was a CIO for a national chain of hospitals and health care facilities. He has also served as a network administrator for some of the country's largest insurance companies and for the Department of Defense at Fort Knox. In addition to his continued work in IT, Posey has spent the last several years actively training as a commercial scientist-astronaut candidate in preparation to fly on a mission to study polar mesospheric clouds from space. You can follow his spaceflight training on his Web site.