How-To
Four Free Network Scanners
My home and home lab network are a mess. Over the years, connecting my lab's physical and virtual machines (VMs), SAN, NAS, and other projects using various network switches, and routers have become a tangled mess. Most of my ESXi servers are in my basement; I have one SAN in my garage, another in my office, and another in the closet in my office. I have dozens of thin clients in my office on a cabinet I built. I have a wireless router in my house that connects all my home and home entertainment devices. I do not have any VLANs or logic separation because all these devices serve dual purposes. I use the SANs for music, video, and VM storage for my ESXi servers. I use my laptop via wireless (usually) to connect to various VMs and VDI desktops.
My home and home lab network are a mess. Over the years, connecting my lab's physical and VMs, SAN, NAS, and other projects using various network switches, and routers have become a tangled mess. Most of my ESXi servers are in my basement; I have one SAN in my garage, another in my office, and another in the closet in my office. I have dozens of thin clients in my office on a cabinet I built. I have a wireless router in my house that connects all my home and home entertainment devices. I do not have any VLANs or logic separation because all these devices serve dual purposes. I use the SANs for music, video, and VM storage for my ESXi servers. I use my laptop via wireless (usually) to connect to various VMs and VDI desktops.
In this series of articles, I will detail how I tried to overcome this massive mess and bring some sense of order to my network using readily available, easy-to-use, free tools. I also want to know the network traffic entering and exiting my home. Although this article is about a home/home lab network, these tools and strategies will benefit others who need to deal with networks.
What I Think I Have
To better understand what I have, I manually generated a PowerPoint slide showing my current network and the locations of my devices.
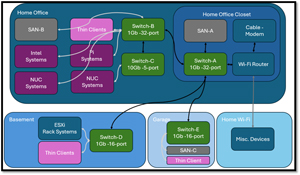 [Click on image for larger view.]
I grouped the different systems (NUC, Pi, etc.) into boxes to save space on this slide.
When connecting to the Internet, all connections go through Switch-A, to the Wi-Fi Router (which acts as a DNS server), then through the cable modem, and finally to the Internet.
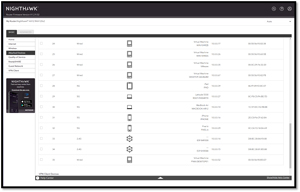
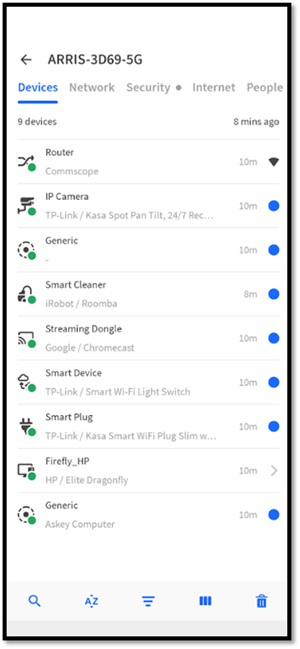
What My Wi-Fi Router Thinks I Have
After mapping out my network on paper, I logged on to my Wi-Fi router and looked at IP addresses assigned to the devices.
 [Click on image for larger view.]
This showed 35 devices, including laptops, tablets, cell phones, and other devices connected to it. It did not show the location of the devices, how much bandwidth they were consuming, or any connections between the devices.
Free Tools to Scan Networks
Although looking at the router gave me a list of devices and their IP addresses, I wanted to use some other free tools to see what they found.
NOTE: Before using network scanning on a company's network, you need to check with the network administrator, as these tools may give you access to sensitive information. Only scan networks that you own or have permission to scan. Scanning other people's networks without their consent is illegal and unethical. Most companies monitor their networks to see if this type of scanning occurs. If you do unauthorized networking scanning, the best you can hope for is a stern warning from your network administrator. The worst is that it could be a career-limiting move (CLM) or be grounds for termination.
I am only including the tool name, not its location, so I leave it up to you to investigate and trust the site where you get the tools before using them.
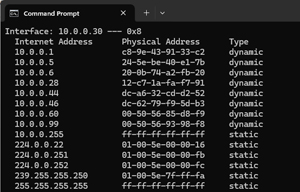
Arp
The first tool I used was the Windows arp -a command. This uses your computer's Address Resolution Protocol (ARP) table to list the IP addresses, and the corresponding MAC (Media Access Control) addresses the computer knows about.
 [Click on image for larger view.]
The problem with this is that it only displays the nine devices that have been communicating with that system.
Fortunately, some free tools are available to scan and probe the network to find what devices are on the network.
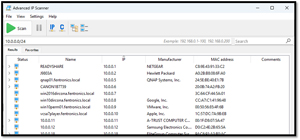
Advanced IP Scanner
This free scanner detects devices on your network and provides information such as IP address, MAC address, device name, and operating system. It also allows you to perform actions like remote shutdown and wake-on-LAN.
After downloading, installing, and running it, it scanned my network and showed the devices on it. I could download the results to my system as a CSV file.
 [Click on image for larger view.]
Advanced IP Scanner scanned my network reasonably quickly and showed all the Wi-Fi and wired devices on it.
Expanding the device shows the services running on it. For example, I have a VCenter server appliance running with an IP address of 10.0.0.33, and it shows the GUI interface as an HTTP connection.
 [Click on image for larger view.]
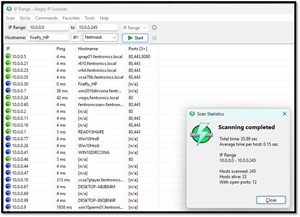
Angry IP Scanner
This is one of the more popular scanners and is highly recommended by many of my IT buddies. It runs on Windows, macOS, and Linux. This lightweight, open-source scanner can quickly scan IP address ranges and identify active hosts.
 [Click on image for larger view.]
You can specify which information to retrieve, like hostname, MAC address, etc.
 [Click on image for larger view.]
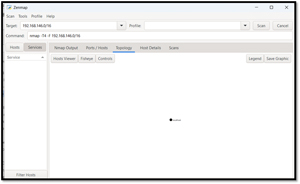
Nmap
Nmap is one of the oldest and most popular tools in the Linux world and one of the first tools many Linux users use to investigate their network. It is a powerful and versatile network scanner that can be used for device discovery, port scanning, and security auditing. It was initially developed for Linux command line users but now has a GUI and runs on MacOS and Linux.
Unlike the other tools above, you must specify the range of ports you want to scan after downloading and installing.
 [Click on image for larger view.]
A scan using ntop took longer than the other tools as it does a more intensive scan. It can even identify the OS running on the device.
 [Click on image for larger view.]
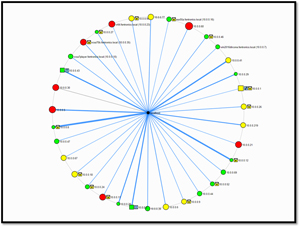
One of the nice features built into its guide interface is a topology map.
 [Click on image for larger view.]
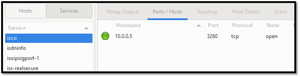
It can identify which services are running on which hosts. Looking at the GUI, I can see that iSCSI is running on 10.0.0.5.
 [Click on image for larger view.]
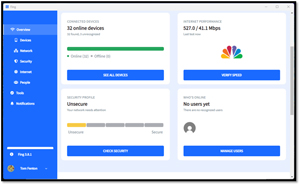
Fing
Although Fing is advertised as discovering devices connected to your Wi-Fi, it also found my wired devices. It provided their IP address, MAC address, device name, and vendor. It also has other features like network security checks and speed tests.
I used the free version, which lets you run three scans a day. To use Fing, I signed in using my Google account, downloaded and ran the Fing app on my Windows laptop, and found 32 devices. It is available for Windows, macOS, Android, and iOS. It even checked the speed of my cable modem.
 [Click on image for larger view.]
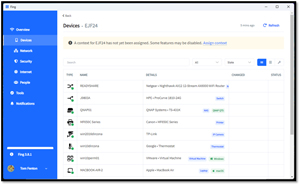
Clicking Devices showed the Wi-Fi devices on the network.
 [Click on image for larger view.]
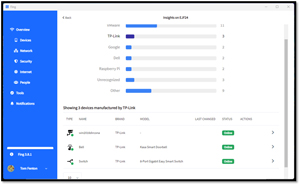
It also displays devices by brand. I used this to see the TP-Link smart devices and switches.
 [Click on image for larger view.]
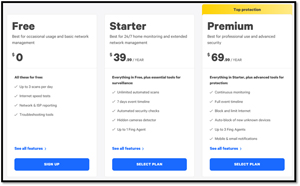
The pro version starts at $40 per year and offers advanced features such as detecting hidden cameras, testing router vulnerabilities, historical data, and unlimited scans.
 [Click on image for larger view.]
I was so impressed by it that I installed it on my phone. I ran a scan from my phone at a cabin where I was staying, and it came up with the following.
 [Click on image for larger view.]
Where Are My Devices
These tools did a good job discovering the devices on my network, but they didn't tell me where they were located. After thinking about it, I figured that I could run a scan on my complete network, save the output to a CVS file, unplug the switch in one of the locations, rerun a network scan, save the second CSV file, and then compare the two files and the devices missing from the second scan would be in the location that I unplugged from. After testing this with my basement systems and proving that it worked, I did it in the other places and came up with a list of what was where. I used Advanced IP Scanner for the scans.
All these tools were a great help in identifying the active devices on my network. They all had their own take on the discovery and reporting process, and as different tools provide different information, using a combination of tools will help you get a more complete picture of your network.
These are some of the more popular network scanning tools, but they are just a sampling of available network discovery tools. All of these tools had GUI interfaces and ran as Windows applications and other Oses. If you want to automate your scans, using command-line tools may be more convenient. The Nmap GUI shows the command you would need on the command line.
I would say that Nmap is the most powerful and Fing really surprised me for its ease of use and the fact that it runs on Android and Apple devices.
Discovering the devices on my network was my first step in understanding my network better. In my next article, I will look at one of the most popular and powerful tools for network traffic visualization and monitoring ntop or, more accurately, ntopng.