Vendor View
How To Deliver IT as a Service via System Center 2012 Service Templates
Microsoft System Center 2012 can be used to provide IT as a service, especially in the deployment of application services. Here's how to set up service templates that can help you do it with consistency and repetitive predictability.
- By Angela Cataldo
- 03/11/2013
Microsoft System Center 2012 allows IT professionals to deliver IT as a service by providing application management, self-service delivery and infrastructure management. The concept of an application as a service is fundamental to understanding how to deploy an instance of a cloud-style application, along with all its associated configuration and virtual infrastructure.
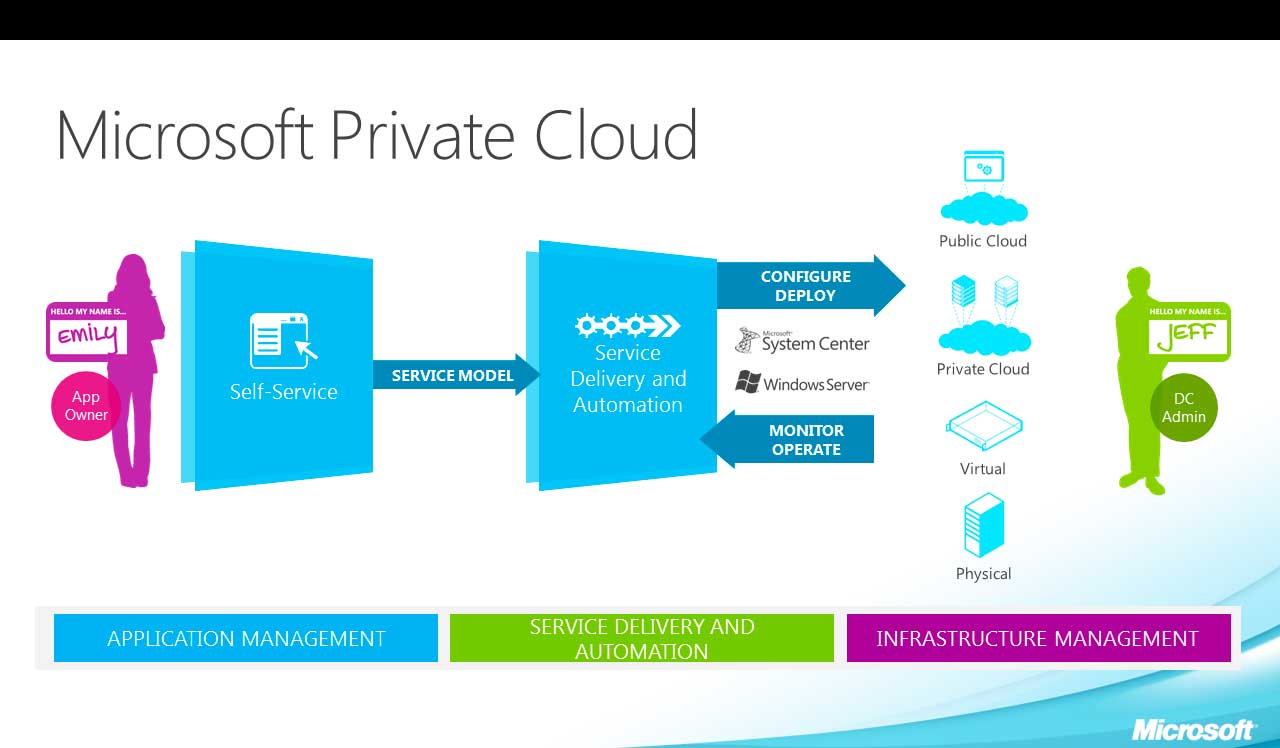 |
Figure 1. By using Microsoft System Center 2012, we can provide IT as a service and deploy application services to the business. (Click image to view larger version.) |
Benefits of Service Delivery and Automation
The concept of services and allowing IT administrators to define them through service templates to deliver applications has many benefits:
- A service template and the configured settings can be reused across multiple tiers and are centrally configurable, making authoring easier and less prone to error for administrators.
- Some information may not be available at the time of authoring. Service templates provide the flexibility to defer a value assignment to deployment time, and as a result makes it possible to deploy multiple services with different settings from the same template. This allows users to provide and override values.
In simple terms, a service template is a blueprint which is reusable and configurable.
Prepare, Initiate an Application Deployment
Now, let's step through the process of preparing an application deployment and then initiating it:
- Create a virtual machine template, add an application to the template, and use the Sevice Designer tool.
- Initiate the deployment.
- Use App Controller to deploy an application and stay within delegated resources.
1. Create a VM template, Add Application, Then Use the Sevice Designer
First we need to create a new virtual machine template, where we can specify roles and features that will be configured on deployment when the virtual machine template is part of a service.
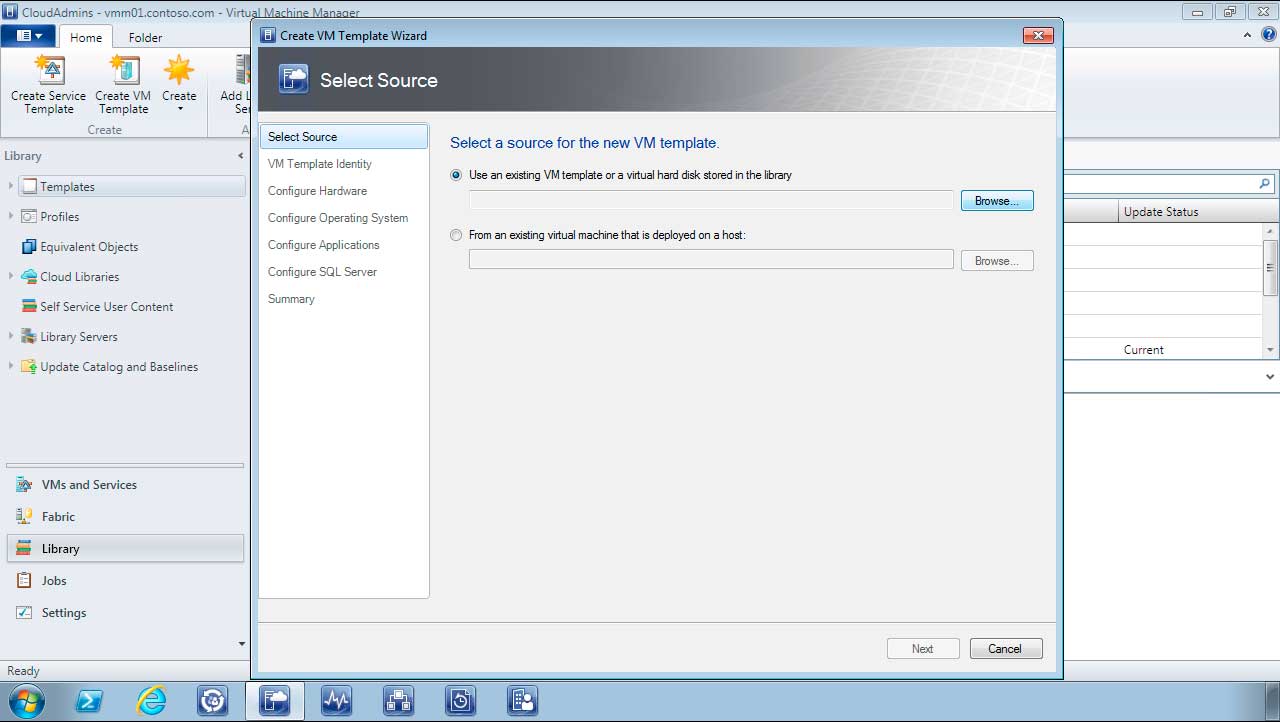
In Virtual Machine Manager on the Home Tab, select Library and then Create VM Template:
 |
(Click image to view larger version.) |
By using templates, we can specify Server App-V packages, MS Deploy or SQL DAC packages for ease of application deployment. These help speed up and simplfy the service deployments by automating application installation and pre- and post-install tasks.
2. Initiate Deployment
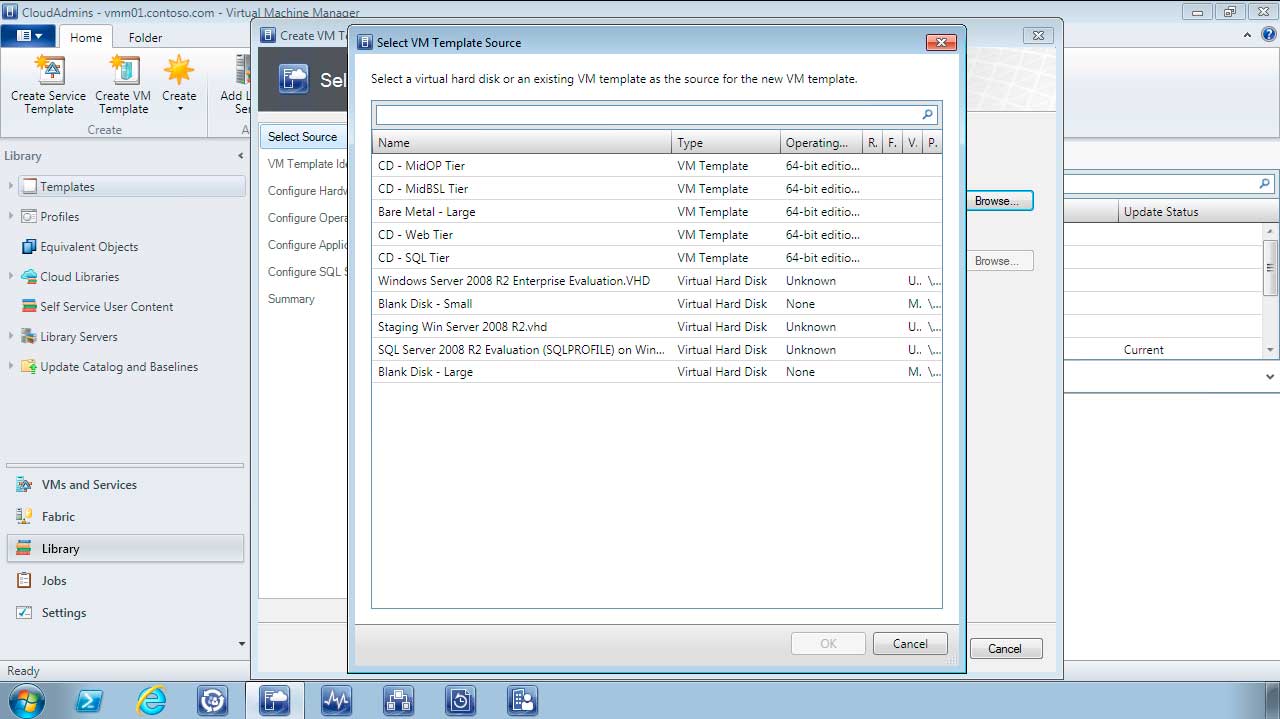
Using the Create VM Template Wizard we can next select the Source for our new Virtual Machine Template. On the Select Source page click on Browse to view a list of virtual hard disks and existing VM templates:
 |
(Click image to view larger version.) |
A number of existing VM templates are shown for the organization such as “Bare Metal- Large” and “CD-Web Tier” including some pre-configured Virtual Hard Disks. For this step I've chosen Select Windows Server 2008 R2 Enterprise Evaluation Edition VHD:
 |
(Click image to view larger version.) |
Once selected we will provide a Name and Description for the New Virtual Machine and continue through the wizard to configure Hardware, Operating System, Application and any SQL Server requirements.
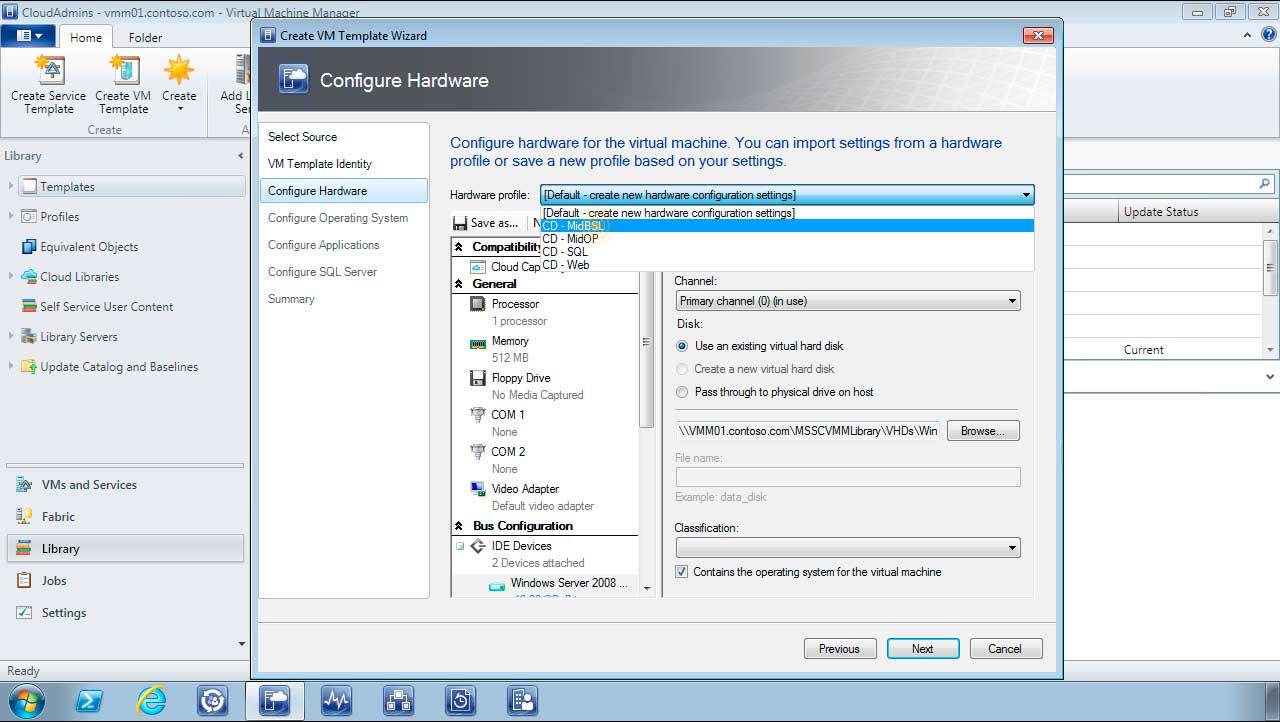
On the Configure Hardware page we can create a new hardware profile, or use an existing one to specify virtual machine settings:
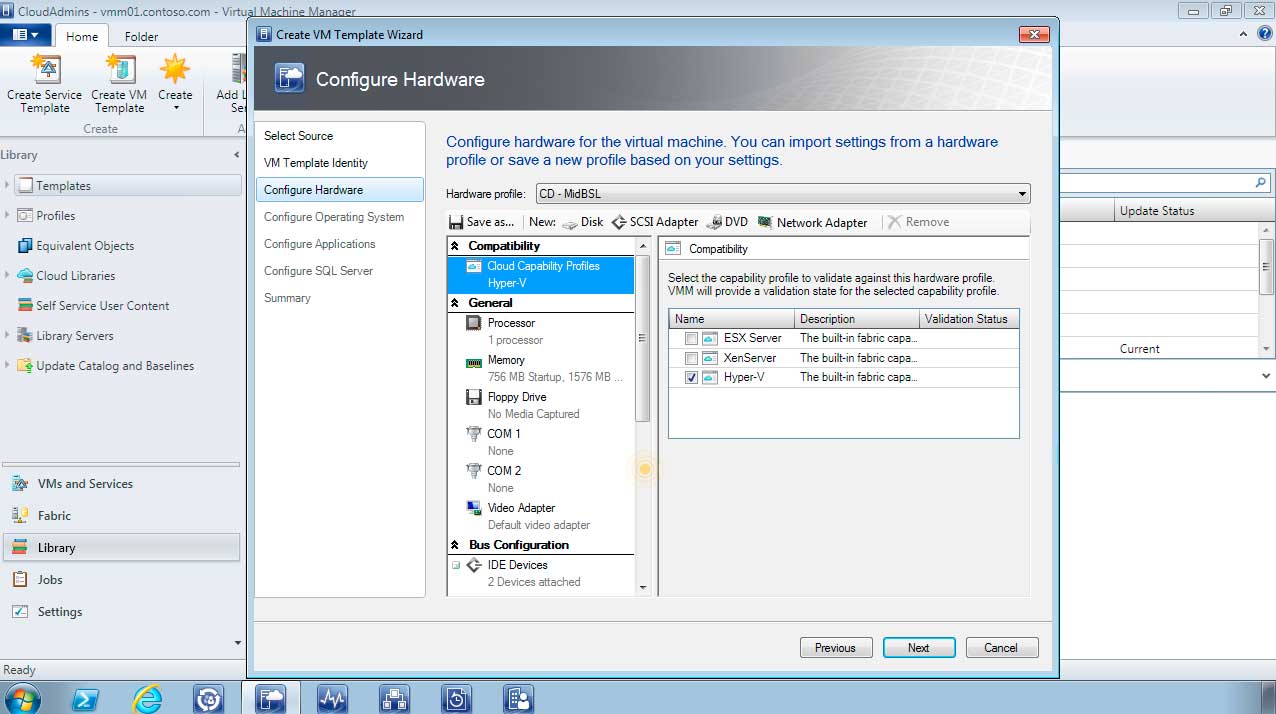 |
(Click image to view larger version.) |
I can then select a Cloud Compatibility Profile having opted for Hyper-V but as you can see we can also enable profiles against both Hyper-V and VMware:
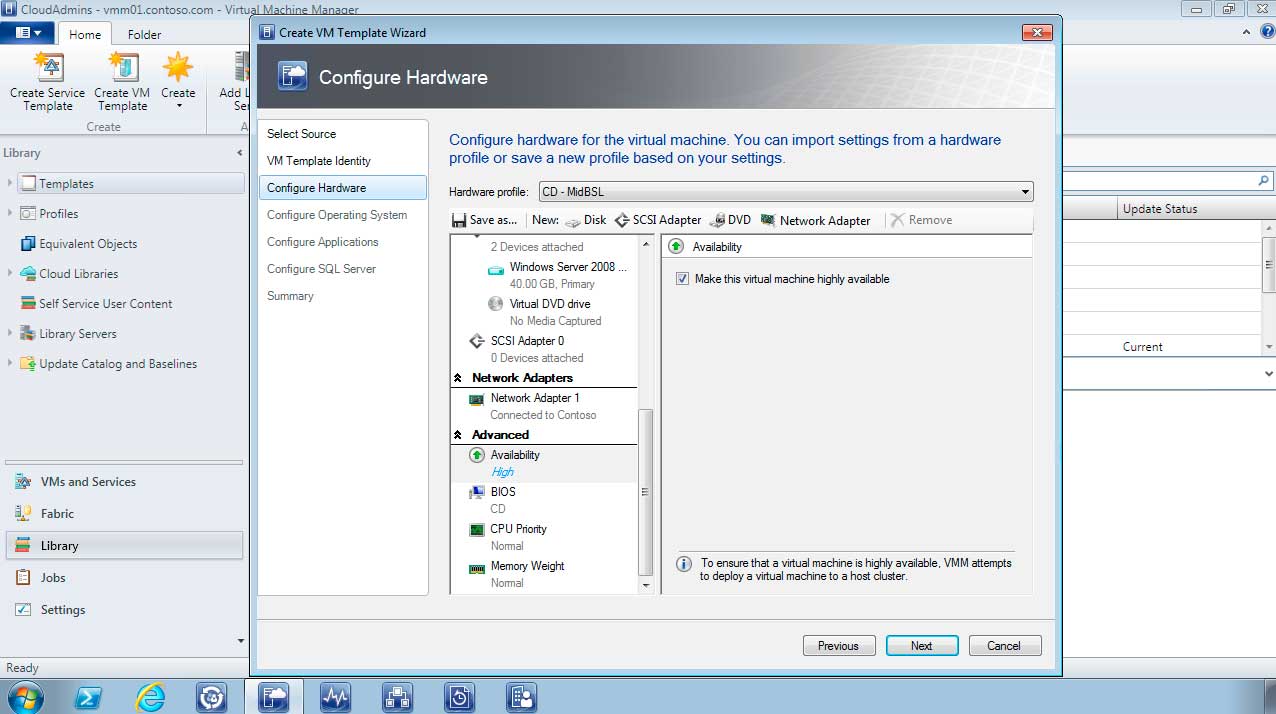 |
(Click image to view larger version.) |
I can also ensure that the virtual machine is highly available and Virtual Machine Manager will attempt to deploy a virtual machine to a host cluster by selecting under the Advanced options: Make this virtual machine highly available:
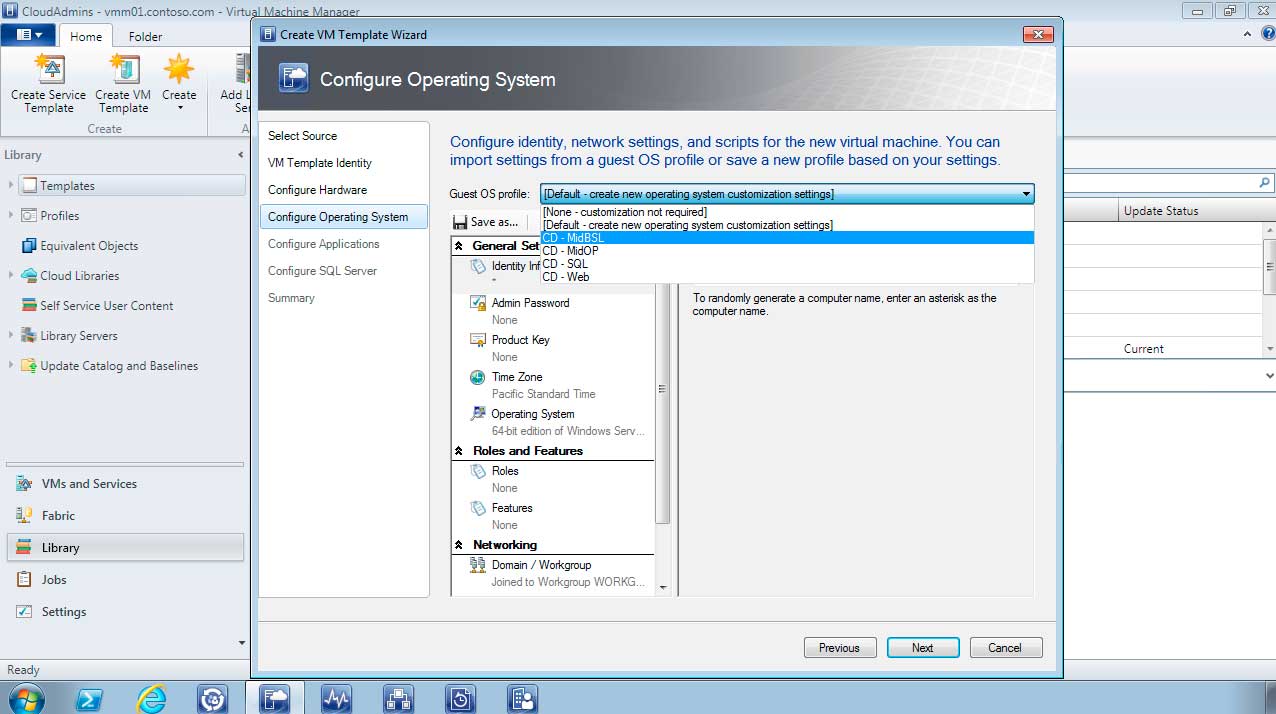 |
(Click image to view larger version.) |
Next I need to Configure Operating System, opting to either create a new profile or choose an existing one, enabling options such as Admin Password, Product key and configuring Roles and Features:
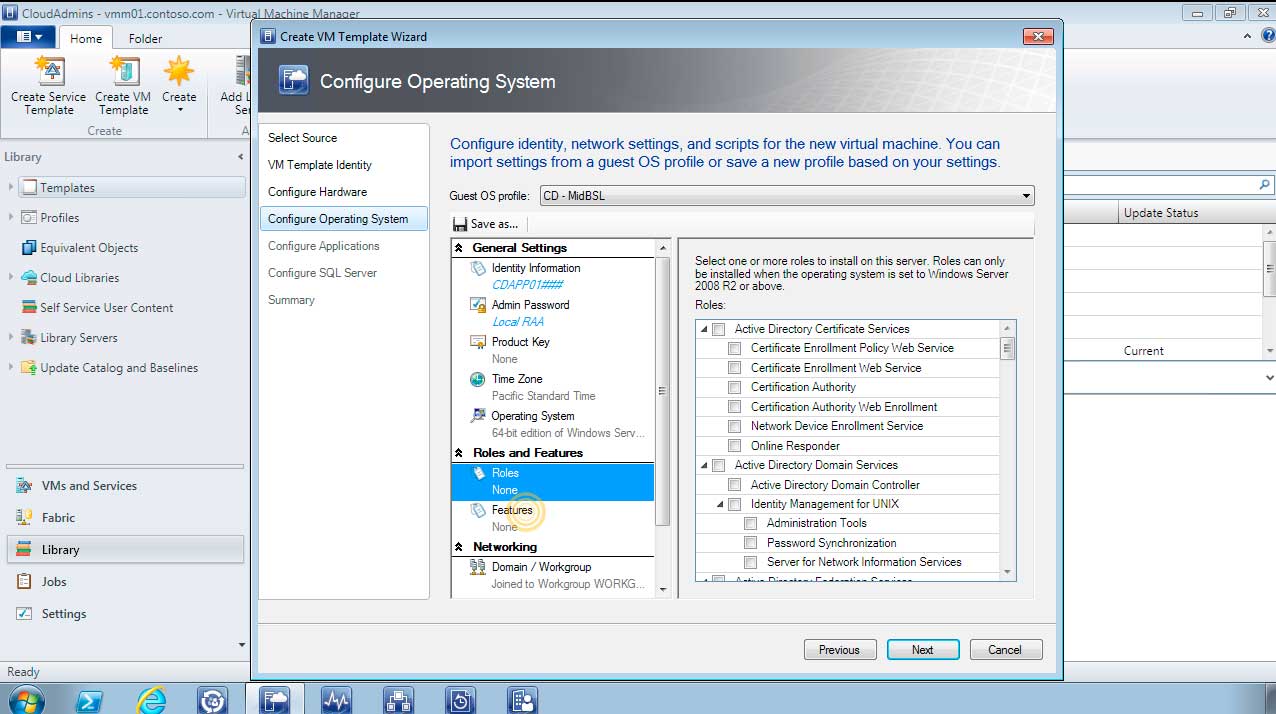 |
(Click image to view larger version.) |
You can select Roles and Features that will be automatically installed when a virtual machine is deployed using this template.
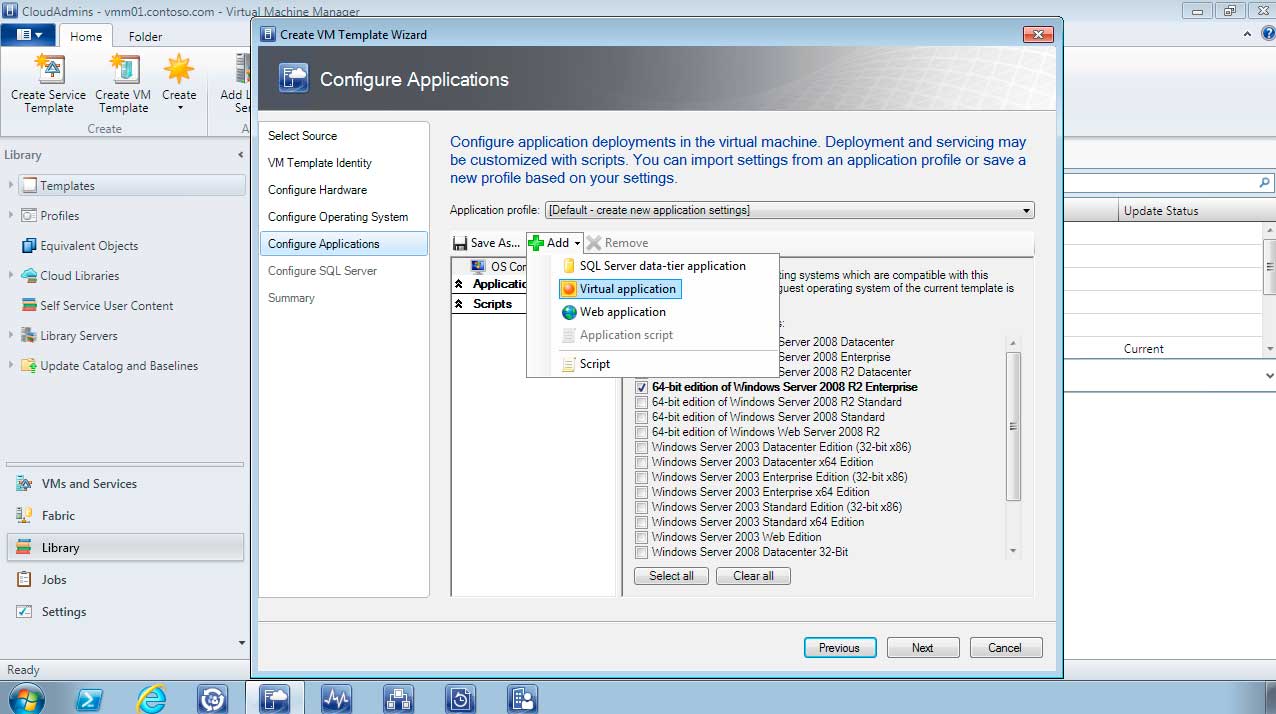
Next, I can Configure Applications to deploy to the virtual machine. In this example I will add a Virtual Application to the template:
 |
(Click image to view larger version.) |
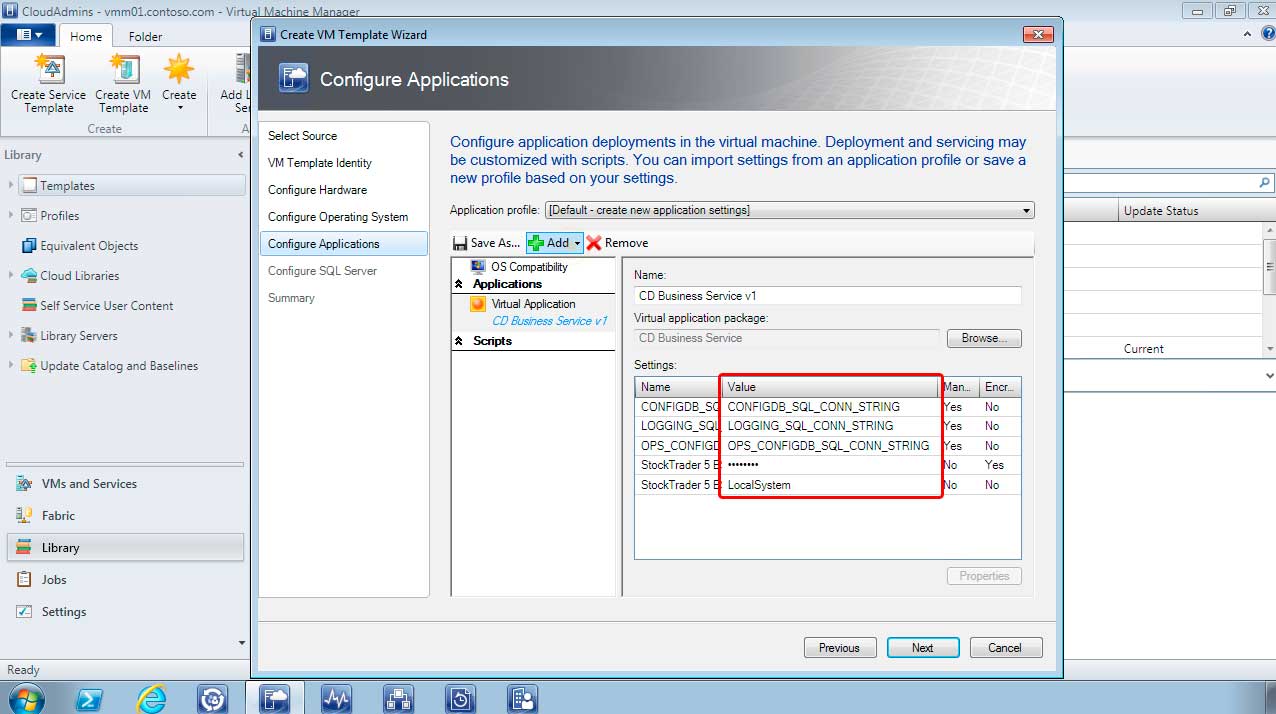
I am opting to deploy a virtual application called CD Business Service v1, browsing to the location where the virtual application manifest file is located. You can also review the variables used in configuring the application:
 |
(Click image to view larger version.) |
I can also choose to configure SQL Server as part of the template; for this example, I will not be configuring SQL Server.
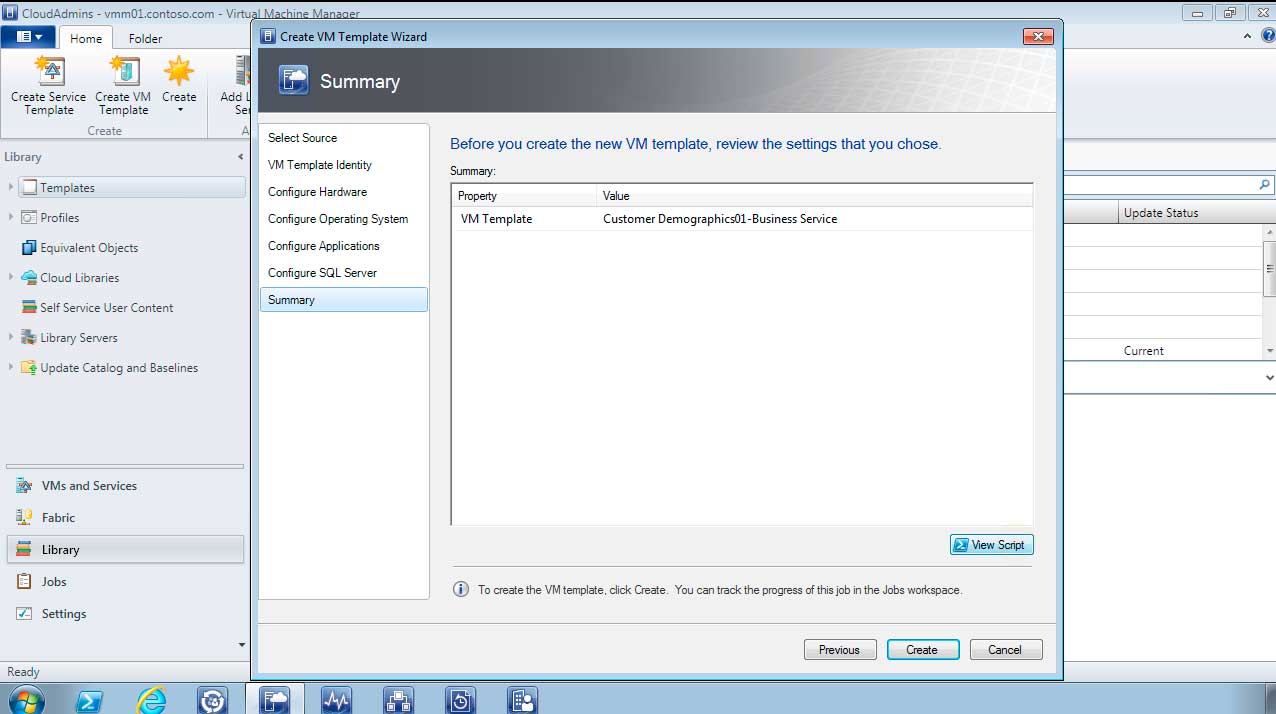
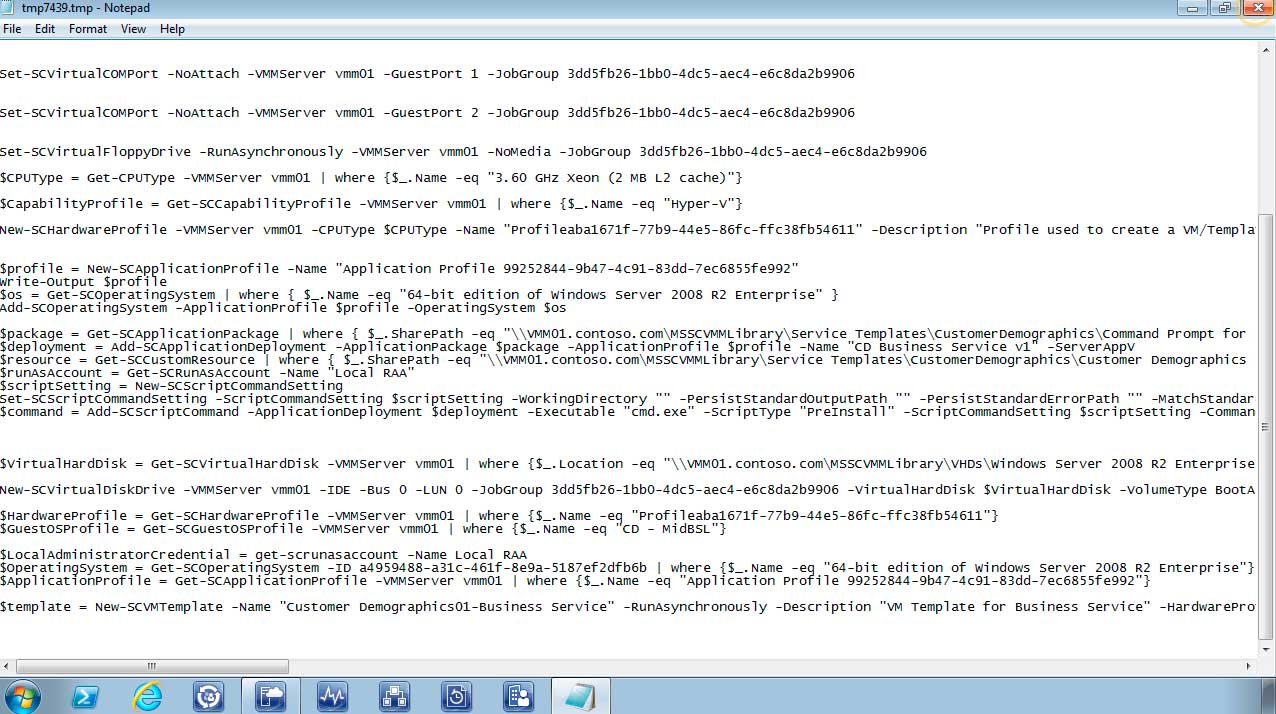
Before you save the template you can preview the Powershell script that will be executed. On the Summary page select View Script:
 |
(Click image to view larger version.) |
 |
(Click image to view larger version.) |
3. Deploy App via App Controller
Create a service template from the Virtual Machine Template I have just created by selecting from the Home Tab Create Service Template:
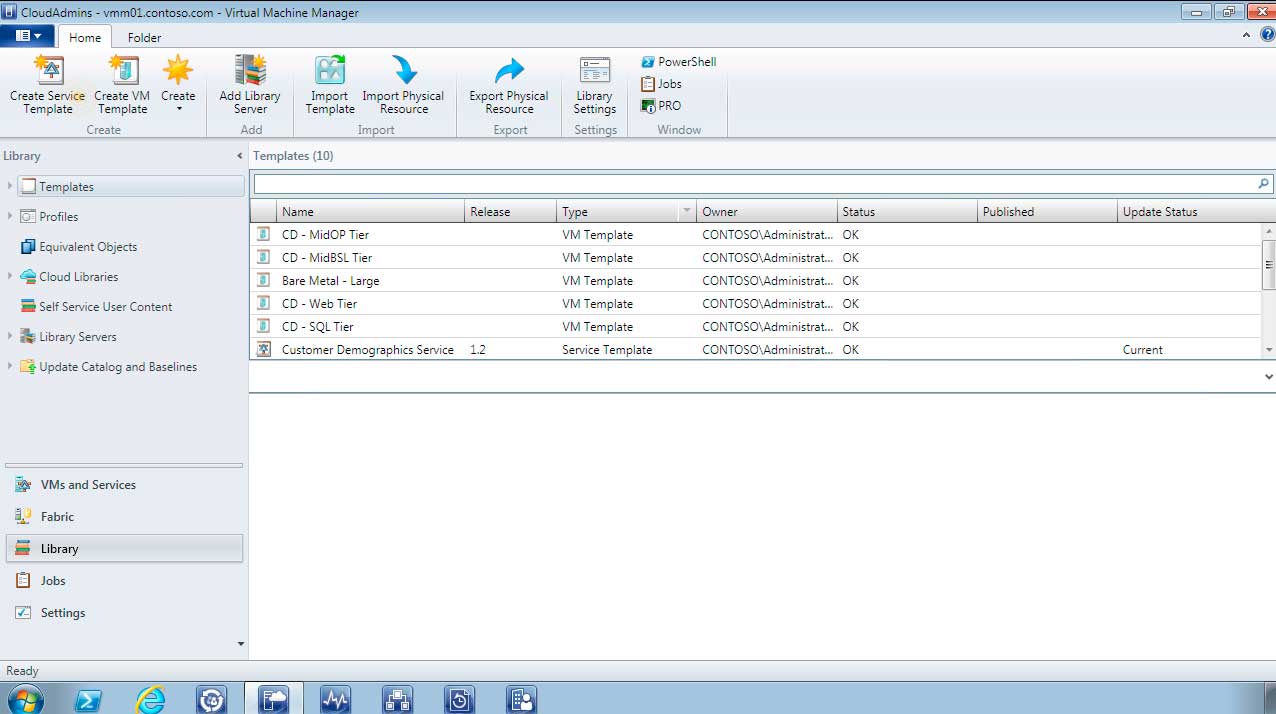 |
(Click image to view larger version.) |
First we need to specify a Name and a Release number for the Service Template and select a Template Pattern. I have chosen a three-tier application deployment pattern:
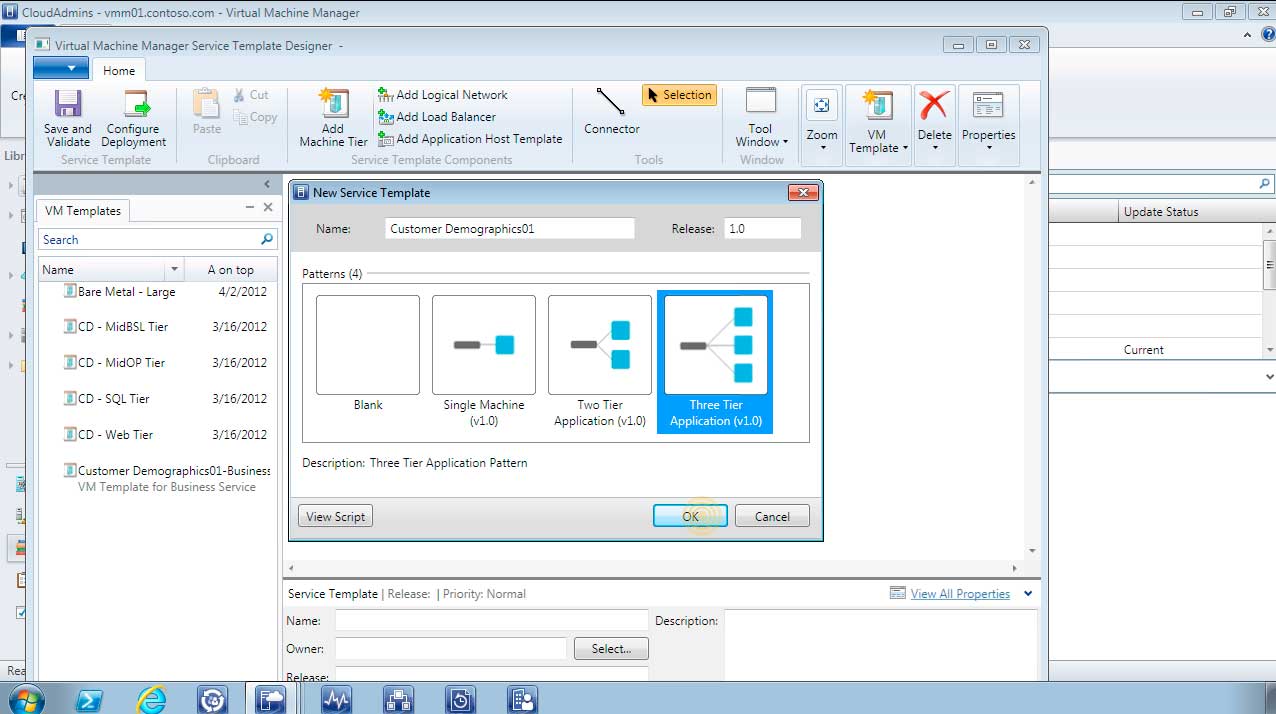 |
(Click image to view larger version.) |
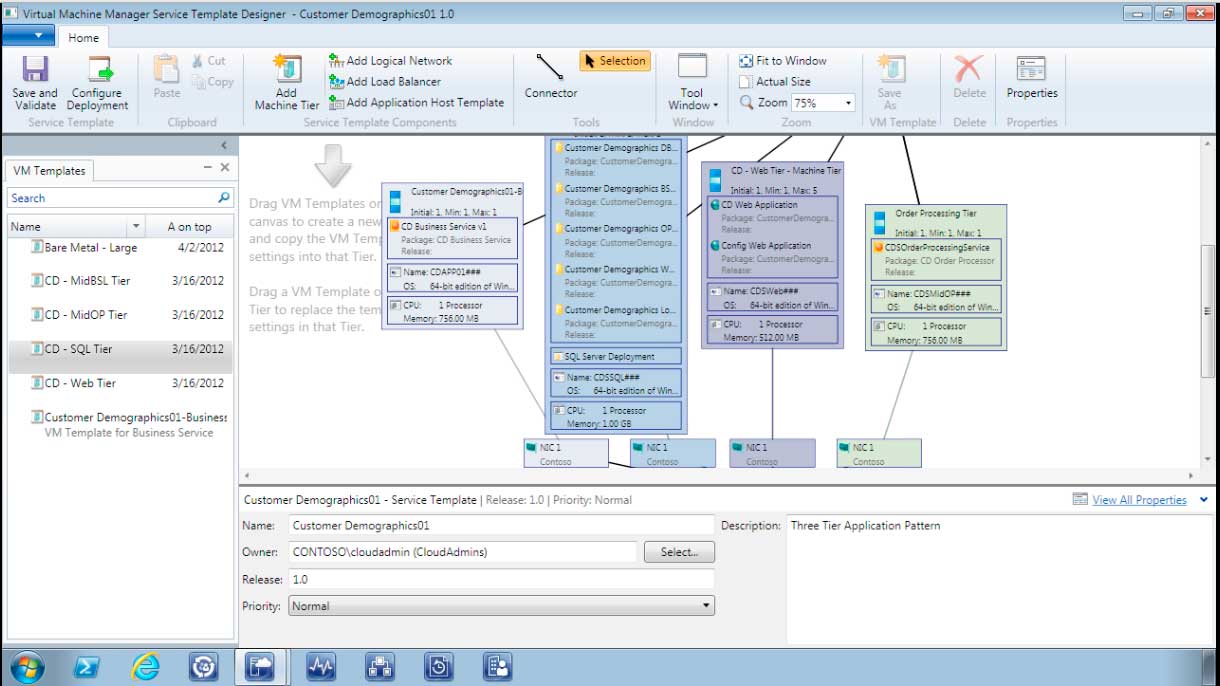
For this Customer Demographics template we have a first, second and third tier that I need to configure by Adding Applications. From the VM Templates pane I can drag and drop the correct template to the relevant tier:
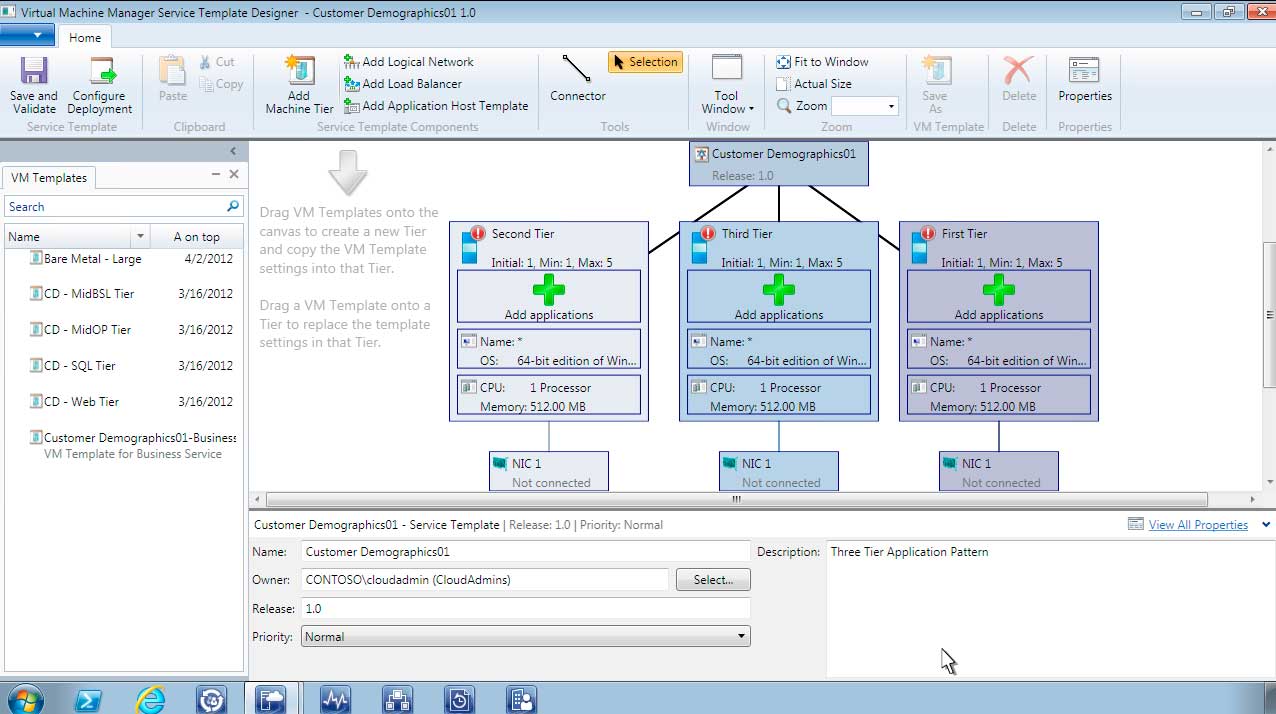 |
(Click image to view larger version.) |
I have adding the following VM Templates to the relevant tiers:
- CD-Web Tier to the first tier
- Customer Demographics 01 Business to the second tier
- CD-SQL Tier to the third tier
I can also select, on the relevant tier, to not scale out the tier by Deselecting the checkbox This computer tier can be scaled out. At the moment I am getting warnings relating to not being connected to any logical network and a valid domain which will be resolved in the next step:
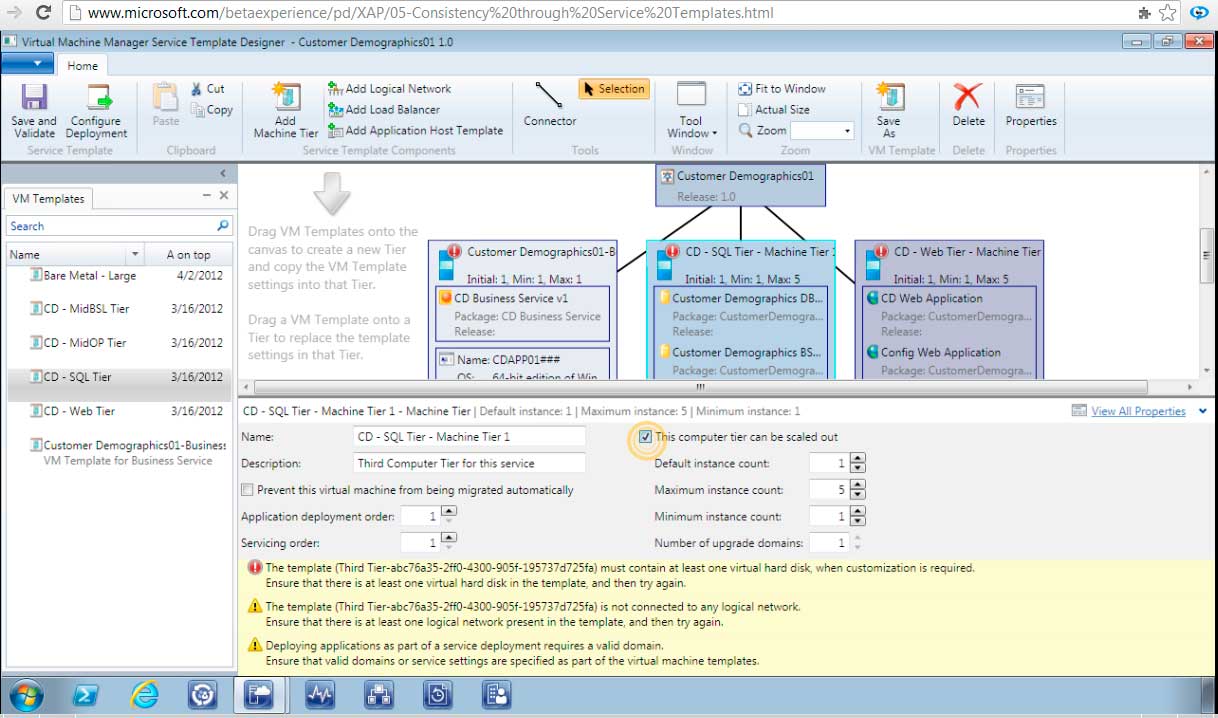 |
(Click image to view larger version.) |
Next I need to drag the individual NIC Cells underneath each tier and then the Contoso Cell underneath the NIC cells to connect them to the tiers. Now each tier is connected to a valid domain and Logical Network:
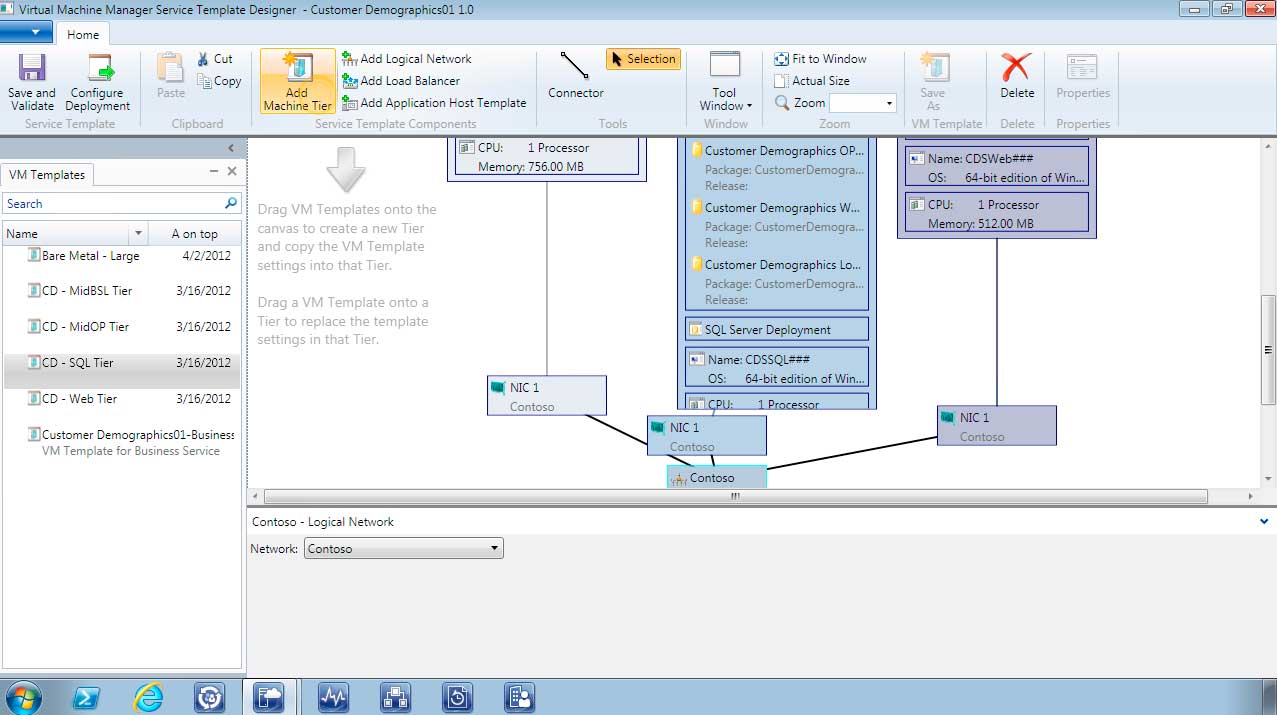 |
(Click image to view larger version.) |
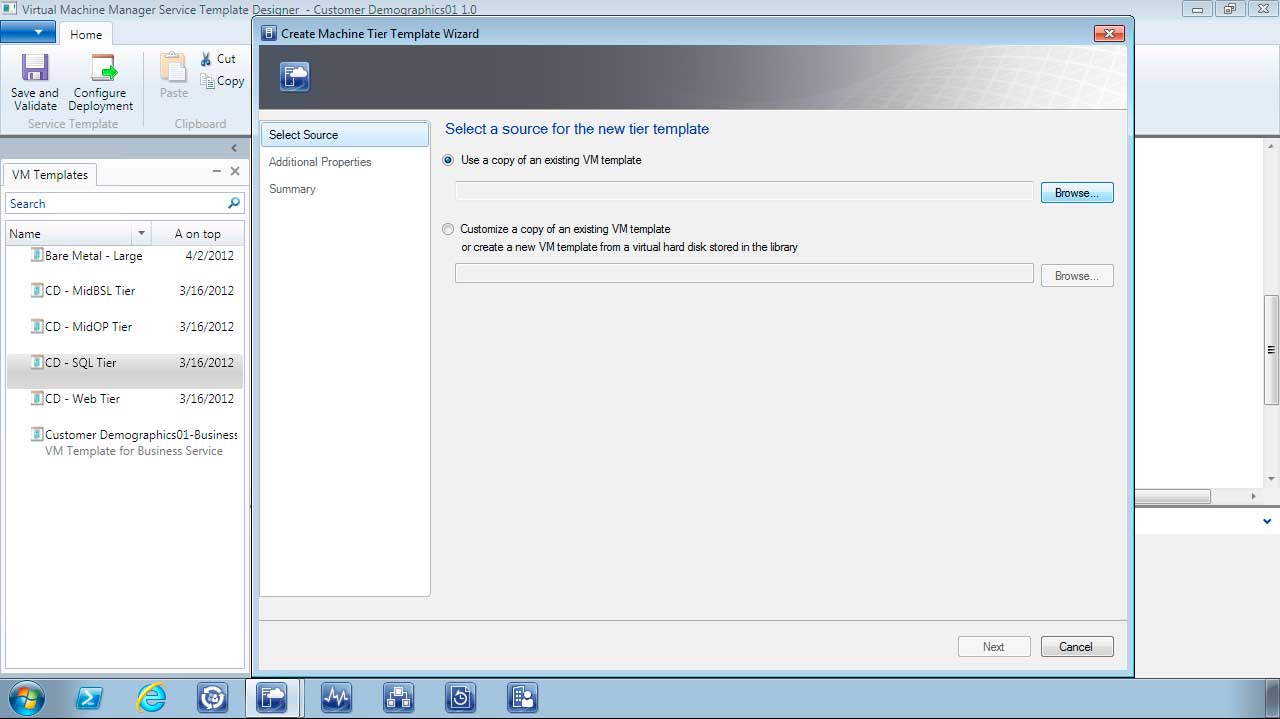
I can next add a new machine tier by Selecting on the Home Tab the option to Add Machine Tier the Create Machine Template Wizard enables me to Select a source for the new tier template but browsing for an existing VM template or customizing a copy of an existing one:
 |
(Click image to view larger version.) |
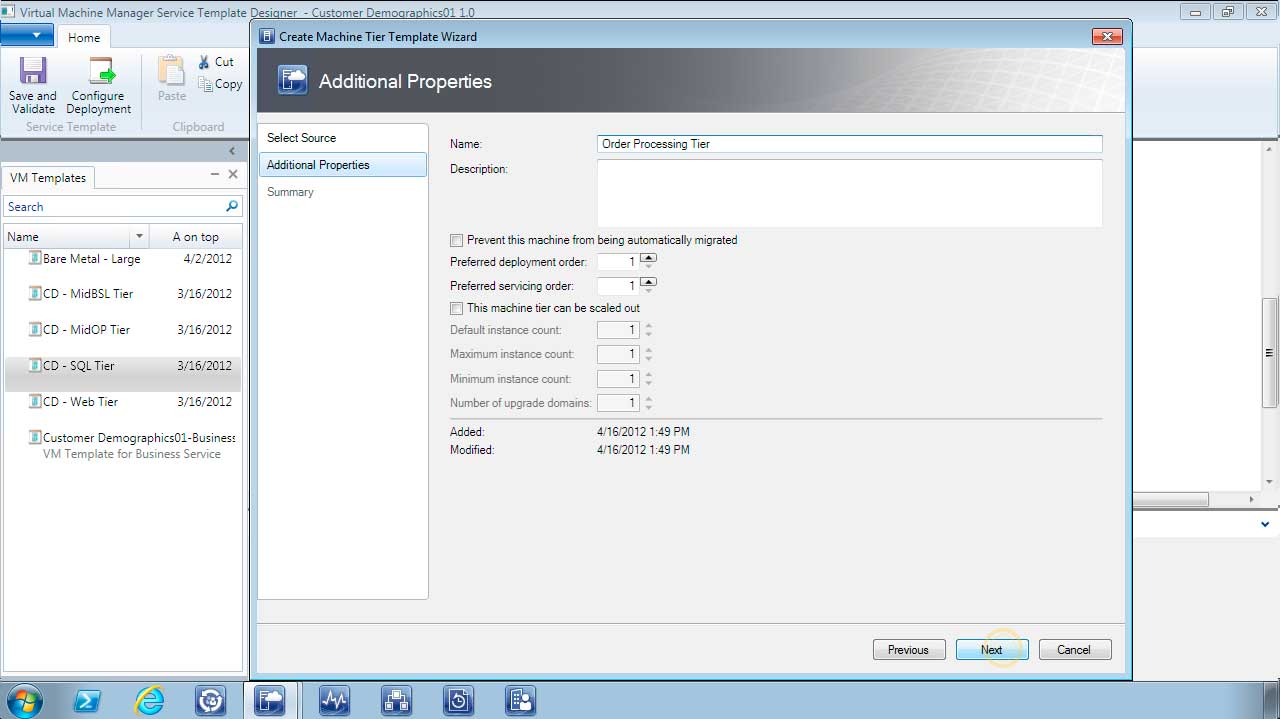
I have selected an existing VM template called Order Processing Tier to add to the Service Template:
 |
(Click image to view larger version.) |
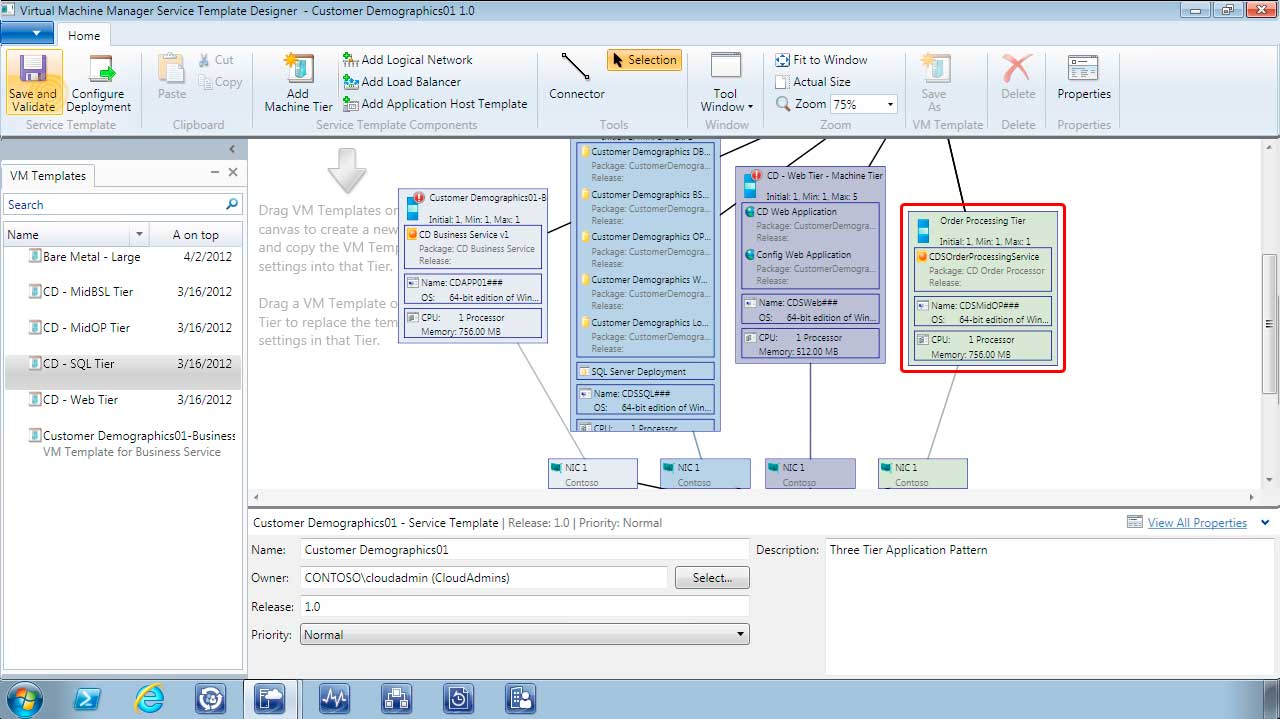
Finally we Create and we have added a new tier to the Service Template. Save and Validate the template:
 |
(Click image to view larger version.) |
At this stage of the process I have shown a representative example of how using System Center 2012 we can create a standardized approach to virtual machine and service deployments, making it possible to create and handle interdependencies across layers and application tiers.
Step 4
Next I need to configure deployment by Selecting on the Home Tab Configure Deployment:
 |
(Click image to view larger version.) |
Select a Name for the deployment and a Destination for the new service. I have opted for the Contoso Staging Cloud:
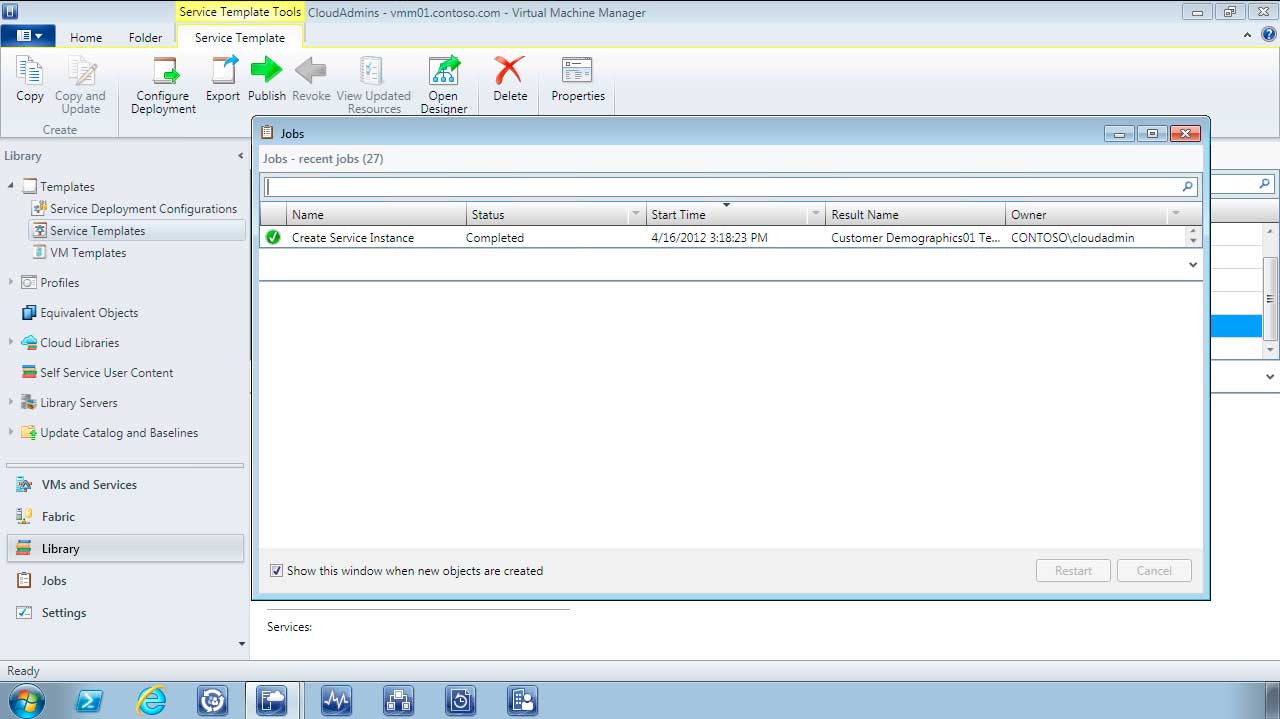
Job status is showing as Completed for the Create Service Instance to the Contoso-Staging Cloud:
 |
(Click image to view larger version.) |
By using System Center 2012 and Virtual Machine Manager we can use service templates to configure repeatable deployment applications that are consistent and robust.
Step 5
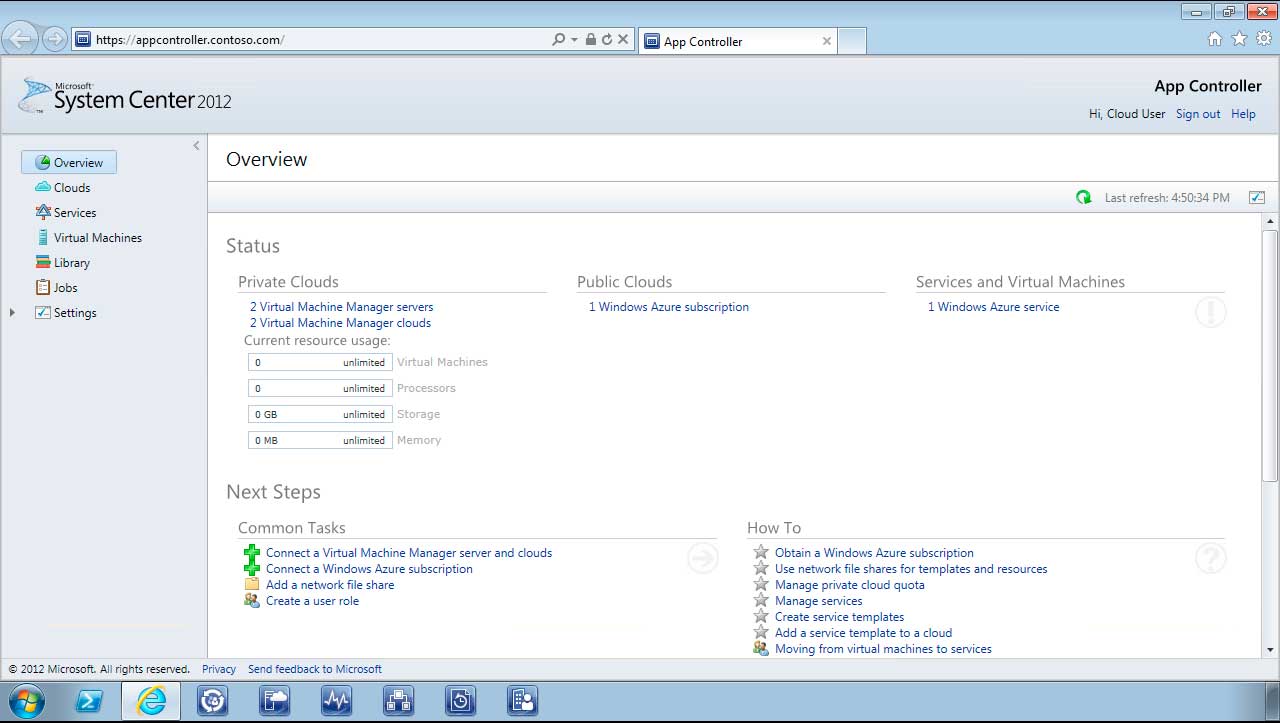
Using App Controller in System Center 2012, you can tightly control resource delegation to application owners providing a convenient self-service model for deployments:
 |
(Click image to view larger version.) |
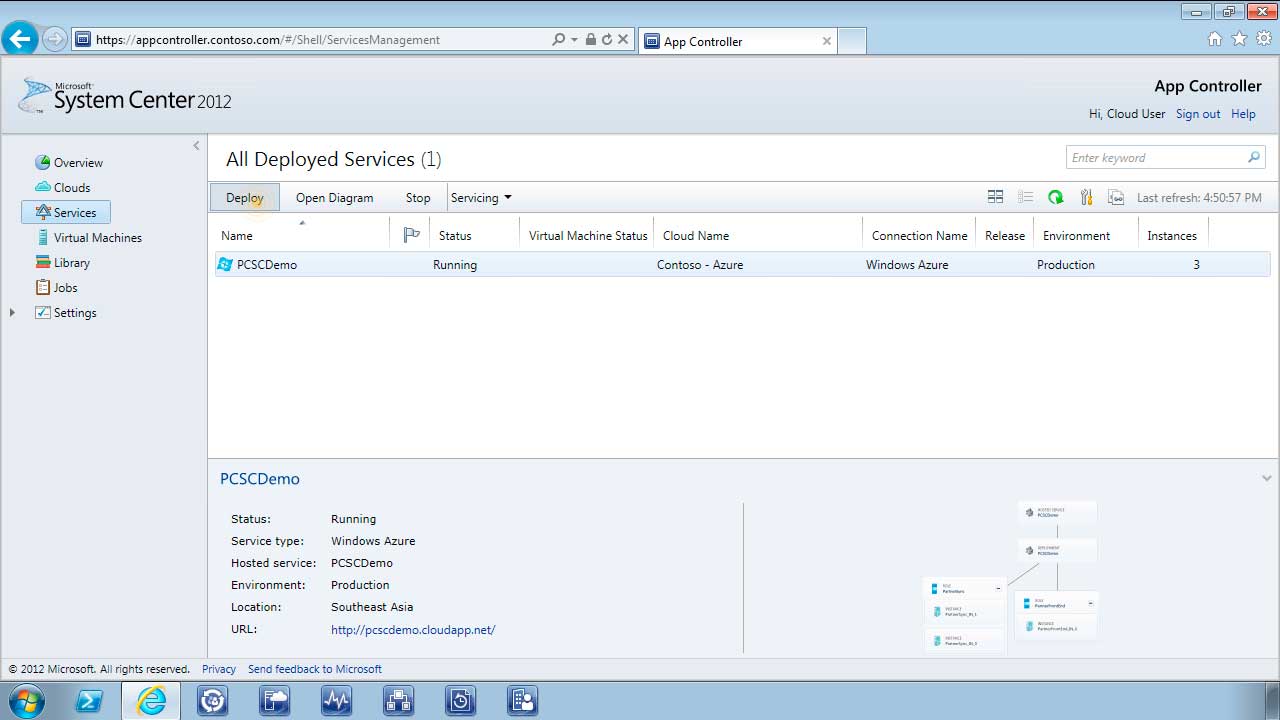
I am currently logged on as a cloud user and will in this example experience quote controls stopping me from deploying to the Customer Demographics Service Template previously created.
Select Services and select Deploy to create a new service deployment:
 |
(Click image to view larger version.) |
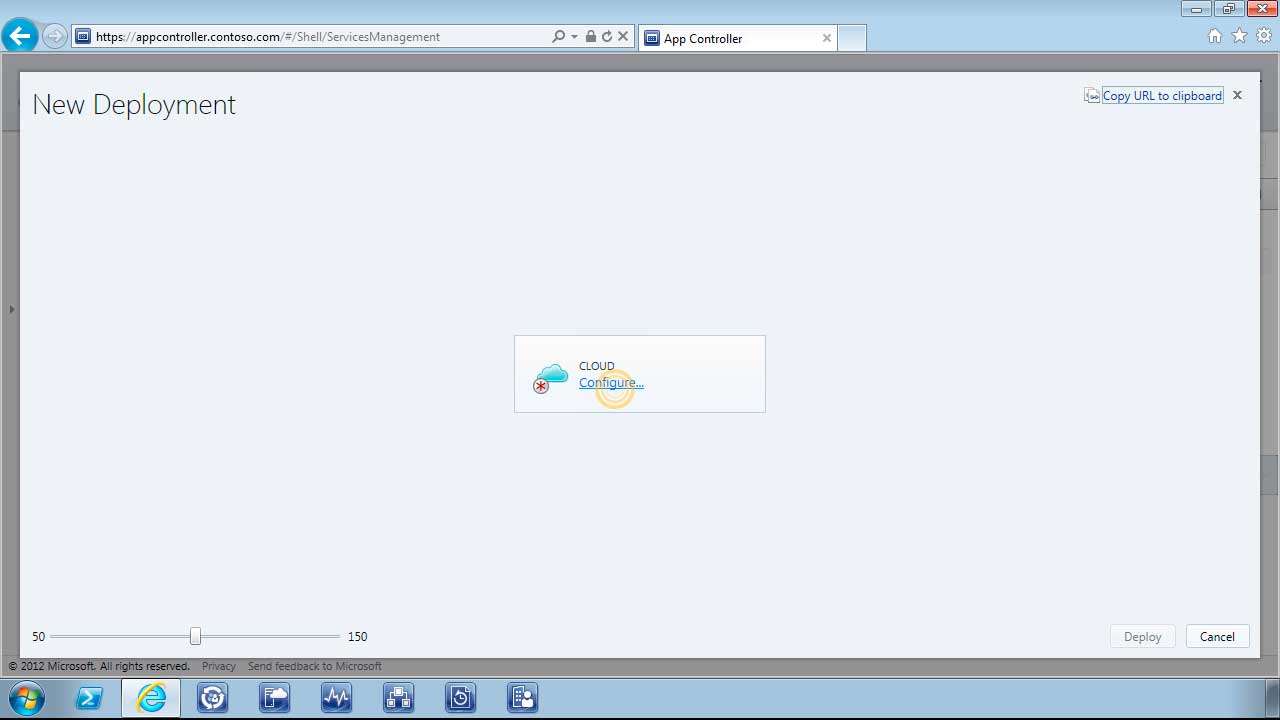
Select Configure to configure the environment for deployment:
 |
(Click image to view larger version.) |
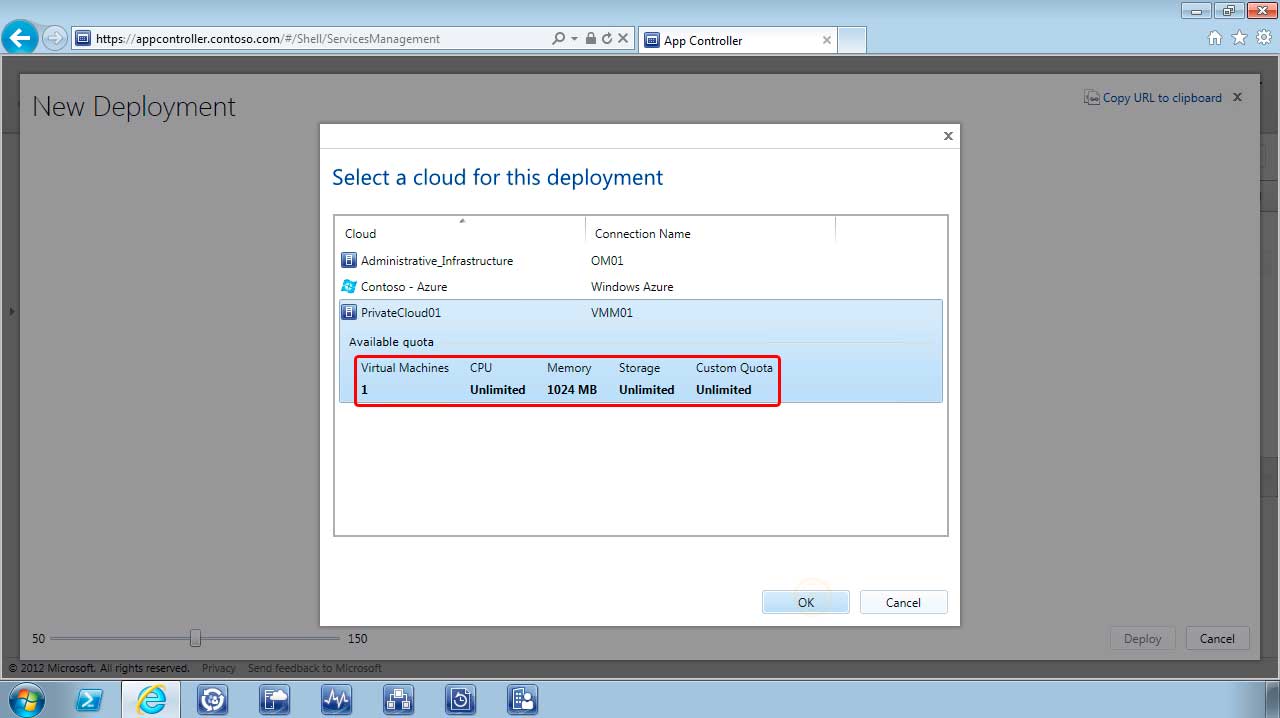
Select a cloud from the list to which I have been given access rights to. We can see the available quota of pooled resources that I have been delegated to for this environment. Notice the number of Virtual Machines is only one:
 |
(Click image to view larger version.) |
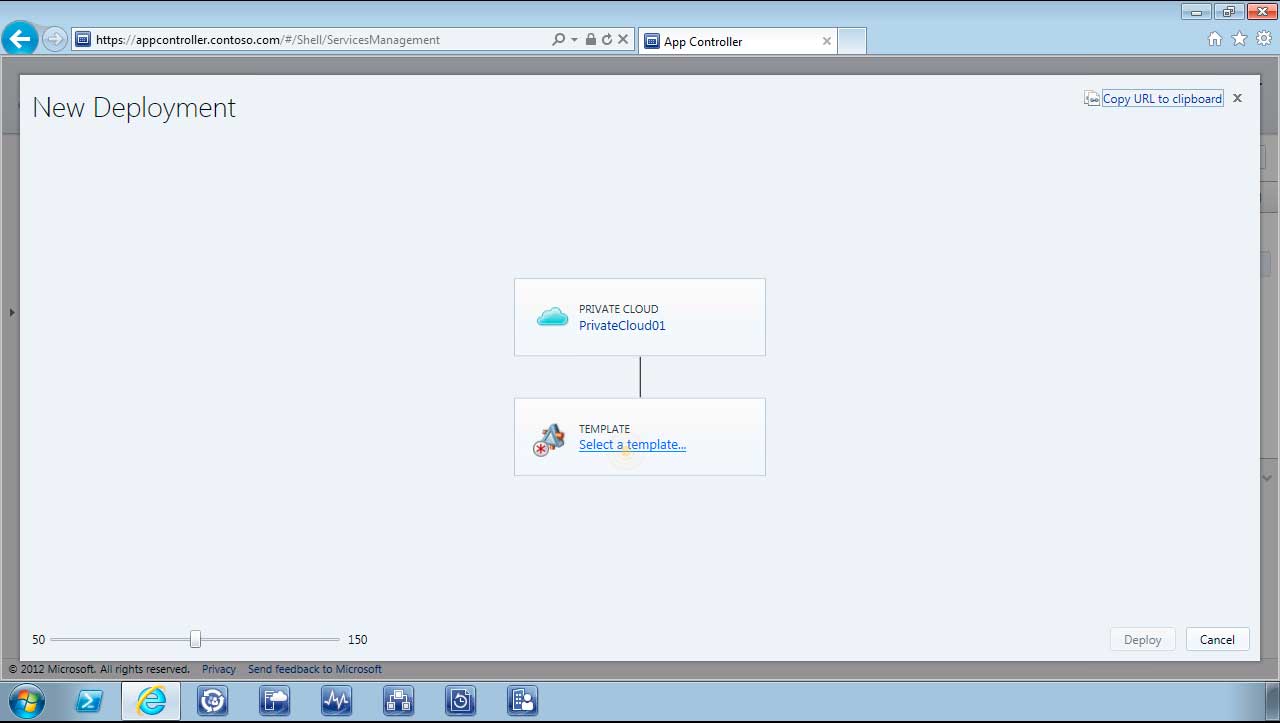
The next step is to select a Service Template:
 |
(Click image to view larger version.) |
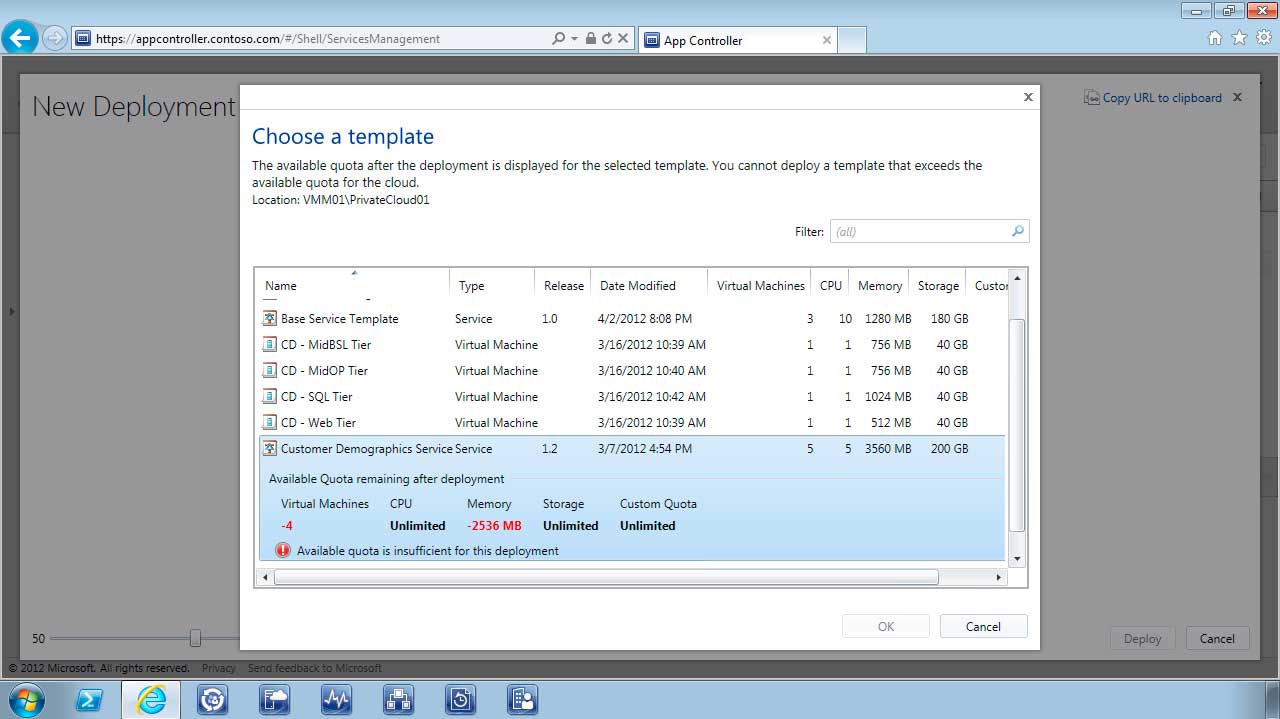
I have selected the Customer Demographics Template and you can see an error is raised for Virtual Machines and memory available after deployment. My access rights as Cloud User will not enable me to use this template:
 |
(Click image to view larger version.) |
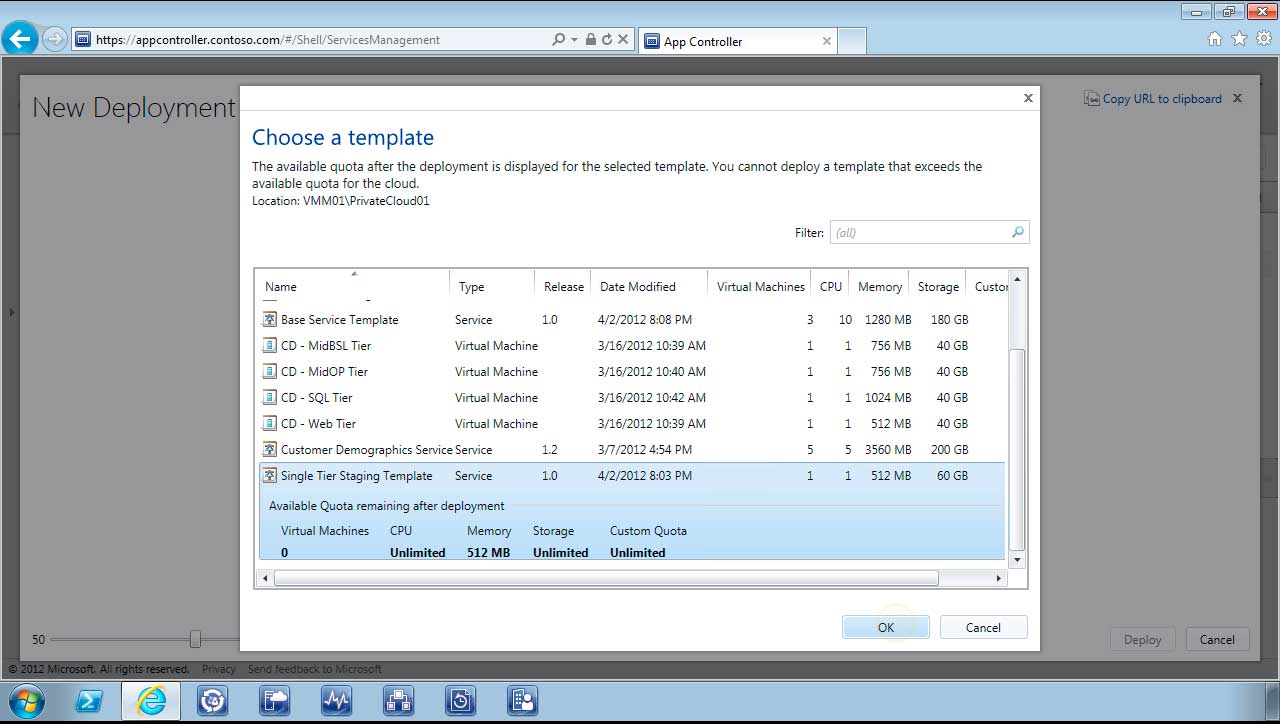
When selecting the Single Tier Staging Template no errors are shown:
 |
(Click image to view larger version.) |
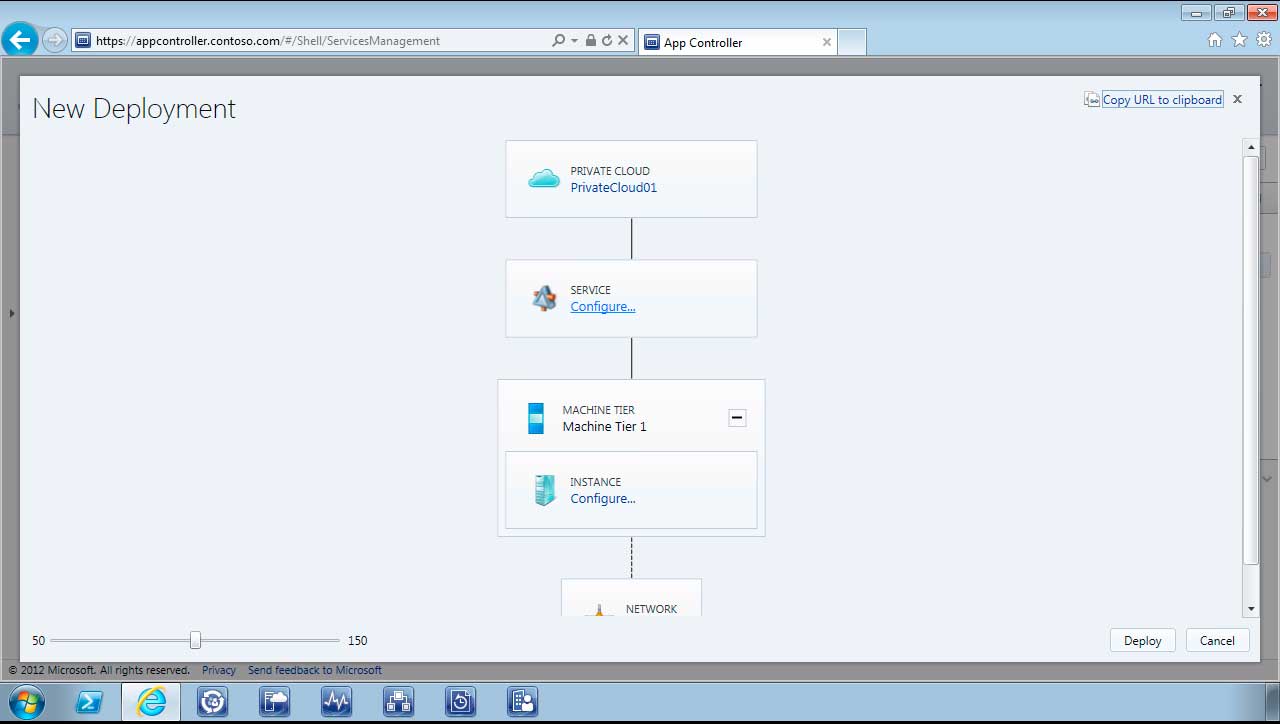
On the new deployment diagram view I need to Select Configure for the Service:
 |
(Click image to view larger version.) |
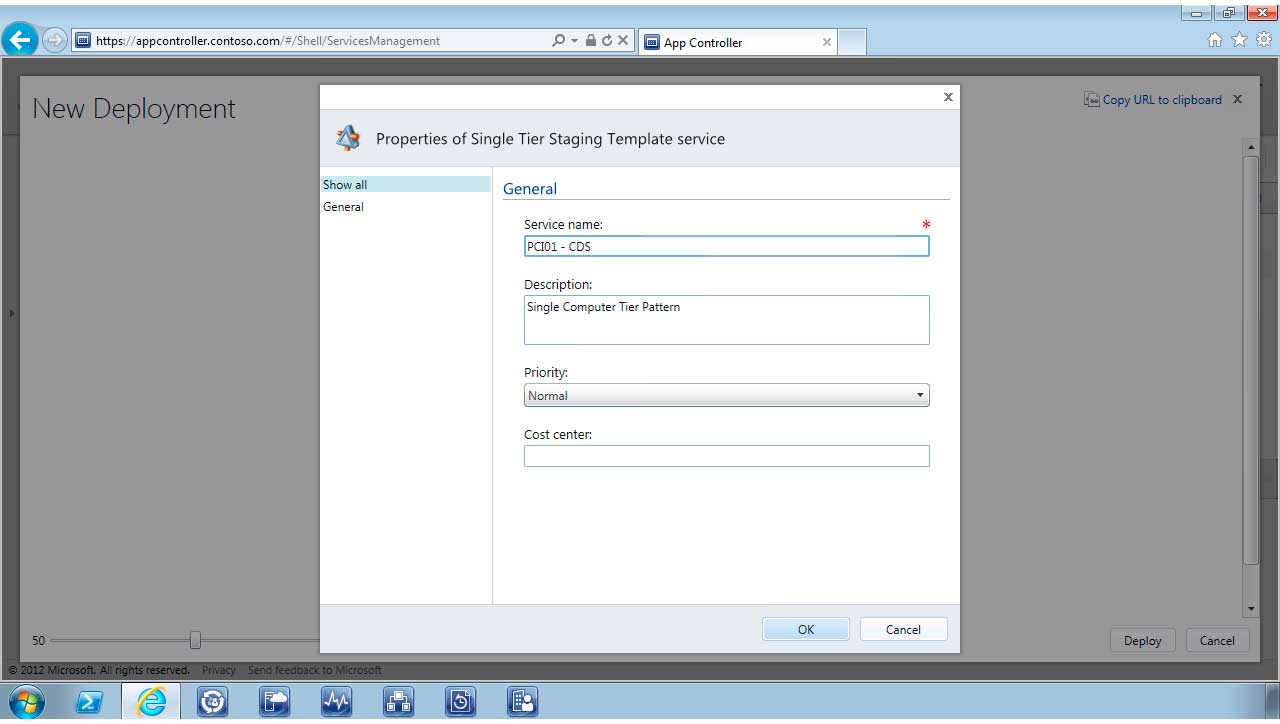
On the Properties of Single Tier Staging Template service I need to configure a Service Name and Description. I can also assign it to a Cost center:
 |
(Click image to view larger version.) |
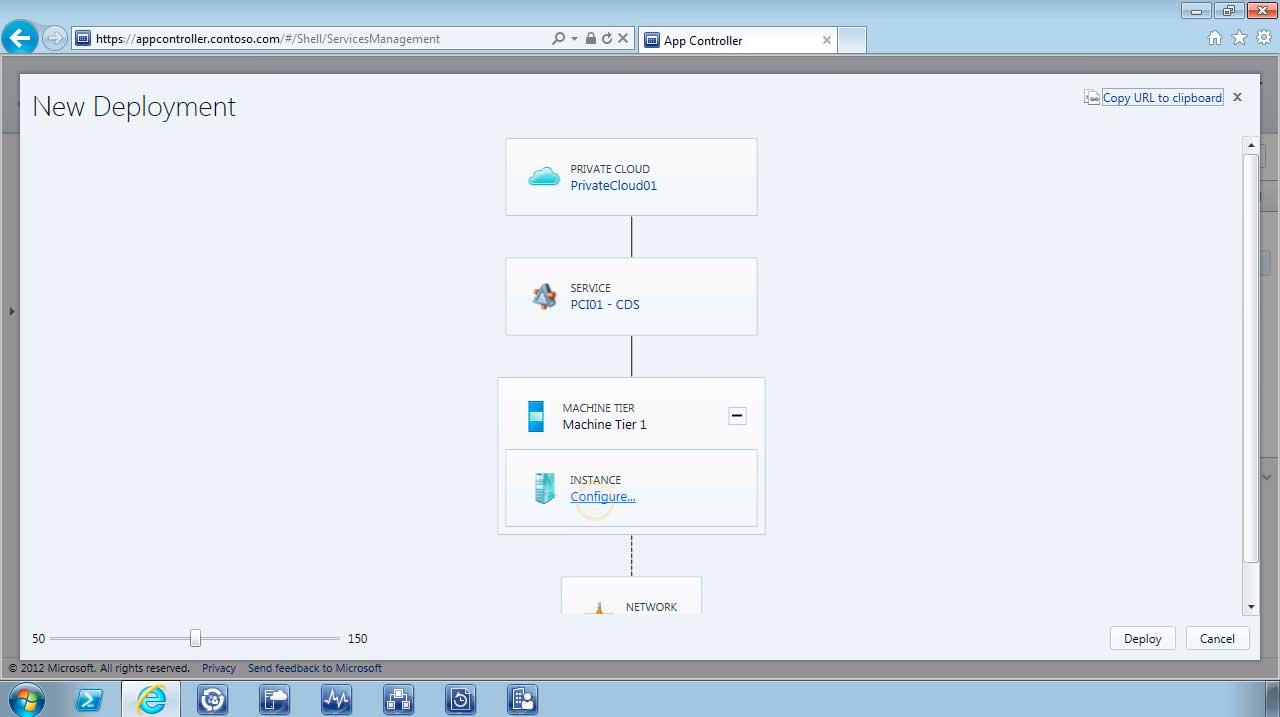
Next I need to Configure the Instance for the Machine Tier 1:
 |
(Click image to view larger version.) |
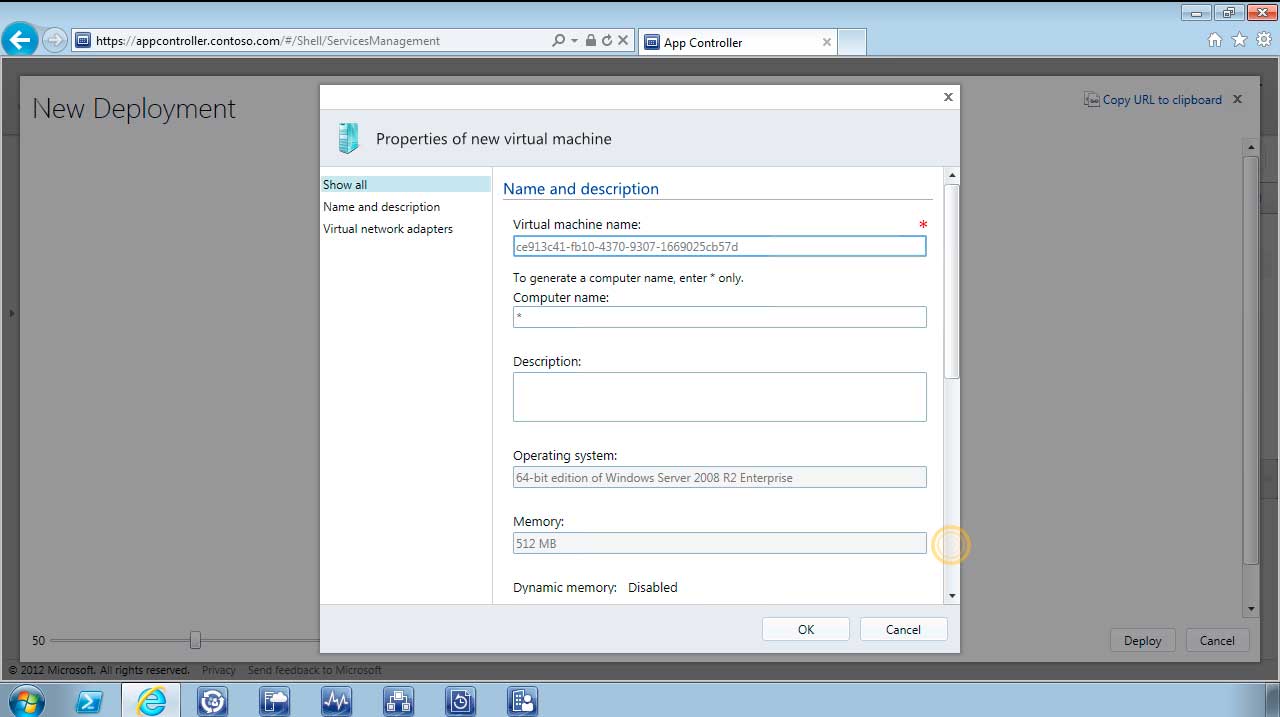
On the Properties of new virtual machine a number of options can be configured such as Computer Name and Cost Center:
 |
(Click image to view larger version.) |
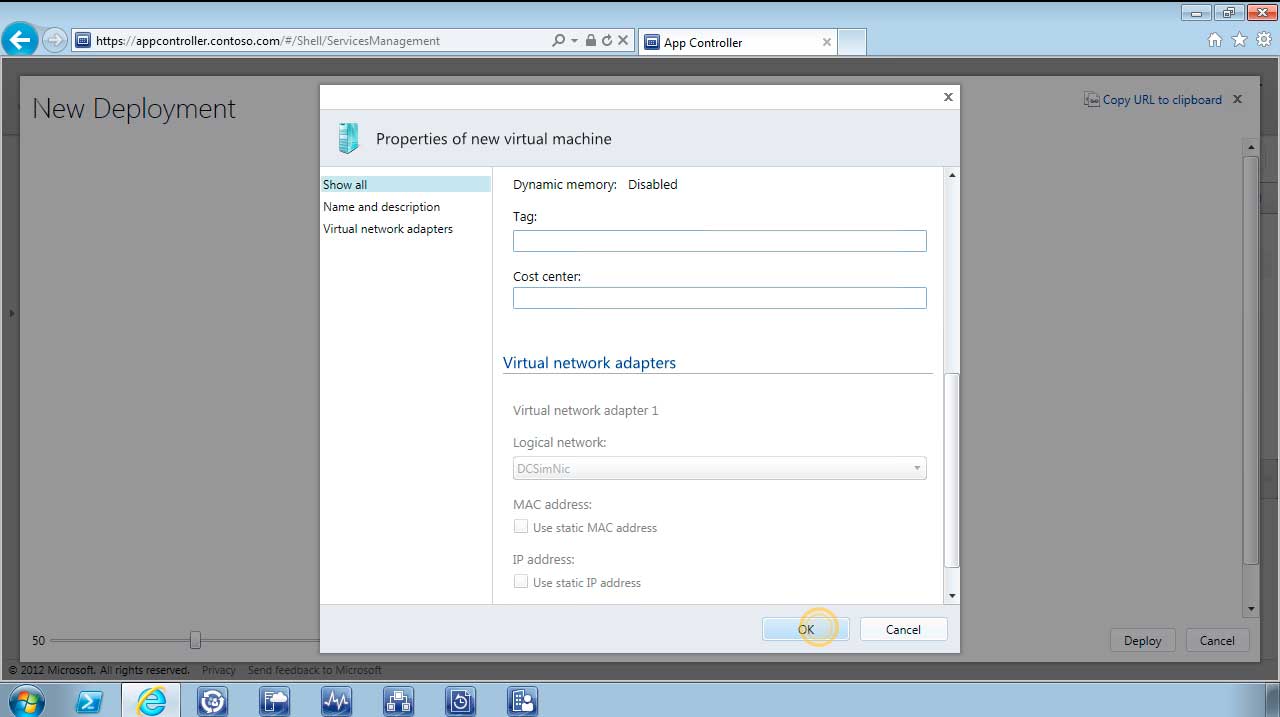
Select OK on completion:
 |
(Click image to view larger version.) |
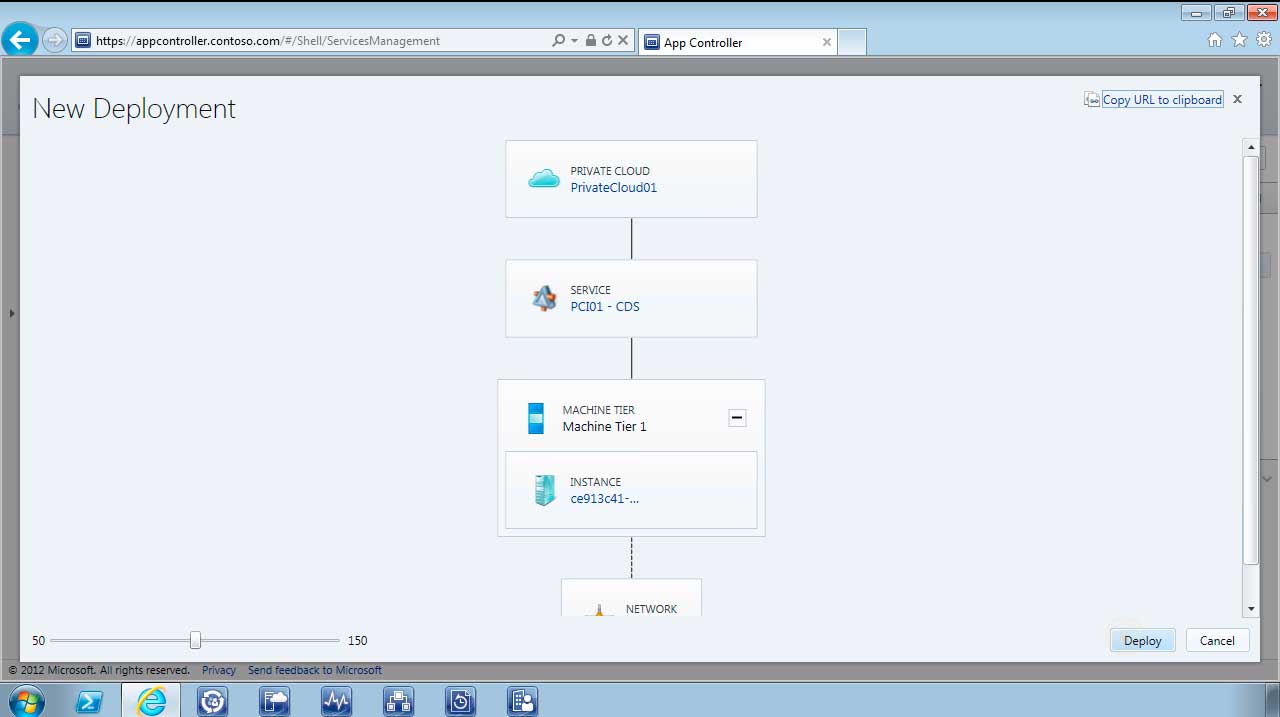
Once completed Select Deploy to save New Deployment configuration and make available to the private cloud:
 |
(Click image to view larger version.) |
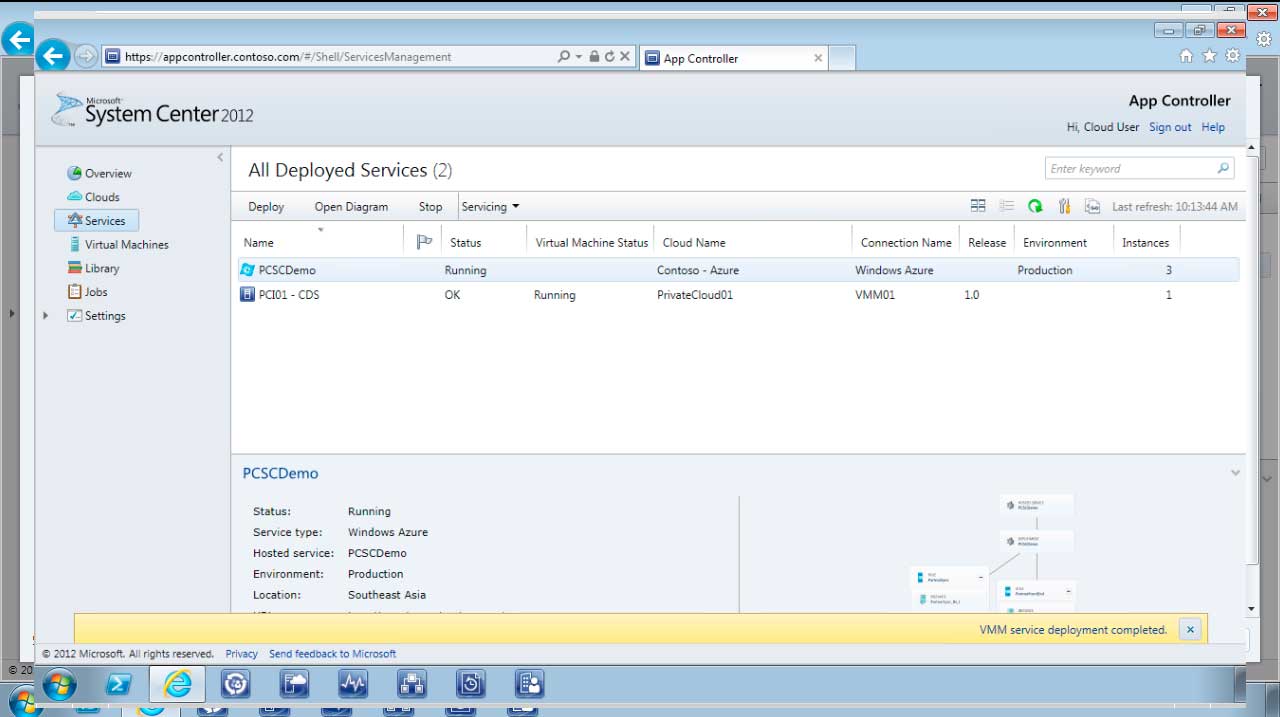
Deployment is successful:
 |
(Click image to view larger version.) |
Once deployed I can then set properties such as sharing with other self-service users and roles. Select the Deployed Service PC101-CDS and Select Open Diagram:
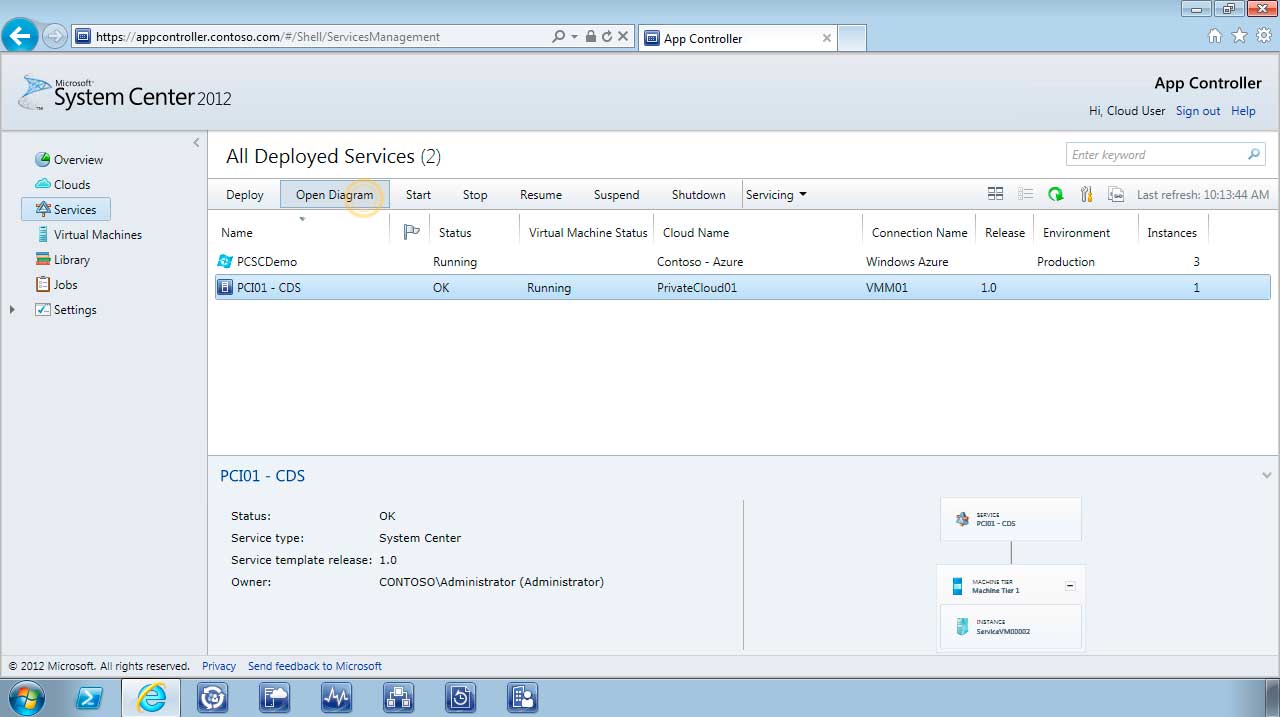 |
(Click image to view larger version.) |
As the owner of the service I can choose to Share this Service with other self-service users and roles by selecting Add and choosing Users or Groups from Active Directory. Select OK when completed:
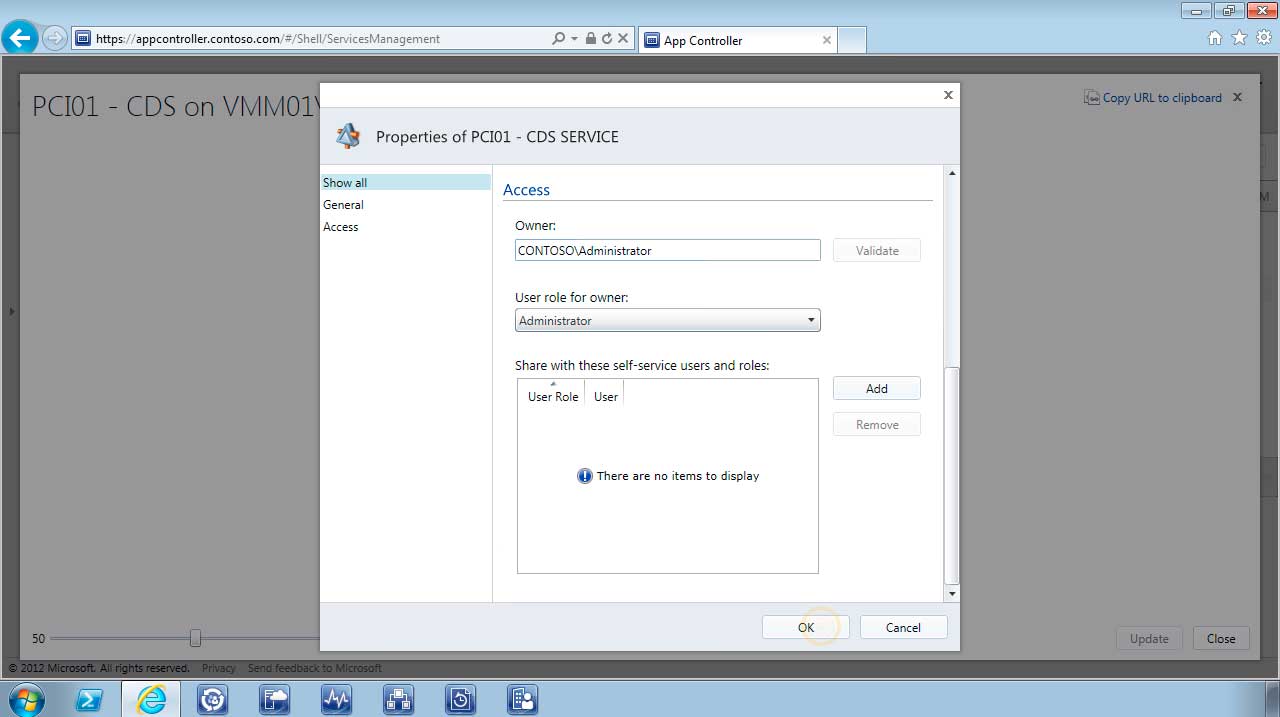 |
(Click image to view larger version.) |
Select Close to complete changes made:
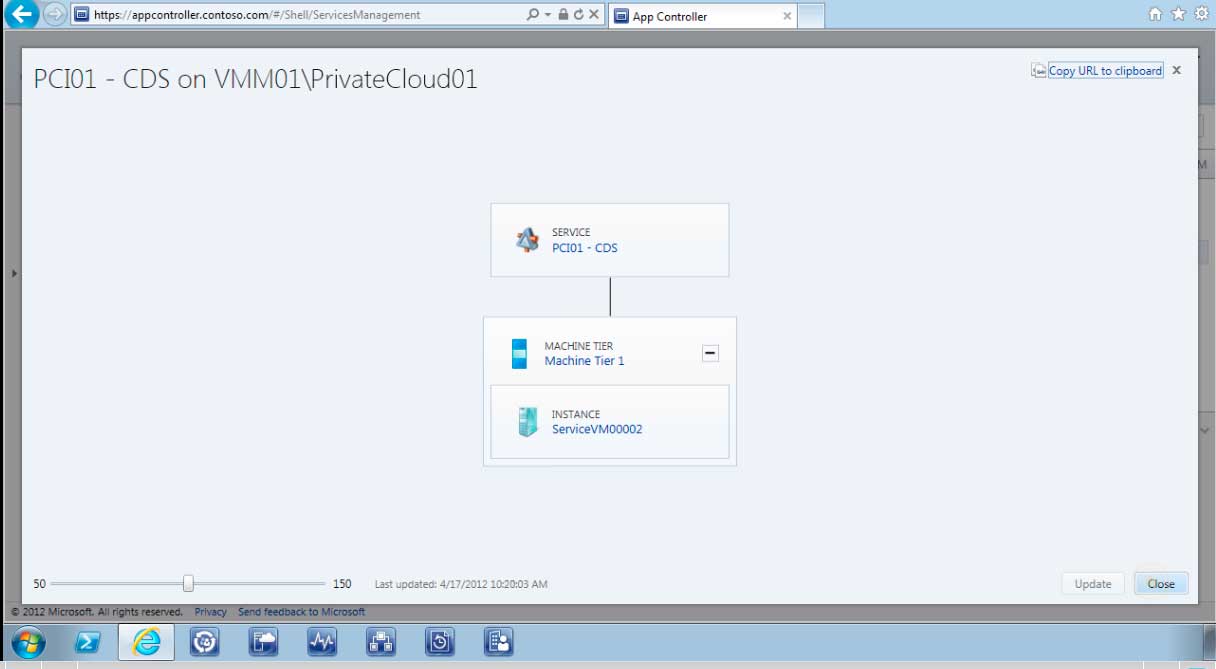 |
(Click image to view larger version.) |
Using App Controller makes it simple and fast for application owners and cloud users to quickly deploy and update applications using the self-service model. IT administrators can still have the control they need to ensure that applications operate robustly, securely and within a defined resource allocation.
Microsoft clearly has provided a service-centric approach to help manage application components.
What else do I need to know?
If you configure System Center 2012 on Datacenter edition, licensing covers unlimited virtual machines, which means you can continually increase your virtual machine density without any additional licensing costs. I wonder how this will impact on business decisions to opt for VMware Private Cloud over Microsoft Private Cloud solutions. Only time will tell.