How-To
How to Configure Multiple TCP/IP Stacks in vSphere 6
Creating custom stacks from the command line for use in vMotion and Provisioning.
It's easy to miss neat features that get added to really broad products, because they don't get publicized as the most important thing about the release. But the under-publicized features can also be really useful and important to some environments. I wrote recently about VM Component Protection, which falls into this category. Another addition to vSphere 6 that's important but under-discussed is the addition of independent vMotion and Provisioning TCP/IP stacks to the ESXi host right out of the box.
In vSphere at 5.1 and earlier, there was a single TCP/IP stack which all the different types of network traffic used. This meant that management, virtual machine (VM) traffic, vMotion, Network File Copy and so on were all bound to use the same stack. While this was generally tolerable, it did cause irritation on occasion when it would have made more sense to configure a certain type of traffic differently than the rest. Because of the shared stack, all VMkernel interfaces had some things in common: they shared the same default gateway, the same memory heap, and the same ARP and routing tables.
In vSphere 5.5, VMware changed this functionality, allowing for multiple TCP/IP stacks, but with some limitations. Only certain types of traffic could make use of a stack other than the default one, and the custom TCP stack had to be created from the command line using an ESXCLI command. In vSphere 6, VMware went ahead and created separate vMotion and Provisioning stacks by default.
Both of these changes have fairly clear motivations, in my opinion: I think the ability to use custom stacks was born from the needs of vShield/vCNS/NSX; I also speculate that the addition of two more unique stacks by default in vSphere 6 was to facilitate the realization of the full software-defined datacenter (SDDC) vision, and allow things like cross-vCenter vMotion to be configured in a way that makes architectural sense.
In this article, I'll walk through creating custom TCP/IP stacks from the command line, modifying them through the vSphere Web Client, and show how to use the vMotion and Provisioning stacks.
Create a Custom TCP/IP Stack
Creating a new TCP/IP stack is the easiest part of this process. VMware rolled a command into ESXCLI's 'network' namespace that allows the creation to take place with very little effort. The ESXCLI command is
esxcli network ip netstack. It has the following options: add, get, list, remove and set. For this example, I'll use NFS traffic as an example of a use case for a custom stack. Here are the steps:
- Enable SSH on the host
- Highlight a host in the vSphere Web Client and navigating to Manage > Settings > Security Profile > Services and clicking Edit…
- Highlight the SSH service and click Start
- Connect to the host via SSH using a tool like PuTTY
- Authenticate with the 'root' credentials (or a named account if you're really doing it right)
- Run the following command: esxcli network ip netstack add -N="[Stack Name]", where [Stack Name] is replaced by what you want the stack to be called
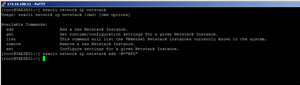
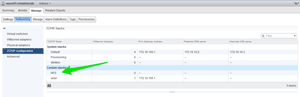
Figure 1 shows the command (when successful, there's no resulting output). Figure 2 shows the newly created network stack in the vSphere Web Client.
 [Click on image for larger view.]
Figure 1. Creating a custom TCP/IP stack with ESXCLI.
[Click on image for larger view.]
Figure 1. Creating a custom TCP/IP stack with ESXCLI.
 [Click on image for larger view.]
Figure 2. The newly created TCP/IP stack, shown in the vSphere Web Client.
Modify Custom TCP/IP Stack Settings
[Click on image for larger view.]
Figure 2. The newly created TCP/IP stack, shown in the vSphere Web Client.
Modify Custom TCP/IP Stack Settings
Once the custom stack is created, it needs to be configured with settings for items like which DNS settings to use, which address to use as the default gateway and so on. Advanced settings can even be configured for things like which Congestion Control algorithm to use, or the maximum number of connections that can be active at any given time.
To configure these settings, navigate to Manage > Networking > TCP/IP configuration and highlight the particular stack to be configured.
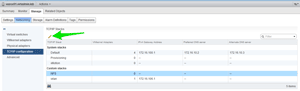
Figure 3 shows the little pencil icon that will open the stack configuration wizard.
 [Click on image for larger view.]
Figure 3. Click the pencil icon to edit the custom TCP/IP stack.
[Click on image for larger view.]
Figure 3. Click the pencil icon to edit the custom TCP/IP stack.
Once the edit dialog has opened, the following settings can be configured:
- Name. Although a name was specified when the custom TCP/IP stack was created, it can be changed here if necessary.
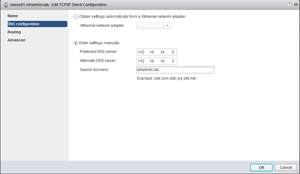
- DNS Configuration. If a VMkernel adapter is configured to use DHCP, the custom TCP/IP stack can be set to use the DNS settings that the DHCP server hands out. Alternatively, a static set of two DNS servers can be set, as well as the search domains.
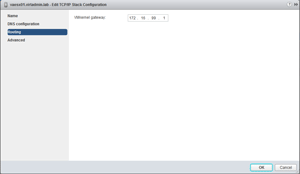
- Default Gateway. One of the primary reasons for creating a separate TCP/IP stack from the default one in many cases is to use a different default gateway. This can be configured here.
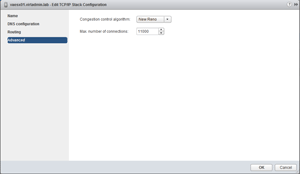
- Congestion Control Algorithm. The algorithm specified here affects vSphere's response when congestion is suspected on the network stack. There are two options:
- Max Number of Connections. The default is set to 11,000.
Figures 4 through 7 show these settings being configured in the vSphere Web Client.
 [Click on image for larger view.]
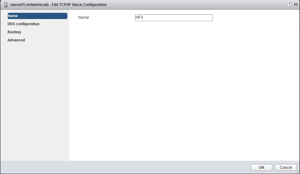
Figure 4. Change the name of the custom TCP/IP Stack.
[Click on image for larger view.]
Figure 4. Change the name of the custom TCP/IP Stack.
 [Click on image for larger view.]
Figure 5. Update DNS settings on the custom TCP/IP stack.
[Click on image for larger view.]
Figure 5. Update DNS settings on the custom TCP/IP stack.
 [Click on image for larger view.]
Figure 6. Enter a new default gateway for the custom TCP/IP stack.
[Click on image for larger view.]
Figure 6. Enter a new default gateway for the custom TCP/IP stack.
 [Click on image for larger view.]
Figure 7. Change Advanced settings on the custom TCP/IP stack.
Configure vMotion or Provisioning Stacks
[Click on image for larger view.]
Figure 7. Change Advanced settings on the custom TCP/IP stack.
Configure vMotion or Provisioning Stacks
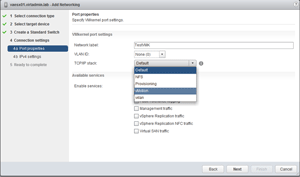
Although the vMotion and Provisioning IP stacks are created automatically in a vSphere 6 installation, they aren't actually utilized until a VMkernel interface is created that specifies one of them as its TCP/IP stack. It's entirely possible (and likely) that in most installations the TCP/IP stack is left set to the default, even for vMotion traffic. It's important to note that once a VMkernel interface is created, the TCP/IP stack it uses can't be changed; it must be deleted and re-created if the stack needs to be changed.
After creating a new VMkernel adapter, all that must be done to utilize the alternate stack is to select it when going through the wizard. Figure 8 shows the drop-down menu from the VMkernel creation wizard where the vMotion stack can be selected. Note that when the vMotion stack is chosen, vMotion traffic is automatically enabled on the adapter, and no other traffic type can be chosen. The same thing is true of the Provisioning stack. The only place Management, Fault Tolerance, VSAN, and other types of traffic can be configured at this time is on the default TCP/IP stack.
 [Click on image for larger view.]
Figure 8. Configuration of the vMotion TCP/IP stack on a new VMkernel adapter.
[Click on image for larger view.]
Figure 8. Configuration of the vMotion TCP/IP stack on a new VMkernel adapter.
Configuring custom TCP/IP stacks in vSphere can be an effective way to achieve a more elegant design than was possible prior to vSphere 5.5. It's not always necessary and could add unnecessary complexity if configured without being warranted, but it's great that VMware has provided this option in case it is needed.
About the Author
vExpert James Green has roughly a decade of experience as an IT administrator, architect and consultant in a variety of organizations. He's highly certified, and continues to purse professional certifications to increase his breadth and depth of knowledge. He has always been passionate about writing and speaking, and discussing the marriage of cutting-edge technology and business is one of his favorite activities. He works for ActualTech Media, www.actualtech.io.