How-To
How To Set Up an NFS Server on Windows Server 2012
In five minutes, you could have one, too.
While working on an article about using vRealize Log Insight's (vRLI) built-in archiving utility, I needed an NFS server to act as its archive repository. I have a Windows Server 2012 in my lab and decided to use it as the NFS repository. Although the process of setting the NFS server is relatively easy, I found it to be unintuitive. In this article I'll walk you through the process of setting up the NFS server and then mounting it with a Linux system, using it as a vRLI repository, and eventually using it as a datastore on an ESXi host.
Setting up the Server
As the base operating system for the NFS server, I used a virtual machine with 2 vCPUs with 16GB of RAM running on a ESXi 6.5 host running Windows Server 2012 R2 Essentials.
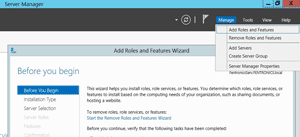
After logging into my Windows Server 2012 as Administrator, I launched Windows Server Manager by typing "ServerManager.exe" in the "run command" window. I then clicked the Manage tab and clicked Add Roles and Features (Figure 1).
 [Click on image for larger view.]
Figure 1.Adding Roles and Features within Windows Server Manager in Windows Server 2012.
[Click on image for larger view.]
Figure 1.Adding Roles and Features within Windows Server Manager in Windows Server 2012.
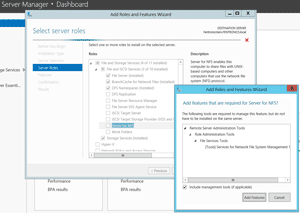
Once in the Roles and Features Wizard, I clicked Next, selected Role-based or feature-based installation, clicked Next, clicked Next again, expanded the File and Storage Services, expanded File and iSCSI Services, checked the Server for NFS checkbox, and clicked Next. When the "Add features that are required for Server for NFS?" dialog box appeared (Figure 2), I clicked Add Features, then Next, and lastly Install. It took about one minute for the NFS feature to finish installing, including a required reboot.
 [Click on image for larger view.]
Figure 2. Adding file service tools.
[Click on image for larger view.]
Figure 2. Adding file service tools.
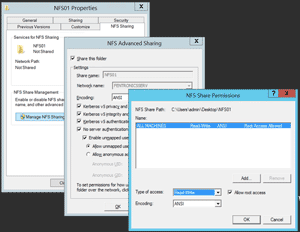
After Windows Server 2012 restarted, I logged back in and added an NFS share. First I created a new folder on my desktop called "NFS01," right-clicked the NFS01 folder, clicked Properties, selected the NFS Sharing tab, clicked the Manage NFS Sharing button, checked the Share this folder check box, clicked the Permissions button, checked Allow root access, clicked OK, then Apply, and finally OK (see Figure 3).
 [Click on image for larger view.]
Figure 3. Creating an NFS share.
Connecting a Linux System
[Click on image for larger view.]
Figure 3. Creating an NFS share.
Connecting a Linux System
After I set up the NFS server, I initially tested it by connecting to it from a Linux system (Ubuntu 14.04) by doing the following:
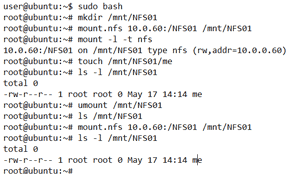
I first became the root user, then created a mount point, mounted the NFS filesystem on the mount point, listed the NFS filesystem, created a new file, listed the file, changed back to my home directory, unmounted the NFS filesystem, listed the file directory (which was now empty), remounted the NFS filesystem and listed the file again.
I completed these steps using the commands shown in Figure 4. If you want to have the NFS filesystem mounted every time that you boot the server, you can put an entry in the /etc/fstab file on the Linux server.
 [Click on image for larger view.]
Figure 4. Mounting NFS in Linux.
vRealize Log Insight Repository
[Click on image for larger view.]
Figure 4. Mounting NFS in Linux.
vRealize Log Insight Repository
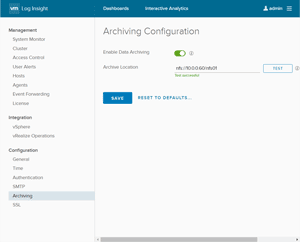
After I verified that I could access the NFS share from a Linux system, I configured vRealize Log Insight (vRLI) to use NFS as its archive repository. I started by logging into my vRLI instance as Admin from the vRLI interface, then went to the
Administration page, selected
Archiving, clicked
Enable Data Archiving, entered
nfs://10.0.0.60/NFS01 in the
Archive Location text box, clicked
Test and received a "Test successful" message (
Figure 5 ).
 [Click on image for larger view.]
Figure 5. Setting up an archive location for vRealize Log Insight.
Connecting an ESXi Host
[Click on image for larger view.]
Figure 5. Setting up an archive location for vRealize Log Insight.
Connecting an ESXi Host
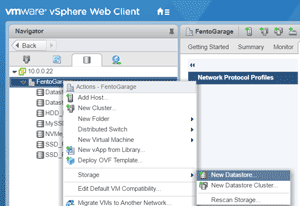
Since I had an NFS share mounted, I decided to try and attach it to an ESXi server. (
As a disclaimer, VMware does not endorse, recommend or support using Windows 2012 NFS as a datastore on ESXi, and it's not on their Hardware Compatibility List (HCL). The instructions here are to show that it can be done, not that it should be done.)
I mounted the NFS filesystem on my ESXi 6.5 host from a vCenter 6.5 Web Client without any problems by opening the vSphere Web Client, from where I selected Storage, right-clicked My Datacenter, then selected Storage > New Datastore.
 [Click on image for larger view.]
Figure 6.Adding the Windows NFS share to ESXi.
[Click on image for larger view.]
Figure 6.Adding the Windows NFS share to ESXi.
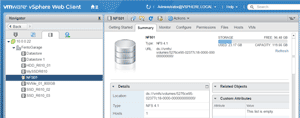
From the New Datastore Wizard, I clicked Next, selected NFS, clicked Next, selected NFS 4.1, clicked Next, supplied the name of the NFS filesystem and the IP address of the NFS server, clicked Next, clicked Next again, selected the ESXi hosts that would have access to the NFS filesystem, clicked Next, and clicked Finished (the steps are shown in 6). The NFS share then appeared in my vSphere Web Client (Figure 7).
 [Click on image for larger view.]
Figure 7. The Windows NFS share, displayed on the ESXi server.
[Click on image for larger view.]
Figure 7. The Windows NFS share, displayed on the ESXi server.
In total, it took me less than 5 minutes to create an NFS server on my Windows 2012 R2 Essentials server. I could mount its NFS share to a Linux system and use it as an archive repository for vRealize Log Insight (vLRI). I was even able to mount it to my ESXi host without any issues, although VMware does not officially support using it as a datastore.
About the Author
Tom Fenton has a wealth of hands-on IT experience gained over the past 30 years in a variety of technologies, with the past 20 years focusing on virtualization and storage. He previously worked as a Technical Marketing Manager for ControlUp. He also previously worked at VMware in Staff and Senior level positions. He has also worked as a Senior Validation Engineer with The Taneja Group, where he headed the Validation Service Lab and was instrumental in starting up its vSphere Virtual Volumes practice. He's on X @vDoppler.