How-To
How To Provide Internet Connectivity to AWS VPCs, Part 2
In the second part of the series, Brien Posey shows how to manually create an Internet gateway and associate it with a VPC.
In my first article, I explained the role of an Internet gateway in an Amazon Web Services (AWS) environment and I showed you how to tell whether or not an Internet gateway would be associated with a VPC. In this post, I want to continue the discussion by showing you how to manually create an Internet gateway and associate it with a VPC.
Create an Internet Gateway
In some real-world situations the creation of an Internet gateway is tied to the creation of a subnet. If you think back to the previous article, however, you'll recall that I created a new VPC and defined a subnet (a CIDR range) as part of the creation process. Because this subnet already exists, I'm going to use it as the basis for my new Internet gateway. If, however, you need additional subnets, then AWS will certainly allow you to create them.
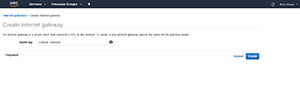
To get started, open the VPC Dashboard and then click on the Internet Gateways tab. From there, click on the Create Internet Gateway button. This takes you to the Create Internet Gateway screen. As you can see in Figure 1, the only thing that you have to do on this screen is to enter a name for the gateway that you're creating, and then click on the Create button.
 [Click on image for larger view.]
Figure 1. Enter a name for your new Internet gateway and click the Create button.
[Click on image for larger view.]
Figure 1. Enter a name for your new Internet gateway and click the Create button.
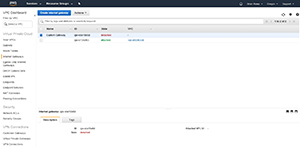
After a few seconds, you should see a message telling you that the gateway was created. Click the Close button to return to the Internet Gateways screen. As you can see in Figure 2, my new gateway (which I called Custom Gateway) was created, but it's currently in a detached state. In other words, the new gateway exists, but it doesn't do anything yet.
 [Click on image for larger view.]
Figure 2. The gateway has been created, but it is in a detached state.
[Click on image for larger view.]
Figure 2. The gateway has been created, but it is in a detached state.
Attaching the Internet Gateway to a VPC
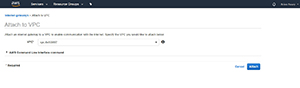
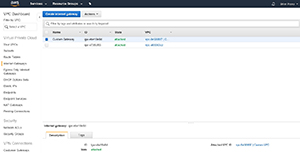
Because the newly created Internet gateway isn't yet connected to anything, the next step in the process is to attach it to a VPC. To do so, select the Internet gateway (as shown in Figure 2), and then choose the Attach to VPC command from the Actions menu. This will take you to the Attach to VPC screen shown in Figure 3. Just select the VPC that you want to use, as I have done, and click the Attach button. After a few seconds, you should be taken back to the Internet Gateways screen, and you should see that the gateway's state is now listed as Attached, as shown in Figure 4.
 [Click on image for larger view.]
Figure 3. Select the VPC that to which you want to attach the gateway.
[Click on image for larger view.]
Figure 3. Select the VPC that to which you want to attach the gateway.
 [Click on image for larger view.]
Figure 4. The new gateway is now attached to a VPC.
[Click on image for larger view.]
Figure 4. The new gateway is now attached to a VPC.
Modifying the Routing Table
When you create a VPC, a routing table is automatically created. This routing table automatically points to any new subnets that you add to the VPC. It does not, however, contain a route to the Internet gateway. For that, you're going to have to create a custom routing table. Fortunately, this is easier to do than it sounds.
Select the Route Tables tab and click on the Create Route Table button. Next, enter a name for the new routing table, and select a VPC, as shown in Figure 5. Click the create button to create the new routing table.
 [Click on image for larger view.]
Figure 5. Enter a name for the routing table and select the VPC that the routing table will service.
[Click on image for larger view.]
Figure 5. Enter a name for the routing table and select the VPC that the routing table will service.
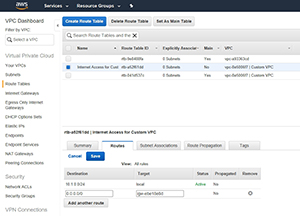
Once the new routing table is created, select it, and then select the Routes tab at the bottom of the screen. Click the Edit button, followed by the Add Another Route button. Now, enter 0.0.0.0/0 into the Destination field, and select the Internet gateway ID in the Target field, as shown in Figure 6. Now, click the Save button.
 [Click on image for larger view.]
Figure 6. Enter 0.0.0.0/0 as the destination and the Internet gateway ID as the target.
[Click on image for larger view.]
Figure 6. Enter 0.0.0.0/0 as the destination and the Internet gateway ID as the target.
If there are any subnets for which you want to provide Internet access, you'll need to explicitly associate those subnets. To do so, go to the Subnet Associations tab, and click the Edit button. Select the Associate checkbox for each subnet, and click Save.
Wrapping Up
As you can see, it's relatively easy to create an Internet gateway and link it to a VPC. Keep in mind, however, that there is still a bit of work that will need to be done before EC2 instances within the VPC will be able to access the Internet. Specifically, you may need to assign a new IP address to the EC2 instance, and you'll need to check your port rules to ensure that Internet traffic is allowed.
About the Author
Brien Posey is a 22-time Microsoft MVP with decades of IT experience. As a freelance writer, Posey has written thousands of articles and contributed to several dozen books on a wide variety of IT topics. Prior to going freelance, Posey was a CIO for a national chain of hospitals and health care facilities. He has also served as a network administrator for some of the country's largest insurance companies and for the Department of Defense at Fort Knox. In addition to his continued work in IT, Posey has spent the last several years actively training as a commercial scientist-astronaut candidate in preparation to fly on a mission to study polar mesospheric clouds from space. You can follow his spaceflight training on his Web site.