How-To
How To Create Amazon Elastic File Systems in AWS
AWS has made it relatively easy to create an Amazon EFS file system -- here's how to get started.
Although virtualization platforms such as VMware ESXi and Microsoft Hyper-V can provide high availability to virtual machines, many organizations also utilize the concept of guest clusters. Guest clusters are failover clusters in which the cluster nodes are running on virtual hardware rather than physical hardware. Guest clusters are often created when workloads that were previously running on physical hardware are virtualized, but some organizations also create guest clusters as a way of providing an additional layer of protection for specific applications.
Even though guest clustering has long been used in virtualized environments, it can still sometimes be a challenge to create guest clusters in public cloud environments. This is primarily due to the shared storage requirement that so often exists. Shared storage refers to a storage volume that can be accessed by all of the nodes within the cluster.
Amazon Web Services (AWS) provides shared storage capabilities through Amazon Elastic File System, or Amazon EFS as it's sometimes called. Unlike Amazon S3, which is the AWS object storage solution, EFS is specifically designed for creating file storage that can be both shared and scaled on demand. Amazon EFS is primarily designed to be accessed by Amazon Elastic Compute Cloud (EC2) instances, but it is possible to attach a physical server running in your own datacenter to Amazon EFS storage.
Steb-by-Step
Creating an Amazon EFS file system is simple to do. From the AWS list of services, go to the Storage section and click on the Amazon EFS option. From there, click on the big blue Create File System button.
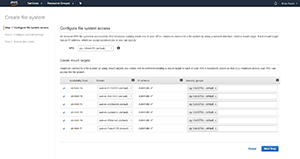
Creating an Amazon EFS file system is a three-step process. The first step involves telling AWS where to create the file system. More specifically, you'll need to associate the file system with a virtual private cloud and one or more availability zones, as shown in Figure 1. It's worth noting that while an Amazon EFS file system can be made accessible across availability zones, it cannot span regions. Each file system that you create is confined to a single region.
 [Click on image for larger view.]
Figure 1. Choose your virtual private cloud (VPC) and availability zones.
[Click on image for larger view.]
Figure 1. Choose your virtual private cloud (VPC) and availability zones.
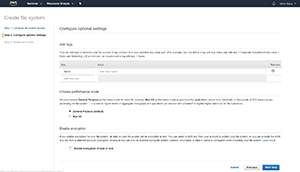
After making your selections, click Next, and you'll be taken to the Configure Optional Settings screen. As you can see in Figure 2, there are three sections within this screen. As the screen's name suggests, however, all of the settings within these sections are optional.
 [Click on image for larger view.]
Figure 2. You can configure optional settings in Step 2 of setting up the Amazon EFS.
[Click on image for larger view.]
Figure 2. You can configure optional settings in Step 2 of setting up the Amazon EFS.
The first section on this screen is the Add tags section. Nearly any AWS object that you create (even non-storage objects) includes the option of adding tags. Tags provide you with the ability to classify the object that you're creating, thereby acting as a form of documentation for the object, and making the object easier to locate in the future. If you want to know a little bit more about how tagging works, then check out my blog post.
The screen's middle section allows you to choose the file system's performance mode. AWS gives you two choices: General Purpose and Max I/O. The General Purpose option is suitable for the vast majority of use cases. The Max I/O option is generally reserved for situations in which large numbers of EC2 instances (anywhere from dozens of instances to thousands) are going to be simultaneously using the file system. If you aren't envisioning quite that massive of a workload, then you're going to be better off using the General Purpose option, because it has a lower latency.
The third and final option on this screen is Enable encryption. There's no rule that says that you have to encrypt your file system, but if you want an additional degree of privacy, then you can enable encryption by simply selecting a checkbox.
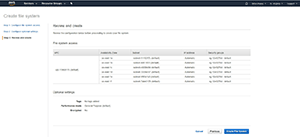
When you finish configuring the optional settings, click Next Step, and you'll be taken to the final step in the creation process, Review and create. As you can see in Figure 3, you don't actually have to configure anything during this step. You'll simply need to review the settings that you've specified, and then click on the Create File System button to generate the new file system.
 [Click on image for larger view.]
Figure 3. Review the configuration options that you've selected, and then click on the Create File System button.
[Click on image for larger view.]
Figure 3. Review the configuration options that you've selected, and then click on the Create File System button.
Wrapping Up
As you can see, AWS has made it relatively easy to create an Amazon EFS file system. You can attach an EC2 instance to the file system by using the NFSv4 protocol. The NFS protocol is probably most commonly associated with Linux OSes, but Windows also has a built-in NFS client.
About the Author
Brien Posey is a 22-time Microsoft MVP with decades of IT experience. As a freelance writer, Posey has written thousands of articles and contributed to several dozen books on a wide variety of IT topics. Prior to going freelance, Posey was a CIO for a national chain of hospitals and health care facilities. He has also served as a network administrator for some of the country's largest insurance companies and for the Department of Defense at Fort Knox. In addition to his continued work in IT, Posey has spent the last several years actively training as a commercial scientist-astronaut candidate in preparation to fly on a mission to study polar mesospheric clouds from space. You can follow his spaceflight training on his Web site.