How-To
Enforce Instance Compliance in Amazon EC2 with State Manager
The State Manager allows you to specify various actions that should be performed against an Amazon EC2 instance.
One of the more useful features found in the Amazon Elastic Compute Cloud (EC2) dashboard is the State Manager. The State Manager allows you to specify various actions that should be performed against an Amazon EC2 instance. You might, for example, add a file to the instance, change a registry key or take a snapshot. Whatever the action, you can not only automate it, but also schedule a compliance check (or a repeat of the action) to occur on a periodic basis.
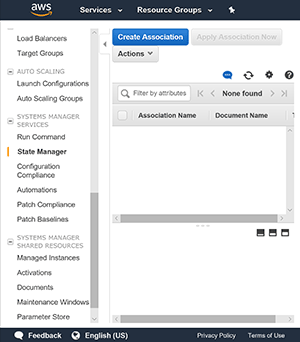
Begin the process by opening the Amazon EC2 dashboard, and clicking on the State Manager container. Now, click on the Create Association button, which you can see in Figure 1.
 [Click on image for larger view.]
Figure 1. The Create Association button.
[Click on image for larger view.]
Figure 1. The Create Association button.
The first thing you'll need to do is assign a name to the association that you're creating. Technically, this is an optional step, but it's a good idea to not only use a name, but to use a descriptive name that you can use to identify the association's purpose.
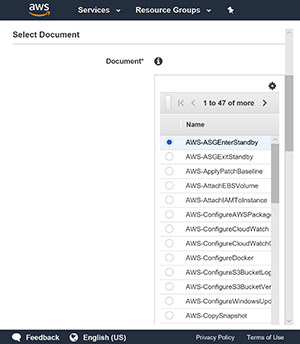
As you move further down the screen, you'll come to the Select Document section, which you can see in Figure 2. The document names are somewhat similar to PowerShell cmdlets (without the verb-noun structure), and like PowerShell cmdlets, some of the document names are kind of cryptic. If you scroll down a little bit, however, the console gives you a description of the currently selected document.
 [Click on image for larger view.]
Figure 2. Select the document you want to use.
[Click on image for larger view.]
Figure 2. Select the document you want to use.
The most important thing to understand about the document association process is that you can only select one document per association. In other words, you aren't going to be creating super complex associations that are made up of dozens of associations. The State Manager doesn't work that way. What you can do, however, is bind multiple associations to one or more EC2 instances.
This is actually the next step in the process. The console asks you to select the targets to which you wish to bind the association. There are two ways of accomplishing this. One method involves creating a static association by manually selecting the EC2 instances that you want to use within the association. The other option, and the one that I prefer, is to base the association around the use of tags.
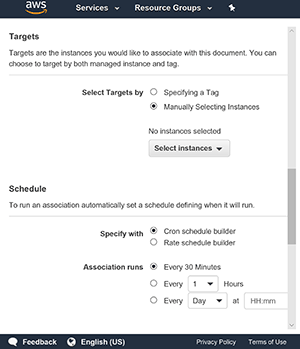
The reason why I prefer using tags rather than specifying EC2 instances is because tags allow the association to behave much more dynamically than would otherwise be possible. The key to making this work, of course, is to have a very well organized tag eco system in place (or to create one). You can see the target selection portion of the interface in Figure 3.
 [Click on image for larger view.]
Figure 3. You can opt to specify EC2 instances or tags.
[Click on image for larger view.]
Figure 3. You can opt to specify EC2 instances or tags.
The next thing that you need to do, which you can also see in Figure 3, is specify a schedule. As you can see, the scheduler is quite straightforward. There are two different schedulers that you can use, and either one of them will let you control the frequency with which the association will run.
In some ways, it's easy to just kind of glance over the scheduler because it's such a simple part of the interface. However, in my opinion the scheduler is the State Manager's killer feature. After all, it's one thing to be able to perform a bulk action against a group of instances (which the State Manager does). It's quite another thing to run a scheduled process that periodically checks to make sure that your action hasn't been undone. If you also use tags rather than relying on the static assignment of virtual machine instances, you can even make sure that your action is automatically performed on any newly created instances, which is great for ensuring compliance.
The last section in the interface is the Parameters section. I didn't create a screen capture for this section, because its appearance varies considerably depending on which document you choose. The document that you select defines the basic action that is to be performed by the association, while the parameters define the sepcifics of that action. If, for example, the document indicates that a registry key is to be added to an instance, the parameters section would give you a spot to specify the key name and the value that you want to assign.
When you've finished, you can create the association by clicking on the Create Association button at the bottom of the screen.
About the Author
Brien Posey is a 22-time Microsoft MVP with decades of IT experience. As a freelance writer, Posey has written thousands of articles and contributed to several dozen books on a wide variety of IT topics. Prior to going freelance, Posey was a CIO for a national chain of hospitals and health care facilities. He has also served as a network administrator for some of the country's largest insurance companies and for the Department of Defense at Fort Knox. In addition to his continued work in IT, Posey has spent the last several years actively training as a commercial scientist-astronaut candidate in preparation to fly on a mission to study polar mesospheric clouds from space. You can follow his spaceflight training on his Web site.