How-To
Backing Up AWS Resources
Amazon Web Services makes it relatively easy to create a backup plan.
Any organization that hosts data or workloads in the Amazon cloud must think about how it can protect its cloud-based resources against loss. While there are a number of third-party backup vendors who offer solutions for Amazon Web Services (AWS), AWS also has its own backup solution, which is simply called AWS Backup.
Like other AWS services, the cost for using AWS Backup is based on usage. AWS bills its backup customers on a per-GB basis, with the price varying depending on the type of backup that's being created. Amazon Electric File System (EFS) cold backups, for example, are billed at a penny per GB, while DynamoDB backups are billed at 10 cents per GB. You can find the full pricing guide here.
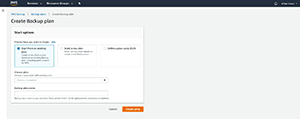
AWS makes it relatively easy to create a backup plan. To get started, choose AWS Backup from the list of services (it's in the Storage section), and then click on the big orange Create Backup Plan button. This will cause the console to display the Create Backup Plan screen, which you can see in Figure 1.
 [Click on image for larger view.]
Figure 1. This is the Create Backup Plan screen.
[Click on image for larger view.]
Figure 1. This is the Create Backup Plan screen.
As you can see in Figure 1, AWS gives you three different options for getting started. The first option is to start with an existing plan. This option essentially clones an existing backup plan. You are then free to modify the clone to meet your needs. This is a simple way to get up and running if you already have a backup plan, because it doesn't require you to start from scratch.
The second option is called Build a New Plan. This option lets you create a backup plan from scratch. I'll show you how this works in a moment.
The final option is to create a backup plan using a JSON file. This option is kind of like creating a backup plan based on an existing plan. The difference is that rather than simply cloning an existing backup plan, you would download a JSON file that outlines the plan's structure. You can then modify the JSON file as needed, and then use it to create a new plan.
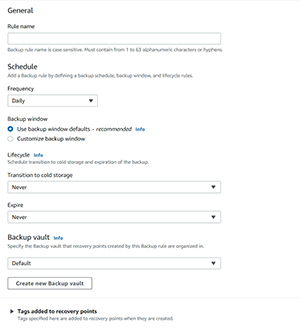
So let's take a look at what's involved in creating a plan from scratch. When you select the Build a New Plan option, you're prompted to enter a name for the plan that you want to create. Next, scroll down and you'll be taken to the Backup Rule Configuration section, which you can see in Figure 2.
 [Click on image for larger view.]
Figure 2. This is the Backup Rule Configuration section.
[Click on image for larger view.]
Figure 2. This is the Backup Rule Configuration section.
A backup plan is essentially a collection of rules. Each backup plan has to include at least one rule, but can contain multiple rules.
The first step in defining a rule is to enter a name for the rule. Because backup plans tend to become more complex over time, I recommend using something descriptive.
The next step in the process is to specify the frequency with which the rule runs, and to define the backup window. The frequency determines whether the backup should run daily, weekly, monthly and so on, while the backup window determines the time of day when the backup will run. AWS recommends that you use the default backup window, but you can use a custom backup window instead.
The next section lets you manage the backup's lifecycle. You can set a time period after which the backup gets moved to cold storage. You can also set an expiration date for the backup, after which time the backup will be purged. Keep in mind that items in cold storage have a minimum retention period of 90 days, so if you opt to use cold storage and an expiration date, the expiration date must take the 90-day requirement into account.
The last option in this section is to create a backup vault. The backup vault is the target to which the backup will be written. You can use the default backup vault, or you can opt to create a new backup vault (or use an existing vault).
Once you've populated these options, scroll down to the bottom of the screen, and you'll find options for tagging your recovery points and for tagging your backups. The use of tags is optional, but tagging can help you keep track of your backup resources.
When you're done, click the Create Plan button to create your backup plan. In the second part of this series, I'll show you how to use your backup plan to protect AWS resources.
About the Author
Brien Posey is a 22-time Microsoft MVP with decades of IT experience. As a freelance writer, Posey has written thousands of articles and contributed to several dozen books on a wide variety of IT topics. Prior to going freelance, Posey was a CIO for a national chain of hospitals and health care facilities. He has also served as a network administrator for some of the country's largest insurance companies and for the Department of Defense at Fort Knox. In addition to his continued work in IT, Posey has spent the last several years actively training as a commercial scientist-astronaut candidate in preparation to fly on a mission to study polar mesospheric clouds from space. You can follow his spaceflight training on his Web site.