How-To
Getting Started with Blockchain in AWS
You can use the Amazon Managed Blockchain service in Amazon Web Services to set up your own blockchain network based on Hyperledger Fabric.
Blockchain technology has been seeing rapid adoption over the past couple of years, so it's hardly surprising that Amazon has added a blockchain solution to its Amazon Web Services (AWS) platform. You can access Amazon Managed Blockchain by logging into the AWS portal, and selecting the Amazon Managed Blockchain option from the Blockchain section within the list of services.
Because blockchain is relatively new to the AWS platform, it's currently only supported in a couple of regions. Another limitation to be aware of is that currently the only supported blockchain framework is Hyperledger Fabric, although Amazon will be adding support for Ethereum in the near future.
Deploying blockchain on AWS consists of four primary steps. First, you'll need to create a blockchain network based on your chosen blockchain framework (again, Hyperledger Fabric is currently the only choice). Once that network is up and running, you can invite other AWS account holders to participate in your blockchain, and then you can begin adding peer nodes. The last step in the process is to deploy applications that utilize your blockchain network. So with that said, let's take a look at how to set up a blockchain network.
As previously mentioned, the first step in setting up a blockchain network is to choose the framework that you want to use. If you look at Figure 1, you can see that Hyperledger Fabric is currently the only available choice, but you can choose between deploying the Starter Edition and the Standard Edition.
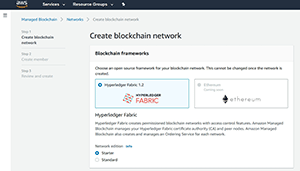 [Click on image for larger view.] Figure 1.Right now Hyperledger Fabric is the only available choice.
In case you're wondering, the Starter Edition is intended primarily for testing purposes, but is billed at a lower hourly rate. Amazon's pricing example lists the hourly cost of a Starter Edition network at $0.676, and the hourly cost of a Standard Edition network at $1.93. Keep in mind that these estimates are based on specific configurations, and that pricing will vary if you configure your blockchain network differently.
The next step in the process is to provide a network name and an optional description. The network name can be up to 64 characters long. Although entering a description is optional, it's a good idea to provide a detailed description outlining when and why the blockchain network was created, as well as its intended purpose.
Once you've entered a network name, the next thing you'll have to specify is the voting policy that you want to use. In blockchain networks, changes to the network are put to a vote. Any network member can propose a change to the network, but that change must be voted on. Such a change might be something like inviting or removing network members. The voting policy allows you to set the percentage of members who must agree to a proposed change in order for the change to be accepted.
The voting policy also includes a Proposal Duration setting. This setting controls how much time members are given to cast their votes before the voting period ends. The proposal duration can be as short as an hour, or as long as 168 hours (one week). You can see these settings in Figure 2.
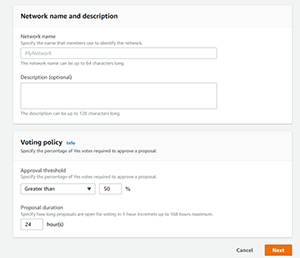 [Click on image for larger view.] Figure 2.You need to provide a network name and set a voting policy.
The next step in the process is to create the first network member. Blockchain networks are made up of discreet members (each of whom have voting rights), and you will need to name the first member before you'll be able to create the network. As you can see in Figure 3, member names can be up to 64 characters in length, and you can also enter a description of the member.
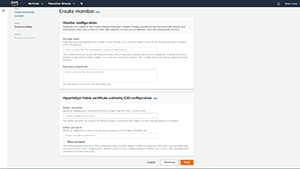 [Click on image for larger view.] Figure 3.You must create your first member as a part of the network creation process.
While you're at it, you'll also need to specify an administrator name and password. The password must be between eight and 32 characters in length, and has to contain uppercase and lowercase letters, and at least one digit.
When you're done, click Next. At this point, you'll be taken to a summary screen where you'll have the opportunity to review your configuration, as shown in Figure 4. Assuming that everything on this screen looks good, click the Create Network and Member button to create your blockchain network.
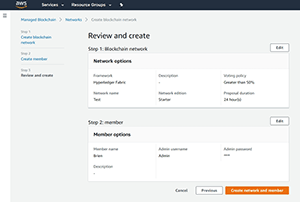 [Click on image for larger view.] Figure 4.Make sure that all of the information on the summary screen is correct prior to creating your blockchain network.
Amazon provides open source documentation that you can reference for key tasks and code samples, along with a short tutorial and key concepts to help you understand the fundamental building blocks of an Amazon Managed Blockchain network.
About the Author
Brien Posey is a 22-time Microsoft MVP with decades of IT experience. As a freelance writer, Posey has written thousands of articles and contributed to several dozen books on a wide variety of IT topics. Prior to going freelance, Posey was a CIO for a national chain of hospitals and health care facilities. He has also served as a network administrator for some of the country's largest insurance companies and for the Department of Defense at Fort Knox. In addition to his continued work in IT, Posey has spent the last several years actively training as a commercial scientist-astronaut candidate in preparation to fly on a mission to study polar mesospheric clouds from space. You can follow his spaceflight training on his Web site.