How-To
Installing ESXi on Raspberry Pi , Part 1
After earlier discussing VMware's ESXi on Arm Fling, Tom Fenton details an overview of his experience installing it.
In a previous article, I discussed the release of VMware's ESXi on Arm Fling. In this article, I will give an overview of my experience installing it.
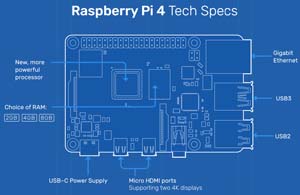
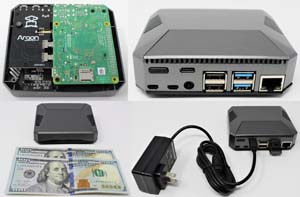
The ESXi on Arm Fling site has a list of supported Arm hardware, broken down into three categories: Datacenter, Near Edge and Far Edge. Under Far Edge is the Raspberry Pi 4B, which is the device I will be using in this article due to its low cost. The model, with 8GB, cost less than $100. It has two USB3 and two USB2 ports, two Micro HDMI ports and Gigabit Ethernet.
 [Click on image for larger view.]
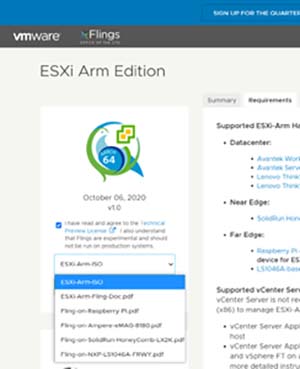
On its Fling site, VMware makes it very clear that ESXi on Arm is not an officially supported product and that it should not be used for production workloads. The company also states it will expire in 180 days, after which point it will need to be reinstalled. An Arm device running ESXi can be managed with either the ESXi Host Client or vCenter Server, but VMware cautions against running it on a production vCenter Server.
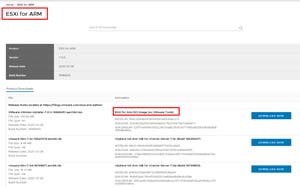
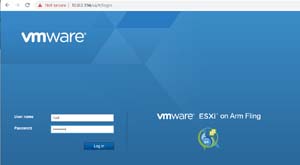
Like other Flings, ESXi on Arm is free, however, unlike other Flings, you need to download it from VMware using your MyVMware account (creating an account is free). I was able to log in to MyVMware and download it without any problems.
 [Click on image for larger view.]
I then went back to the Fling page and downloaded the ESXi-on-Raspberry-Pi and ESXi-ARM-Fling-Doc PDFs.
 [Click on image for larger view.]
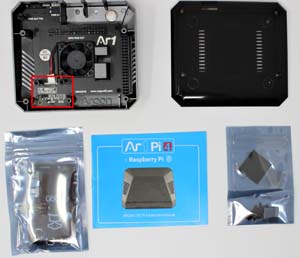
The installation guide included a section on supported hardware. From this list, I determined what I needed and then bought those items from Amazon. The total price of all the components came out to just under $200.
| Item Needed |
Part Found |
Cost |
| Power supply; |
CanaKit 3.5A Raspberry Pi 4 Power Supply (USB-C) |
$9.99 |
| Raspberry Pi 4 Model B 8GiB |
CanaKit Raspberry Pi 4 Model B Quad Core 64 Bit WiFi Bluetooth (8GB) |
$89.10 |
| Case and cooling fan combo |
Argon ONE Raspberry Pi 4 Case with Cooling Fan and Power Button |
$25.00 |
| 1 x micro SD card for UEFI firmware |
Samsung PRO Endurance 32GB 100MB/s (U1) MicroSDXC Memory Card |
$8.99 |
| 1 x USB drive for installer ISO |
Samsung FIT Plus USB 3.1 Flash Drive 128GB - (MUF-128AB/AM) |
$19.99 |
| 1 x USB drive for the actual ESXi installation |
PNY Elite-X Fit 128GB USB 3.0 Flash Drive - Read Speeds up to 200MB/sec (P-FDI128EXFIT-GE), Silver |
$19.99 |
| Micro HDMI to HDMI adapter |
GANA Micro HDMI to HDMI Adapter Cable, Micro HDMI to HDMI Cable (Male to Female) |
$8.99 |
 [Click on image for larger view.]
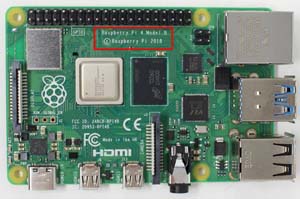
I unpacked the components and verified that the Raspberry Pi was, in fact, version 4 model B.
 [Click on image for larger view.]
The Argon One case was very well built and appeared to be made of die-cast metal. I set the fan jumper to Always On mode.
 [Click on image for larger view.]
I attached the Raspberry Pi to the extension board and screwed the bottom of the case to the top. The device fit nicely inside the case.
 [Click on image for larger view.]
From this point on, I followed the steps listed in the user guide to install ESXi on the Raspberry Pi. Below is a summary of my experience with this process.
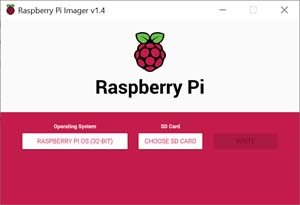
First, I downloaded the Raspberry Pi Imager Tool for Windows and used it to install Pi OS onto the SD card. This image is used to make sure the Raspberry Pi microcode is up to date.
 [Click on image for larger view.]
I attached the Pi to a monitor, keyboard and my network, and then powered it on. I worked my way through the setup wizard, let it check for updates and then rebooted it. I logged back onto the device and checked for the latest EEPROM by entering sudo pi-eeprom-update -a. Then I rebooted the device again.
Following the instructions in the ESXi on Arm guide, I set up my SD card to be used for UEFI booting. This process involved downloaded and writing firmware files to the SD card.
I inserted the SD card into the Pi, booted it up, and then used the ESC key to enter the BIOS and configure it per the guide's instructions.
I wrote the ESXi Installer ISO to the Samsung FIT Plus Flash Drive and then plugged it in to one of the USB ports and plugged in the PNY Elite-X Fit, which I intended to install ESXi onto via another USB port. When installing ESXi, I needed to enter the BIOS again and select the boot drive; using two different brands of USB drives made it easier to identify which drive contained the ESXi Installer. I was able to install ESXi without running into any issues.
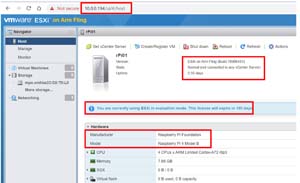
After ESXi had finished installing, I rebooted the Pi and configured it to boot from the USB drive. After letting the Pi boot up on ESXi, I was able to monitor it with ESXi Host Client by entering its IP address in a web browser.
 [Click on image for larger view.]
The summary page showed that it had an ARM Cortex-A72 CPU.
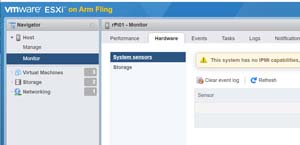
 [Click on image for larger view.]
Unfortunately, I could not see any system sensor data, but I did notice that ESXi was using less than 2GB of RAM, leaving 6GB for virtual machines (VMs).
 [Click on image for larger view.]
Conclusion
ESXi on Arm is a transformation for VMware as it is the first non-x86 processor that is supported with ESXi.
It took me a couple hours to install ESXi on a Raspberry Pi, but the installation process went smoothly. Overall, I was happy with the look and the build quality of the Argon One case, and the Pi has been continuing to run without any issues. In my next article, I will show you how I added USB-backed storage, as well as how I created and ran a VM on the Pi.
About the Author
Tom Fenton has a wealth of hands-on IT experience gained over the past 30 years in a variety of technologies, with the past 20 years focusing on virtualization and storage. He previously worked as a Technical Marketing Manager for ControlUp. He also previously worked at VMware in Staff and Senior level positions. He has also worked as a Senior Validation Engineer with The Taneja Group, where he headed the Validation Service Lab and was instrumental in starting up its vSphere Virtual Volumes practice. He's on X @vDoppler.