How-To
Building a Desktop-as-a-Service Environment in the AWS Cloud, Part 1
Brien Posey shows how to deploy an AWS based Active Directory infrastructure, and how to then create a Desktop-as-a-Service (DaaS) deployment that leverages that cloud-based directory.
With so much of the world still working remotely thanks to the pandemic, organizations are increasingly turning to Desktop-as-a-Service (DaaS) as a tool for ensuring that users are able to remotely work from standardized corporate desktops. AWS makes it relatively easy to deploy such an environment. In this blog post series, I am going to show you how to deploy an AWS based Active Directory infrastructure, and how to then create a DaaS deployment that leverages that cloud-based directory.
So as previously noted, the first step in the process is to create an Active Directory environment. Incidentally, it is possible to use your own on-premises Active Directory environment rather than creating a cloud-based directory service, but for the purposes of this blog post, I am going to create a directory service in the AWS cloud.
One thing that I need to explain before I get started is that if you are planning on using a managed directory service environment, then you should ideally create it at the time that you are setting up the DaaS environment. That's what I will be doing in this blog post. The reason why this is so important is because if you create a managed directory service ahead of time, there isn't an easy way to tell the DaaS environment to use it. Instead, you have to set up a connector, which adds extra cost and complexity. So that's the reason why I am going to create the directory service environment in conjunction with provisioning the DaaS environment.
To get started, log into the AWS console and choose the Workspaces option from the list of services (it's in the End User Computing section). When the console opens, click on the Get Started Now button, followed by the Launch button associated with Advanced Setup, shown in Figure 1.
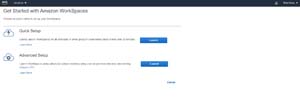 [Click on image for larger view.]Figure 1: Click the Launch button associated with Advanced Setup.
At this point, you will be taken to a screen that prompts you to select your directory type. As you can see in Figure 2, there are several different directory types to choose from. For the purposes of this blog post, I will be using the AWS Managed Microsoft AD option.
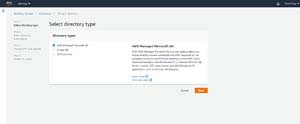 [Click on image for larger view.]Figure 2: Choose AWS Managed Microsoft AD as the directory type.
Choose AWS Managed Microsoft AD as the directory type, and click the Next button. This will take you to a screen that asks you to provide some configuration information for the directory service. The first decision that you will have to make is whether you want to host the directory service on Windows Server Standard Edition or Enterprise Edition. Both options include two domain controllers, but there is a big difference in price. Generally speaking, Standard Edition is usually the best fit for smaller organizations, whereas Enterprise Edition is optimized for a far greater number of directory objects and should be used by large organizations.
Once you have made your selection, enter a directory DNS name. As you can see in Figure 3, this needs to be a fully qualified domain name, but it does not have to be internet resolvable. It's OK to use an internal domain name.
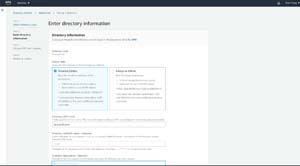 [Click on image for larger view.]Figure 3: This is the screen that is used to configure your directory service.
After providing a domain name, you have the option of entering a NetBIOS name. You usually won't have to worry about supplying a NetBIOS name, because AWS will create one automatically based on your domain name.
You also have the option of entering a description of the directory. Even though the description is optional, I highly recommend going ahead and entering a description. Your description might include details such as who created the directory service, for what purpose, and who is responsible for managing it.
Finally, you will need to enter and confirm a password. Your password will need to be between 8 and 64 characters in length, and include all of the usual complexity elements.
Click Next, and you will be taken to a screen asking you to choose the Virtual Private Cloud (VPC) with which the directory service should be associated. As you can see in Figure 4, this screen also asks you to choose two of your VPC's subnets. You should select existing subnets when possible, but the option does exist for creating new subnets if necessary. Click Next when you are done.
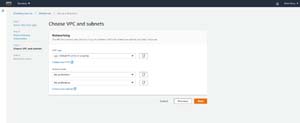 [Click on image for larger view.]Figure 4: Choose the VPC and subnets that you want to use for your directory.
At this point, you will be taken to a summary screen outlining the details of the Directory Service environment that you are about to create. You can see what this screen looks like in Figure 5. Take a moment to make sure that all of these details appear to be correct, and then click the Create Directory button.
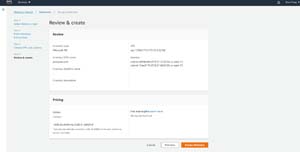 [Click on image for larger view.]Figure 5: Take a moment to review your configuration options.
It can take several minutes for the new directory service to be created, but when the process completes you should see it listed on the Directories tab, as shown in Figure 6.
 [Click on image for larger view.]Figure 6: The new directory service has been created.
Now that the directory service infrastructure is in place, it's time to begin creating the DaaS environment. I will show you how to do that in Part 2.
About the Author
Brien Posey is a 22-time Microsoft MVP with decades of IT experience. As a freelance writer, Posey has written thousands of articles and contributed to several dozen books on a wide variety of IT topics. Prior to going freelance, Posey was a CIO for a national chain of hospitals and health care facilities. He has also served as a network administrator for some of the country's largest insurance companies and for the Department of Defense at Fort Knox. In addition to his continued work in IT, Posey has spent the last several years actively training as a commercial scientist-astronaut candidate in preparation to fly on a mission to study polar mesospheric clouds from space. You can follow his spaceflight training on his Web site.