How-To
How to Save Money by Automating EBS Snapshot Lifecycles in AWS Cloud
Brien Posey shows how to use the EBS Lifecycle Manager in the AWS cloud to build automated lifecycle policies for your EBS snapshots and avoid money-wasting proliferation.
One of the problems that often stems from using EBS snapshots is that of snapshot proliferation. As time goes on, an organization often accumulates an excessive number of snapshots, thus wasting money on storing outdated snapshots. One of the most effective ways to deal with this problem is to use the EBS Lifecycle Manager to build automated lifecycle policies for your snapshots. In this blog post, I will show you how.
To get started, open the EC2 console and then expand the Elastic Block Store tab and click on Lifecycle Manager. When you do, you will see a screen containing a Create New Lifecycle Policy window. Choose the EBS Snapshot Policy option from the dropdown list and click Next. You can see what this looks like in Figure 1.
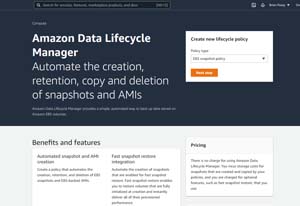 [Click on image for larger view.] Figure 1: Set the policy type to EBS Snapshot Policy.
Click Next Step and you will be taken to the screen shown in Figure 2. The first thing that you will need to do on this screen is to select the resources for which the new policy should apply. You can target the new policy toward either volumes or instances. Regardless of which option you choose however, you can't select the specific volumes or instances that you want to use. Instead, you will have to apply the policy based on resource tag values.
Amazon presumably makes you use tags rather than volume or instance names because tags scale more easily. After all, you wouldn't want to have to edit a list of instances every time you create or delete an EC2 instance. By using tags, you can make it so that the policy applies to your volumes or instances automatically. All you have to do is to enter one or more tag/value pairs. The policy will be applied to any volume or instance (depending on which you select) for which the object's tags match those specified within the policy.
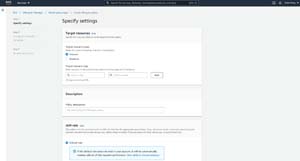 [Click on image for larger view.] Figure 2: You will have to use resource tags to apply the new policy to your EBS resources.
The next step is to enter a description for the policy that you are creating. The description is required and helps to identify the policy and its purpose.
Next, you will need to choose the IAM role with which the policy should be associated. The IAM role is what gives the policy permission to manage snapshots on your behalf. You can assign an IAM role of your own choosing if you like, but using the default role is normally all that is needed.
The bottom portion of the screen contains two additional settings that do not appear in Figure 2. The first of these settings allows you to apply tags to the policy. These tags are optional and help to identify the policy, whereas the tags mentioned earlier are used to identify the instances or volumes that the policy will act on. The other remaining setting is the Policy Status option. This is where you can choose to enable the policy or leave it disabled until you choose to manually enable it later on.
Click Next, and you will be taken to the Configure Schedule screen shown in Figure 3. There are two things that you will need to do on this screen.
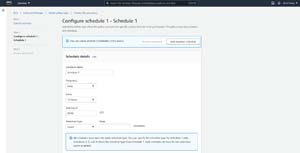 [Click on image for larger view.] Figure 3: You will need to set up a schedule for the policy.
The first, and most obvious, thing that you will have to do is to set up a schedule defining when the policy should run. By default the policy will run every day at 9:00 AM and 9:00 PM UTC, but you can change the schedule to meet your own needs.
If you look back at Figure 3, you will also notice the Add Another Schedule button. You can set up to four separate schedules for each policy. However, these schedules must all be configured to use the same retention type.
This brings me to the second thing that you will need to do on the Configure Schedule screen. You are going to need to set the retention type to be used by the policy. By default, the retention type is set to Count, which lets you specify how many snapshots you want to keep for each volume or instance. However, you can also manage snapshots by age.
When you are done, click on the Review Policy button. This will take you to the Review and Create screen, which gives you a chance to review your policy settings, as shown in Figure 4. Take a moment to make sure that all of the settings are correct and then click the Create Policy button. Your new policy will now be created.
 [Click on image for larger view.] Figure 4: Verify that your settings are correct and click Create Policy.
About the Author
Brien Posey is a 22-time Microsoft MVP with decades of IT experience. As a freelance writer, Posey has written thousands of articles and contributed to several dozen books on a wide variety of IT topics. Prior to going freelance, Posey was a CIO for a national chain of hospitals and health care facilities. He has also served as a network administrator for some of the country's largest insurance companies and for the Department of Defense at Fort Knox. In addition to his continued work in IT, Posey has spent the last several years actively training as a commercial scientist-astronaut candidate in preparation to fly on a mission to study polar mesospheric clouds from space. You can follow his spaceflight training on his Web site.