How-To
Migrating an AWS Lightsail Instance to EC2
Expert advice for organizations that outgrow AWS Lightsail and need to move their web applications to the more scalable EC2 platform.
AWS Lightsail is designed to be an easy and cost-effective platform for hosting web applications. Oftentimes however, organizations have eventually found that they have outgrown Lightsail and need to move their web application to a more scalable platform such as EC2. Thankfully, Amazon provides a direct migration path from Lightsail to EC2. In this blog post, I will show you how to perform such a migration.
To get started, log in to the Lightsail console and select the instance that you want to migrate. Next, select the image's Snapshots tab and then click on the Create Snapshot link, shown in Figure 1. Now, provide a name for the snapshot and then click on the Create icon.
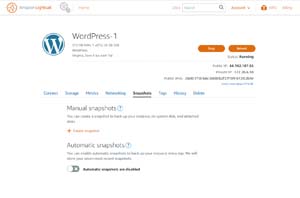 [Click on image for larger view.] Figure 1: Create a snapshot of your Lightsail instance.
Once the snapshot has been created, click on the snapshot's menu icon and then select the Export to Amazon EC2 option, shown in Figure 2. When you do, you will see a warning message indicating that you will be billed at the EBS rate and that the export process could take several hours to complete. Click on the Yes, Continue button to begin the export process. This export process will cause the snapshot to be converted to an Amazon Machine Image (AMI).
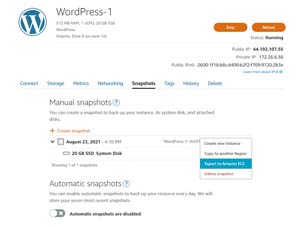 [Click on image for larger view.] Figure 2: Export the snapshot to EC2.
When the export process finishes, you should see a message like the one shown in Figure 3, indicating that the snapshot has been exported to Amazon EC2. As you can see in the figure, there is a link within the message that you can click on to open the EC2 console. Go ahead and click on that link. Although you can open the EC2 console manually instead, using the link to open the console simplifies the next step in the process.
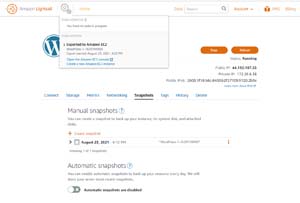 [Click on image for larger view.] Figure 3: Click on the Open the Amazon EC2 Console link.
Upon opening the EC2 console (assuming that you used the Open the Amazon EC2 Console link), you will be taken to a list of AMIs. The console will automatically filter the list of AMIs so that only the AMI that was created from the snapshot is shown. You can see what this looks like in Figure 4.
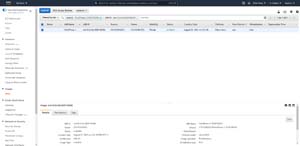 [Click on image for larger view.] Figure 4: This AMI was created from a snapshot of a Lightsail instance.
With the AMI selected, click on the Launch button. When you do, AWS will ask you what type of instance you want to create. The instance type selection process allows you to choose the hardware configuration on which the EC2 instance will be hosted. As such, you will need to select a hardware configuration that is adequate for the anticipated workload, as shown in Figure 5.
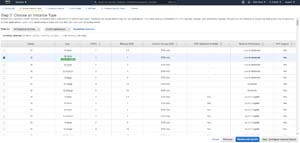 [Click on image for larger view.] Figure 5: Choose the type of instance that you want to create.
Click Next and you will be taken to the Configure Instance Details screen, shown in Figure 6. While you may be able to simply accept the default values, it is important to review the various settings (especially the Network and Subnet settings) to make sure that they are appropriate for the instance that you are creating.
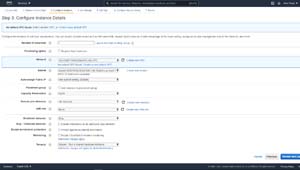 [Click on image for larger view.] Figure 6: Configure the instance details to meet your instance's needs.
Click Next, and you will be taken to the Add Storage screen. The new instance will already be configured to use a volume configuration that matches that of your Lightsail instance. You can add an additional volume if you need to, but in most cases you can just click Next to accept the default configuration.
At this point, you will see the Add Tags screen. Add any necessary tags to the new instance and then click Next.
Now the EC2 console will display the Configure Security Group screen. In EC2, a security group is essentially just a software firewall. The default security group rule allows remote access to the instance (SSH for Linux or RDP for Windows). This rule is necessary in order to be able to manage the instance, although you should consider restricting the source so that not just anyone can remotely manage the instance. In most cases, this means setting the source value to match your IP address or your subnet.
You will also need to add any other required rules. In the case of a Web server for example, you may need a rule to allow HTTP traffic on Port 80.
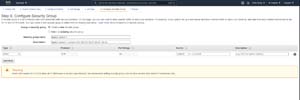 [Click on image for larger view.] Figure 7: You will need to configure a security group to provide the appropriate access to your instance.
Finally, click Review and Launch. When you do, you will be taken to a screen that allows you to review your configuration settings. Take a moment to review these settings to be sure that they are correct. Assuming that everything looks good, click on the Launch button. At that point, you will be prompted to select the key pair that you wish to use to access the instance. Make your selection and then click the Launch Instance button to complete the migration process.
About the Author
Brien Posey is a 22-time Microsoft MVP with decades of IT experience. As a freelance writer, Posey has written thousands of articles and contributed to several dozen books on a wide variety of IT topics. Prior to going freelance, Posey was a CIO for a national chain of hospitals and health care facilities. He has also served as a network administrator for some of the country's largest insurance companies and for the Department of Defense at Fort Knox. In addition to his continued work in IT, Posey has spent the last several years actively training as a commercial scientist-astronaut candidate in preparation to fly on a mission to study polar mesospheric clouds from space. You can follow his spaceflight training on his Web site.