How-To
Deploying Containers in AWS Lightsail
Primarily geared toward hosting web applications, Lightsail now can used as a container hosting platform.
AWS Lightsail is a Virtual Private Server environment that is designed to for use by small businesses or developers. Although Lightsail is primarily geared toward hosting web applications, Amazon made some changes to Lightsail that now allow it to also be used as a container hosting platform.
Before you will be able to create containers on Lightsail, you will need to deploy a container service. A container service is simply a compute resource upon which you can deploy containers. To get started, log into AWS and select Lightsail from the list of services (it's in the Compute section). Once Lightsail loads, select the Containers tab and then click the Create Container Service button, shown in Figure 1.
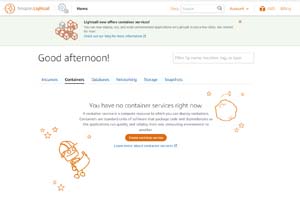 [Click on image for larger view.] Figure 1: Select the Containers tab and click the Create Container Service button.
At this point, AWS will display the Create a Container Service screen, which you can see in Figure 2. The first thing that you will need to do on this screen is to select the region within which you wish to deploy the container service. Next, you will have to choose the container service capacity. In other words, you are going to have to specify the amount of memory and CPU resources to allocate to each node, which of course has a direct impact on cost. Additionally, you will have to choose a scale for your deployment. The scale corresponds to the number of nodes that will be deployed. Setting the scale to 5 for example, causes Lightsail to create five nodes. You can increase of decrease the scale later on as your needs change.
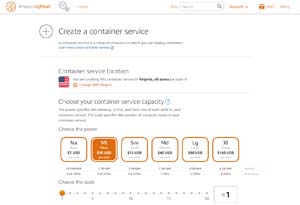 [Click on image for larger view.] Figure 2: The container service capacity that you choose has a direct impact on cost.
The next step in the process is to set up your first deployment. Scroll down until you locate the Set Up Your First Deployment section, shown in Figure 3, and then click on the Set Up Deployment link.
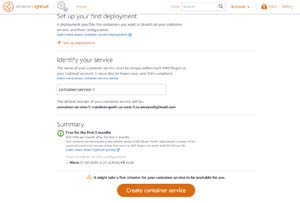 [Click on image for larger view.] Figure 3: Click on the Set Up Deployment link.
At this point, you will need to tell AWS what type of container you want to launch on the container service. If your only goal is to try out the container service to see how it works, then you might consider using one of the sample containers, shown in Figure 4. For the purposes of this blog post for example, I will be deploying the Hello World container.
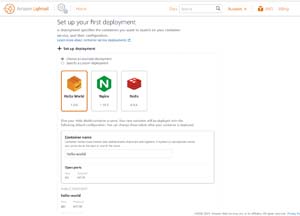 [Click on image for larger view.] Figure 4: You can deploy one of the three sample containers as a way of getting a feel for how Lightsail works.
If on the other hand, you are ready to deploy "real" containers that will be used in your production of development environments, then you will need to choose the Specify a Custom Deployment option instead. Upon doing so, you will need to provide a container name, a link to an image reference from a public repository (such as DockerHub). You also have the option of adding a launch command, environment variables and a list of ports to open. You can see what these options look like in Figure 5. Incidentally, you can host up to 10 containers within a container deployment.
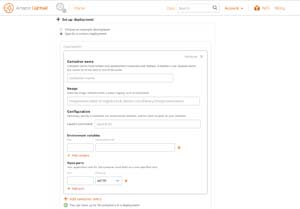 [Click on image for larger view.] Figure 5: At a minimum, you must specify a container name and an image to use.
Regardless of whether you deploy a container of your own or use one of the sample containers, you will have to provide a name for the container service that you are creating. The name will have to be lower case, DNS compliant, and unique within the region that you have selected. When you are done, click the Create Container Service button found at the bottom of the page. It can take several minutes for the container service to be created.
Once the deployment process completes, you will see a message at the bottom of the page indicating that the container deployment is active. There is a link near the top of the page that you can click on to verify that the container application is working. In the case of the Hello World application, the resulting page looks like the one shown in Figure 6.
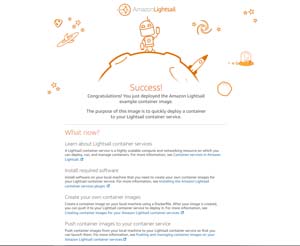 [Click on image for larger view.] Figure 6: This is what the Hello World container app looks like.
About the Author
Brien Posey is a 22-time Microsoft MVP with decades of IT experience. As a freelance writer, Posey has written thousands of articles and contributed to several dozen books on a wide variety of IT topics. Prior to going freelance, Posey was a CIO for a national chain of hospitals and health care facilities. He has also served as a network administrator for some of the country's largest insurance companies and for the Department of Defense at Fort Knox. In addition to his continued work in IT, Posey has spent the last several years actively training as a commercial scientist-astronaut candidate in preparation to fly on a mission to study polar mesospheric clouds from space. You can follow his spaceflight training on his Web site.