How-To
Taking Advantage of AWS Spot Instances
If you have a lot of workloads running on EC2 virtual machine instances, you have no doubt discovered just how costly those instances can sometimes be. EC2 spot instances offer an option for substantially driving down the cost of your less important workloads, but with one big caveat.
That caveat is that spot instances are run on what essentially amounts to leftover or unused compute resources. As such, if Amazon sees a sudden demand spike, spot instances can see a service interruption. That's why spot instances are so cheap. Even so, spot instances have their place. While it would be a bad idea to host a mission-critical workload on spot instances, spot instances are great for dev/test environments or for workloads that do not have strict SLAs.
To create a spot instance, open the EC2 console, select the Spot Requests tab and then click on the Request Spot Instances button. This will take you to the Request Spot Instances screen, shown in Figure 1.
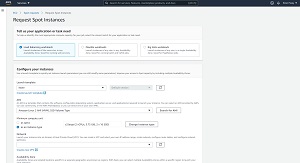 [Click on image for larger view.] Figure 1: This is what the Request Spot Instances screen looks like.
The first thing that you will need to do is to tell AWS what type of application you need to host on a spot instance. You can choose between load balanced workloads, Big Data workloads and flexible workloads. The flexible workloads option is best suited for general-purpose workloads.
The next step in the process is to configure the instance that you want to create. You can use a template, or you can just choose an AWS AMI instead. You can also choose the type of instance that you want to create. You will also need to select the VPC within which you wish to create the instance, the network that you want to use and your preferred availability zone.
Once you have finished telling AWS how to configure the instance, the next thing that you will need to do is to specify the amount of capacity that you are going to need, as shown in Figure 2. You can enter your target capacity either as the number of instances that you wish to create, or as the number of vCPUs that you need.
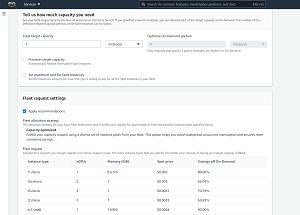 [Click on image for larger view.] Figure 2: You will need to specify the amount of capacity that you need.
As you look at the figure above, you will notice that the Capacity section includes a checkbox labeled Maintain Target Capacity. As previously noted, spot instances are prone to interruption. If you select this checkbox, then any interrupted instances will be automatically replaced.
Just beneath the Maintain Target Capacity checkbox is a checkbox that you can use to set a maximum cost for spot instances. Remember, spot instances run on spare capacity that would otherwise be used to host EC2 instances. As such, Amazon uses a supply-and-demand model for spot instance pricing. As demand for capacity wanes, the market price for spot instances decreases. As demand increases, so too does spot instance pricing. However, that pricing will never exceed the cost of a comparable EC2 instance. Setting a maximum cost allows you to cap your spending, but the price that you enter does not impact your chances of receiving resources on which to run your spot instances.
The last option that you need to configure, and one that is critical to the success of your spot instances, is an option to apply Amazon's recommendations to your fleet request settings. The idea behind this option is that because spot instances are created from excess capacity, the instance type that you request might not necessarily be available at a given moment. However, there may be other instance types that are capable of running your workload.
Suppose for a moment that you have a workload that can run on a t1.micro instance. Although you might have requested a t1.micro instance, t1.micro isn't the only instance type that is capable of hosting your instance. The workload might also be able to run on a t2.micro instance or an m1 small instance.
When you select the Apply Recommendation checkbox, shown in Figure 3, what you are effectively doing is accepting Amazon's recommendation to allow your workload to potentially be hosted on a variety of instance types, based on what is available. This can go a long way toward improving the odds of your workload being given the resources that it needs in order to run. In the figure above for instance, there are nine instance pools, meaning that there are essentially nine possibilities for hosting the workload. While it is true that some of the instance types are more expensive than what you have requested, part of the appeal of spot instances is that they are deeply discounted. That means that even if you have to resort to running a workload on a more expensive instance type, doing so will likely still cost far less than if you were to run the workload on an on-demand EC2 instance.
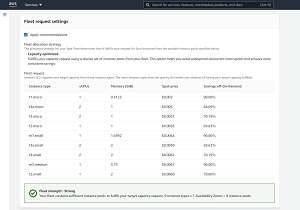 [Click on image for larger view.] Figure 3: Amazon provides recommendations for your instance pool.
When you are done, click the Launch button and your spot request will be submitted. If the request is approved, AWS will launch an instance.
About the Author
Brien Posey is a 22-time Microsoft MVP with decades of IT experience. As a freelance writer, Posey has written thousands of articles and contributed to several dozen books on a wide variety of IT topics. Prior to going freelance, Posey was a CIO for a national chain of hospitals and health care facilities. He has also served as a network administrator for some of the country's largest insurance companies and for the Department of Defense at Fort Knox. In addition to his continued work in IT, Posey has spent the last several years actively training as a commercial scientist-astronaut candidate in preparation to fly on a mission to study polar mesospheric clouds from space. You can follow his spaceflight training on his Web site.