How-To
Introduction to Docker, Part 4: Persistent Storage
This is the fourth article in a series on Docker. In my previous articles (starting here), I have covered how to install, configure and download images from a public repository and run them on a host OS. I have also looked at the various options for networking with it.
Persistent Storage on Containers
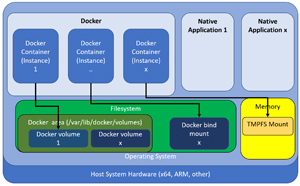
So far, I have not been concerned with saving the data on the instances. Once an instance is removed, all the data is gone. However, Docker does have different ways to store persistent data such as volume and bind mounts (or host volumes), with volume being the preferred method. You can store nonpersistent data to a TMPFS mount where it is stored in memory.
 [Click on image for larger view.]
Bind mounts are dependent on the directory structure of the host machine, while volumes offer a level of abstraction from the host system as they are stored in a separate area on the host's file system. Host volumes present a directory of the host file system to the instance.
Volumes
Volumes are created and managed by Docker. They can be created independently or when an image is instantiated and can be shared by multiple containers.
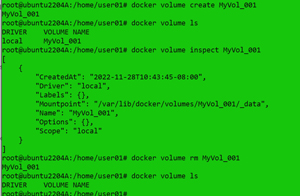
I created a volume, listed all the volumes on my system, inspected them, and then removed them by entering:
    docker volume create MyVol_001
    docker volume ls
    docker volume inspect MyVol_001
    docker volume rm MyVol_001
    docker volume ls
 [Click on image for larger view.]
I instantiated an image and created and mounted a volume to it, changed to the directory that was mounted on the volume, and created a file on it by entering:
    docker run -it --name=Alpine20 --mount source=Alpine20_Vol01,target=/app alpine
    df -h .

    touchMyFile_Alpine20
    ls -l
 [Click on image for larger view.]
The df -h command showed that the mount point had 116GB of space, which is all the free space on the host system.
Next, I exited the instance, removed it, started a new instance with the volume mounted to it, and listed all the file in the mounted directory.
 [Click on image for larger view.]
The file that was created by the previous instance was present.
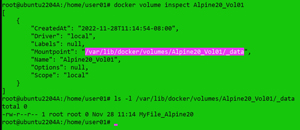
To see detailed information about the host where the volume was saved, I entered:
docker volume inspect Alpine20_Vol01
 [Click on image for larger view.]
Removing All Volumes Not Currently Being Used
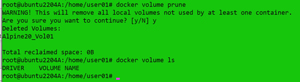
I removed all the volumes that were not currently being used by entering:
docker volume prune
 [Click on image for larger view.]
Bind
Bind presents a portion of the file system of the host to a container instance.
To demonstrate how bind works from the host command line, I created a new directory on the file system and created a file in it by entering:
    mkdir /tmp/tjf_001
    echo "hello Tom" > /tmp/tjf_001/hello_tom
I instantiated an image with the directory attached to it, changed it to the directory that was mounted on the volume and created a file on it by entering:
docker run -it -d --mount type=bind,source=/tmp/tjf_001,target=/tjf01_001A --name=Alpine22 alpine
 [Click on image for larger view.]
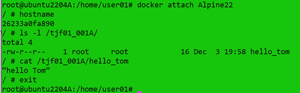
I attached to the image, listed the directory, displayed the contents of the file and exited the container by entering:
    docker attach Alpine22
    hostname
     ls -l /tjf01_001SA
    cat /tjf01_001A/hello_tom
    exit
 [Click on image for larger view.]
Removing Unused Objects
In this series of articles, I have been manually removing each unused object, but Docker has a powerful prune command that will remove all unused objects.
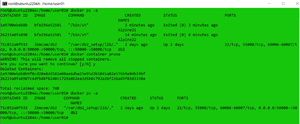
I listed the instances, removed all nonrunning instances and then verified that they were gone by entering:
    docker ps -a
    docker container prune
    docker ps -a
 [Click on image for larger view.]
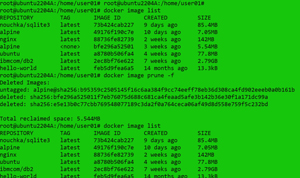
I listed the images, removed all dangling images (one that is not tagged and is not referenced by any container) and then verified that they were gone by entering:
    docker image list
    docker image prune
    docker image list
 [Click on image for larger view.]
I removed all the images that were not being used by an existing container by entering:
    docker image list
    docker image prune
 [Click on image for larger view.]
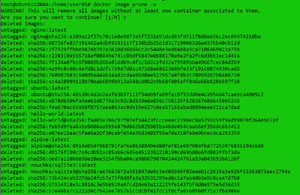
I removed all the volumes that were not being used by an existing container by entering:
docker volume prune
If you want to clean up all unused objects, including volumes, enter:
docker system prune -volume
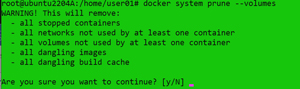 [Click on image for larger view.]
Using External Storage
Docker supports the use of NFS and CIFS as backing for volume storage. While the use of these is beyond the scope of this article, you can find more information on using them at: https://docs.docker.com/storage/volumes.
Conclusion
Below is a summary list of Docker commands used in this article:
|
Command
|
Notes
|
|
docker
volume create MyVol_001
|
Create a
volume
|
|
docker
volume ls
|
List the
volumes
|
|
docker
volume inspect MyVol_001
|
Give detailed
information on a volume
|
|
docker
volume rm MyVol_001
|
Remove a
volume
|
|
docker run
-it --name=Alpine20 --mount source=Alpine20_Vol01,target=/app alpine
|
Mount the
directory/app of the Docker instance to the volume Alpine21_Vol01
|
|
docker volume prune
|
Remove all
the volumes that are not currently being used
|
|
docker run
-it -d --mount type=bind,source=/tmp/tjf_001,target=/tjf01_001A
--name=Alpine22 alpine
|
Bind a
directory on the host file system to the instance
|
|
docker
container prune
|
Remove all
unused instances (containers)
|
|
docker
image prune
|
Remove all
unused images
|
|
docker
volume prune
|
Remove all
unused volumes
|
|
docker
network prune
|
Remove all unused
networks
|
|
docker
system prune --volumes
|
Remove all
unused instances, images, networks and volumes
|
Throughout this series of articles on Docker, I have shown you the basics of working with Docker images, instances (containers), networking and storage. I have also discussed how lightweight they are and how little resources they consume. These articles should provide you with enough information to get you started with Docker and containers. Hopefully these articles have piqued your interest in Docker, and you have begun to see how powerful containers are and potential ways you can begin to use them in your own environment.
About the Author
Tom Fenton has a wealth of hands-on IT experience gained over the past 30 years in a variety of technologies, with the past 20 years focusing on virtualization and storage. He previously worked as a Technical Marketing Manager for ControlUp. He also previously worked at VMware in Staff and Senior level positions. He has also worked as a Senior Validation Engineer with The Taneja Group, where he headed the Validation Service Lab and was instrumental in starting up its vSphere Virtual Volumes practice. He's on X @vDoppler.