How-To
Running Applications in Docker, Part 3: Integrate Container Apps Using Docker Compose
Tom shows how to use Docker Compose to deploy PostgreSQL and pgAdmin from a file.
Docker has been around now for about a decade, and during that time it has become a standard tool in many production and test environments. I wrote a previous series of articles (starting here) exploring the basics of Docker, and in this current series I am looking at running applications in Docker.
So far, I have focused in on using a powerful, popular and free open source database, PostgreSQL. In my last two articles, I have deployed a Docker image from the command line, used the command line via psql (the command-line front end to PostgreSQL) to manipulate the database, and created scripts to complete repetitive tasks on the database.
Where Docker really shines, however, is in its ability to create and deploy multiple Docker images to create a multi-tiered application. In this article, I will use Docker Compose to deploy PostgreSQL and pgAdmin from a file.
What is pgAdmin?
pgAdmin is an application that is used to interact with and manage PostgreSQL. It uses a browser as its GUI front-end which allows local and remote users to interact with it. pgAdmin has a devoted following and is the most popular open source management tool for PostgreSQL. It is actively being developed and supports advanced features such as two-factor authentication.
Docker Compose
Docker Compose was specifically designed to help define and share multi-container applications. By creating a YAML file to specify the images that you want to deploy, you can then launch this file (which should be called docker-compose.yml) to deploy your application.
First, Docker Compose will need to be installed on your system. To do this, I entered:
Apt-install docker-composer
Below is the YAML file that I will use in this article to deploy PostgreSQL and pgAdmin:
version: "3.8"

services:
  postgresdb:
    image: postgres:12.2
    container_name:  PostgreSQL
    restart: always
    environment:
      POSTGRES_DB: postgres
      POSTGRES_USER: admin
      POSTGRES_PASSWORD: MyPassword
      PGDATA: /var/lib/postgresql/data
    volumes:
      - pgsql-data:/var/lib/postgresql/data
    ports:
      - 5010:5432

  pgadmin:
    image: dpage/pgadmin4:4.18
    container_name:  pgAdmin
    restart: always
    environment:
      PGADMIN_DEFAULT_EMAIL: [email protected]
      PGADMIN_DEFAULT_PASSWORD: MyPassword
      PGADMIN_LISTEN_PORT: 80
    ports:
      - 5011:80
    volumes:
      - pgadmin-data:/var/lib/pgadmin
    links:
      - postgresdb:pgsql-server

volumes:
  pgsql-data:
  pgadmin-data:
Below is a breakdown of information contained within the YAML file:
- Version tells what version of Docker Compose to use. This must align with the version of Docker that you are using.
- Service refers to the containers that will be deployed. The two containers that will be deployed in this case are PostgreSQL and pgAdmin. I list specific versions of these images, rather than the latest, as I know that they work together.
- The services section describes how the container will be deployed.
- The volumes section describes the volumes that will be used by the containers.
Although not used in this example, you can also describe networks in the file. This is just the briefest overview of the YAML file; more information can be found in the official documentation.
The docker-compose.yml should be placed in a separate directory and then executed. To do this, I entered:
  mkdir pgAdminPostgres
  mv docker-compose.yml pgAdminPostgres
  cd pgAdminPostgres
  docker-compose up -d
The docker-compose up -d command runs everything in the background.
 [Click on image for larger view.]
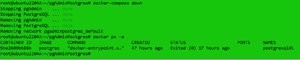
I verified that the containers were deployed by entering docker ps -a.
 [Click on image for larger view.]
I then stopped the containers and removed the instances, and verified that they were removed by entering:
  docker-compose down
  docker ps -a
 [Click on image for larger view.]
This command also shows a previous instance of PostgreSQL (postgresql01) to confirm that the down command did not affect it.
Using pgAdmin
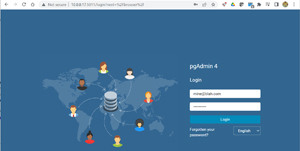
After restarting my environment, I entered http://10.0.0.17:5011/ in my web browser, where 10.0.0.17 is the IP address of my Docker host, and 5011 is the port that I described in the YAML file.
In the login screen, I entered [email protected] and MyPassword. These values were described in the YAML file.
 [Click on image for larger view.]
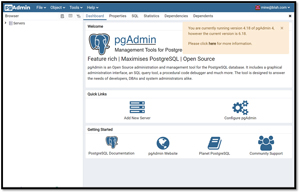
In the next page, I was informed that I was not running the latest version of pgAdmin.
 [Click on image for larger view.]
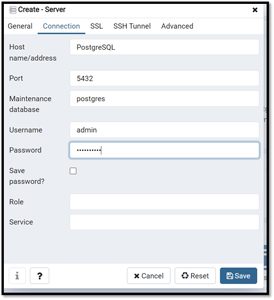
I clicked the Add New Server icon and entered the name of my PostgreSQL instance (PostgreSQL), the username (admin), and password (MyPassword).
 [Click on image for larger view.]
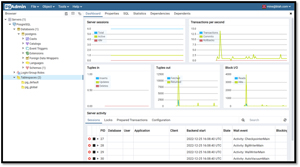
In the left navigation menu, I expanded Databases and Tablespaces, and then clicked the Dashboard tab.
 [Click on image for larger view.]
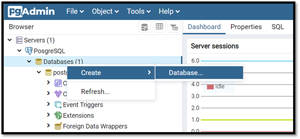
Next, I right-clicked Database and selected Create > Database.
 [Click on image for larger view.]
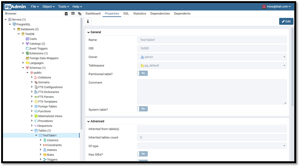
This brought up a wizard that allowed me to create a new database. I expanded the scheme of the new database, right-clicked Tables, and created a new table (TestTable).
 [Click on image for larger view.]
I could also create a new column in the table by right-clicking Columns. Further use of the interface is beyond the scope of this article; however, if you want more information, you can consult its usage guide.
Conclusion
The beauty of using Docker Compose is that environments can be created and destroyed quickly. This is not only useful for testing, but also for production. If you need to do regression testing, for example, you can spin up an old version of your multi-tiered application with a single command. In production, you can spin up new environments, and if an issue is seen with it you can revert to an older version just as quickly. In the next article on Docker, I will work further with Docker Compose by using it to deploy other versions of applications.
About the Author
Tom Fenton has a wealth of hands-on IT experience gained over the past 30 years in a variety of technologies, with the past 20 years focusing on virtualization and storage. He previously worked as a Technical Marketing Manager for ControlUp. He also previously worked at VMware in Staff and Senior level positions. He has also worked as a Senior Validation Engineer with The Taneja Group, where he headed the Validation Service Lab and was instrumental in starting up its vSphere Virtual Volumes practice. He's on X @vDoppler.