How-To
Using AWS Transfer Family to Modernize File Transfers
New users sometimes ask Brien Posey how to get their data into the AWS cloud. This is what he says.
One of the questions that I am sometimes asked by those who are just getting started with AWS is how to get their data up to the cloud. There are any number of different options available, but for those who need to copy files to S3 or EFS storage, one of the easiest options is to use Amazon's Transfer Family service. AWS Transfer Family is a fully managed service for those who need FTP, FTPS, SFTP and AS2 capabilities in the Amazon cloud.
To get started, log in to the AWS console and launch the AWS Transfer Family service. When prompted, click the Create Server button. This will take you to a screen that walks you through a simple six-step process for creating your managed file transfer service.
The first step, which you can see in Figure 1, is to select the file transfer protocol that you want to use to transfer data to the cloud. It is worth noting that you aren't limited to making a single selection. You can select as many protocols as you need to. Depending on which protocols you select, you may be prompted to provide a certificate.
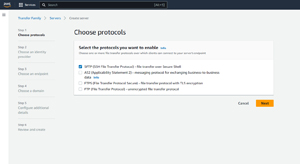 [Click on image for larger view.] Figure 1: Select the protocols that you want to use.
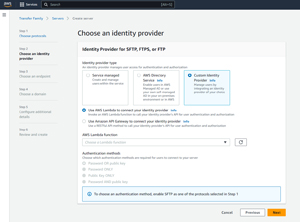
After making your selection, click Next and you will be taken to the screen, shown in Figure 2, where you are asked to select your identity provider. You can choose between service managed identities, the AWS directory service and a custom identity provider.
 [Click on image for larger view.] Figure 2: You will need to choose the identity provider that you want to use.
Once again, the options that are displayed will vary depending on which identity provider option you choose. If for example, you were to choose the AWS Directory Service, then you would need to select a directory. Of on the other hand, you were to choose a custom identity provider, then you would need to decide whether you want to use AWS Lambda or the Amazon API Gateway to connect to your identity provider.
Click Next and you will be taken to the screen shown in Figure 3. Here you will need to decide whether the endpoint that you are creating for use with file transfers should be publicly accessible or if it should only be available internally. Your selection will depend on your business requirements and how you plan on using the file transfer endpoint.
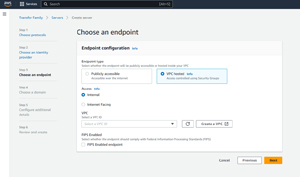 [Click on image for larger view.] Figure 3: You must decide if your file transfer endpoint will be accessible from the internet.
If you do decide to make the endpoint publicly accessible, then you will have to select a custom hostname. However, the option to make an endpoint publicly accessible is only available for the SFTP service. If you are using any of the other file transfer protocols, then you won't be able to use the Publicly Accessible option.
If you choose to use the VPC Hosted option, then you are going to need to decide whether the endpoint will be purely for internal use or if it will be internet-facing and decide whether the endpoint should adhere to FIPS compliance standards. In either case, you will need to choose the VPC that you want to use with the endpoint. If you are making the endpoint internet-facing however, then you cannot use the FTP protocol (the other file transfer protocols are supported).
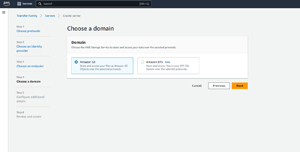
Click Next, and you will be taken to the Choose a Domain screen, shown in Figure 4. This screen asks you to choose which storage service you will use to store the data that is being uploaded or downloaded. Your options are to use Amazon S3 or to use Amazon EFS.
 [Click on image for larger view.] Figure 4: Choose the type of storage that you want to use.
Click Next and you will be taken to the Configure Additional Details screen. You can see a portion of this screen in Figure 5. This screen contains a number of last-minute configuration options. Here, you will need to choose the logging role (as it related to CloudWatch logs) that you want to use, as well as your preferred cryptographic algorithm. You can also optionally provide a server host key and some tags. This screen also contains the option to create workflows that can take various actions on the files that you upload and you can even create a banner to be displayed before the client is authenticated.
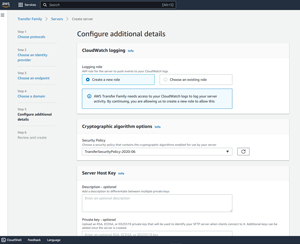 [Click on image for larger view.] Figure 5: Choose the type of storage that you want to use.
The Configure Additional Details screen contains a variety of settings.
Click Next, and you will be taken to the Review and Create screen. Take a moment to make sure that all of the configuration options shown on this screen are correct. Assuming that everything looks good, click the Create Server button. It takes several minutes to create the server, but when the process completes, you should see your server listed on the console's AS2 Trading Partners screen, as shown in Figure 6.
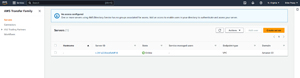 [Click on image for larger view.] Figure 6: The Configure Additional Details screen contains a variety of settings.
The file transfer endpoint has been created.
As you can see in the figure, AWS displays a warning message telling you that no users currently have access to the service. To grant access to users in your organization, just click on the server to display its configuration data. Then, scroll down to the Access section and click the Add Access button. You can then choose who should have access to the service.
About the Author
Brien Posey is a 22-time Microsoft MVP with decades of IT experience. As a freelance writer, Posey has written thousands of articles and contributed to several dozen books on a wide variety of IT topics. Prior to going freelance, Posey was a CIO for a national chain of hospitals and health care facilities. He has also served as a network administrator for some of the country's largest insurance companies and for the Department of Defense at Fort Knox. In addition to his continued work in IT, Posey has spent the last several years actively training as a commercial scientist-astronaut candidate in preparation to fly on a mission to study polar mesospheric clouds from space. You can follow his spaceflight training on his Web site.