In-Depth
Build an IT Lab for Virtual Machines
Do you have a demand for testing hardware to support new projects and updates? A virtual test lab could fit the bill.
Are you frustrated because your IT staffers are constantly demanding hardware for testing -- hardware that you don't have in your budget? Then you're dealing with a problem that's probably as old as IT itself.
Everybody talks about virtualization for datacenters, but what about virtualization for IT labs and development environments? Virtualization provides a significant degree of efficiency, flexibility and cost savings. It also reduces the friction between IT professionals and business unit leaders when the subject is additional funding for dedicated lab or development infrastructure.
Previously, your IT staff only had a couple of options for dealing with these tasks. They could use their own work desktops or laptops, or allocate budget money to buy hardware to support their testing and development needs. Both of these methods are inefficient in terms of use of budget and time.
Hardware is often purchased when there's plenty of unused hardware still available. This is expensive and time-consuming. Another disadvantage is that you can't move or transfer hardware or the tools and apps running on a particular desktop or laptop, so there's limited flexibility with that approach.
Another possibility for establishing a testing or development platform is to use laptop hardware with Virtual Server or Hyper-V installed. This is more flexible for moving the lab around to customers, but has many disadvantages as well:
- Installation and provisioning new virtual machines (VMs) wastes a lot of productive time
- Most installation source files need to be locally available
- Running multiple VMs on a laptop requires a significant amount of memory -- you can't recreate certain scenarios
- Disk drives don't deliver high performance and create a bottleneck
- Disk space for VMs and installation sources is limited
- Extensive backup scenarios
- Little flexibility in creating different networks
You need a highly flexible, centralized lab infrastructure that everyone can use with the least amount of administrative effort. You don't want to require staff dedicated to running the lab environment. Any virtual infrastructure has to include all needed components for self-service, without the need for routine technical or organizational tasks.
The Virtual Solution
One of the more effective virtual solutions for developing and maintaining a virtual lab setting is built around a central infrastructure of Hyper-V hosts grouped by Microsoft System Center Virtual Machine Manager (VMM) and running VMM Self-Service Portal 2.0 on top. This is what we used to set up our virtual test lab. The technologies include:
- Windows Server 2008 R2 Hyper-V
- VMM 2008 R2
- VMM Self-Service Portal 2.0
- SQL Server 2008 R2
- Windows Server Update Services (WSUS)
- Forefront Threat Management Gateway (TMG) 2010
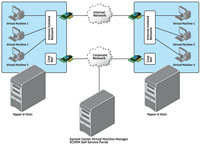
Two Hyper-V hosts have a minimum of two physical network adapters each (see Figure 1). One network adapter is connected to the corporate network. A second adapter serves the internal IT lab network, which is isolated from the production network. Both hosts are members of a VMM host group.

[Click on image for larger view.] |
| Figure 1. The physical base infrastructure of a virtual lab environment |
A third physical machine (that doesn't even have to be that powerful) runs VMM and SQL Server 2008 R2, and hosts the Web server for the VMM Self-Service Portal.
Inside the virtual IT lab, we built a minimum core infrastructure. This consists of an Active Directory Domain Services (AD DS) domain controller (DC) that also acts as the WSUS server for the internal environment. There's also a virtual SQL Server 2008 R2 two-node cluster and a VM acting as Forefront TMG 2010.
This virtual base infrastructure is convenient for someone who needs to create new VMs and wants them to join an existing domain without worrying about Windows Updates, installing Active Directory or installing SQL Server. It receives Windows Updates via the virtual WSUS server. There's a domain policy in the virtual domain that configures all domain-joined machines to use this WSUS server automatically. The Forefront TMG 2010 server provides access to the Internet from the isolated internal network via the corporate network.
There's a lengthy but straightforward list of initial tasks required to set up the lab:
- Setup of central hosts with Windows Server 2008 R2 Hyper-V
- Install Windows Server 2008 R2
- Check the Hyper-V Getting Started Guide
- Set up VMM server with Windows Server 2008 R2, SQL Server 2008 R2, VMM 2008 R2 and VMM Self-Service Portal 2.0 (including the dashboard functionality)
- Install the VMM server
- Check the VMM 2008 R2 Self-Service Portal 2.0
- Configure a Host Group in VMM and join your central Hyper-V hosts
- Configure at least one virtual network -- this is bound to the second network adapter of the hosts
There are some other preparation steps as well. You'll have to prepare Sysprepped images for each type of VM you want to provide your users in the VMM Library (this is initially the most time-consuming part of the solution). Microsoft provides images for Windows XP, Windows Vista, Windows 7, Windows Server 2003, Windows Server 2008 and Windows Server 2008 R2.
There are different ways to do this step: One is to set up a VM with the base OS and run Sysprep from the VMM console. This basically prepares the image with Sysprep and moves it as a template to your VMM installation library. If you need to do a manual Sysprep within your VM, you can manually add the Sysprepped images as VM Templates to the VMM library.
You'll also need to predefine hardware profiles for the VMs and configure them to use the virtual network. This is separate from the corporate network. You can add additional software shares (for installing additional software on the VMs) to the library. You can allow access for your users with their corporate user accounts to these library parts, so these items are available in the Self-Service Portal.
Configure a basic structure for the Self-Service Portal in the form of a business unit, infrastructure, service and service roles. Here you have the flexibility to create a structure that's most useful for your requirements.
The hierarchy in our solution looks like this:
- Business Unit: Services AT
- Infrastructure 1: ATSERVICES-Infrastructure
- Service 1: Services LAB
- Service Role 1: LABService
- Infrastructure 2: Sales-Infrastructure
- Service 1: Sales Service
- Service Role 2: Sales Role
This is just a simple setup for a basic separation of two different environments. One environment is for Microsoft services employees to create testing scenarios. The other is for Microsoft salespeople to create product demonstrations.
There are a variety of optional steps you can take to add additional features, depending on your needs:

[Click on image for larger view.] |
| Figure 2. A sample console view of the Self-Servfraslqab menh several VMs. |
- Configure a certificate for the Self-Service Portal Web site to provide SSL communication
- Set up a virtual DC and create a default Windows domain for the internal environment
- Create user accounts so they can join machines to the domain
- Install the Dynamic Host Configuration Protocol, or DHCP, server on the virtual DC, which makes it convenient for every new preconfigured VM to request an IP address
- Install and configure WSUS on the virtual DC
- Configure a domain-wide Group Policy Object that configures each domain-joined machine to use the internal WSUS server and configure the Windows Update parameters
- Install Forefront TMG 2010 to provide Internet access from within the VMs on the separated network using the Firewall Client for Internet Security and Acceleration (ISA)
- Provide network shares that are accessible from the corporate network and from the internal virtual network if users have to transfer data between the two environments
- Associate costs and limits in the Self-Service Portal to create guidelines for your users and force diligent infrastructure usage

[Click on image for larger view.] |
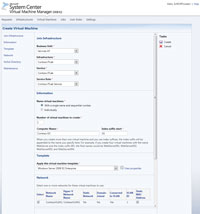
| Figure 3. The standard form for creating a new VM with the VMM Self Service Portal. |
This is only a sample configuration, done according to
one organization's requirements. You need to identify and address your needs and the capabilities of your underlying virtualization hardware.
Virtual Visuals
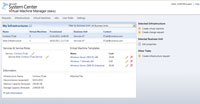
The images in Figures 2, 3 and 4 should give you an impression of how the solution looks in real life. Using this solution to maintain a testing and development lab helps with a lot of tasks. It also aids in decreasing the budget spent for hardware, as we use available hardware much more efficiently.
One of the really cool facts about our implementation is that we can access it from anywhere. We use the Direct Access Infrastructure of the Microsoft corporate network without needing a VPN connection.

[Click on image for larger view.] |
| Figure 4. A sample overview of configured infrastructures. |
We're now working on extending this "basic private cloud" to the "premium version." Microsoft Consulting Services has built a solution called "Datacenter Services Solution," which provides extended workflows and the highest level of automated provisioning (utilizing System Center "Opalis," System Center Configuration Manager, System Center VMM, System Center Operations Manager and a customizable Web portal). It also uses multinode clustering, and automated host patching provides high availability.