In-Depth
Hyper-V Replica, Part 2: Scaling
Exploring replication on Azure.
Last month we looked at the basics of Hyper-V Replica, including how to configure it, selecting the transport protocol between two servers and setting up a virtual machine (VM) for replication.
This time we'll look at how to scale, involving host clusters and the Hyper-V Replica Broker role. We'll also look at extending replication, as well as using Azure as a target for your replicated VMs through Azure Site Recovery. In large environments, you'll want to use System Center Virtual Machine Manager (SCVMM) to handle many replicated VMs; there, too, Azure can help with your orchestration. We'll look at different types of application workloads as well as the different types of failover you can initiate. Finally, we'll look at what improvements Windows Server 2016 brings.
Clusters and Hyper-V Replica Broker
Part 1 discussed setting up VM replication from one server to another, either from hosts that are joined to the same domain or workgroup hosts. If you add a cluster to either the primary or secondary side, replication becomes a little trickier as VMs move around to different hosts through Live Migration.
To manage this, you need Hyper-V Replica Broker. Here's the setup sequence:
- Open Failover Cluster Manager
- Connect to your cluster
- Select Configure Role in the Actions pane
- Pick the Hyper-V Replica Broker in the list of roles
- Give the role a NetBIOS name and IP address
You should test that the role fails over between cluster nodes by right-clicking on it and selecting Move, then picking another node.
The Broker will then orchestrate VM replication, no matter which hosts they're currently running on.
Capacity Planning
Whether you have two or 200 VMs to replicate, planning for adequate capacity is key to ensuring a good experience. Keep an eye on the network bandwidth between the two locations, and the disk I/O on the replica side. In the case of a failover, you'll also need to ensure that the replica host(s) has sufficient memory and CPU capacity to run the VMs. During normal operation, the main issue is network bandwidth; how much you need depends on the number of VMs, the churn of disk changes in each VM and your replication frequency.
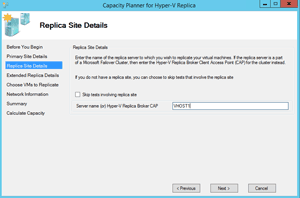
Microsoft offers a free tool that can help, called the Capacity Planner for Hyper-V Replica (shown in Figure 1.) It's installed on a Windows Server 2012 or 2012 R2 host where you're planning to replicate from. It'll gather statistics on selected VMs, then create and replicate a test VM with a 10GB disk. It next prepares a report detailing the likely IOPS and network requirements. (Note that you can't use this tool for VMs where replica has already been enabled.) It takes a lot of the guesswork out of planning a Hyper-V Replica deployment.
 [Click on image for larger view.]
Figure 1. The Hyper-V Replica Capacity Planner.
Failing Over
Hyper-V Replica provides different types of failover, depending on your situation. For testing, you can do a test failover which will start the VM on the replica server in a network disconnected state (to avoid issues with both the primary server and replica running on the same network). This allows you to log in and verify that the replicated VM is functioning as expected.
If a disaster is coming and you're aware of it, you should do a planned failover, initiated on the primary server side. This will shut down the VMs, replicate all changes to ensure the replica VMs are up to date, then start the VMs on the replica side. This will also reverse the replication so that disk changes flow from the replica side back to the primary side.
An unexpected outage requires an unplanned failover, initiated on the replica side. There may be some data loss in this situation, depending on your replication frequency.
For Windows VMs, Hyper-V replica allows you to specify alternate IP addressing information to be injected into the replicated VMs. This allows them to function on the replica-side networks in a planned or unplanned failover scenario.
Extending Replication
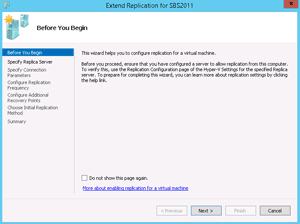
For some workloads, it might make sense to have a third copy of a VM on another host. Some datacenters have a local copy for rapid disaster recovery (DR) in the same datacenter, as well as a third copy in an offline location. The process to extend replication is simple; just open Hyper-V manager on the replica server, right-click on a VM and select Extend Replication (
Figure 2).
 [Click on image for larger view.]
Figure 2. Extending replication for better disaster recovery.
Some limitations apply:
- You have to replicate the same virtual disks as the initial replication relationship
- You can only pick 5- or 15-minute replication
- Replication can't be more frequent than the primary relationship is set to.
If you're using application-consistent snapshots in the primary relationship, these will be forwarded to the extended replica target; but you can't set a different frequency for them.
System Center Virtual Machine Manager
Interestingly, marrying SCVMM with Hyper-V Replica doesn't really provide a lot of extra functionality. SCVMM is aware of which VMs are replicated, and will display replication health (if you add the column in the list of VMs).
But the key to using the two together is to add Azure Site Recovery.
Azure Site Recovery
If you add
Azure Site Recovery (ASR), several features light up in SCVMM, such as the ability to enable replication during VM creation, setting replication as a default in the VM template and enabling protection for existing VMs. Intelligent placement takes into account cloud and networks for replica for appropriate placement of VMs. You can also assign IP addresses and networks to replica VMs at scale using VM Networks.
ASR is an umbrella term for several different services. With SCVMM, you can use ASR to replicate VMs from your own infrastructure to Azure, from one of your sites to another on-premises site (without the VM data passing through Azure), and from one of your sites to another site using SAN replication. If you don't have SCVMM, you can still use ASR to replicate VMs to Azure. Apart from Hyper-V Replica, ASR can be used to replicate VMware VMs and physical servers to Azure or VMware VMs and physical servers to a second on-premises location. In all cases, failover is a manually initiated process. This isn't a stretched high availability cluster; ASR is for DR.
A core part of the ASR service is recovery plans, where the orchestration of your potentially complex application services is defined: "Start this VM first, then this one, pause for a manual step to ensure that X is working, then proceed with these VMs…" Recovery plans can also incorporate Azure Automation to further streamline your recoveries.
Another important thing to realize is that you're not paying for VMs in the cloud during normal replication; only for the service itself and for the storage consumed. The only time you actually pay for VMs is if you do a test failover or an actual failover, when VMs are created from the replicated disks and the configuration ASR has for each VM.
Note that Generation 2 VMs are supported with ASR, and if you fail them over to Azure they'll automatically be converted to Generation 1, as Gen 2 isn't supported in Azure yet.
Workload Considerations
Not all workloads are suitable for Hyper-V replica. As with any replication technology, workloads such as Active Directory or Exchange Server -- where data is replicated between VMs -- have the very real potential for data corruption. It's important to follow the
guidelines for virtualized domain controllers.
SQL Server is supported (with some restrictions), while
Exchange Server is not supported in Hyper-V Replica.
For any third-party applications, you'll need to check with the manufacturer. In general, workloads contained in a single VM should be fine; after all, Hyper-V Replica is just creating a copy of the VM on another host (or in Azure).
What's Coming in Windows Server 2016
There are a few improvements coming in the next version of Windows Server. If you're looking to implement shielded VMs, these can be replicated, provided the target replica host is authorized to run the replicated VMs.
Another improvement is around adding disks to already replicating VMs. Today this will cause replication to fail and lead to a full resynchronization. In 2016, when you add a disk to a VM that's replicating, it'll be added to a non-replicated set and normal replication will continue. If you need to replicate this new disk, you can manually add it to the set of replicated disks.
Tips
To see the replica health of your VMs in Hyper-V Manager, go to View – Add/Remove Columns and enable Replication Health. This will give you an overall status for each VMs replication: Normal, Warning or Critical. Note that even if a VM misses a few replication cycles, the status will only switch to warning. Critical is reserved for serious situations where replication is down and has been so for a while.
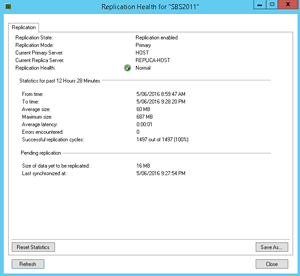
For more information, right click on the VM and select Replication – View Replication Health, where you'll see statistics for the last few hours (Figure 3). You've got the option to reset the statistics or save them to a file. You can also pause replication, as well as resume it if it's paused.
 [Click on image for larger view.]
Figure 3. Checking replication stats.
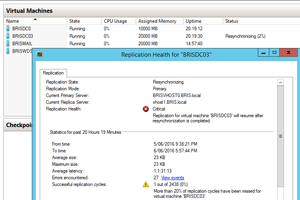
When you fix a problem with replica it might report the status as Resynchronization required. This is a disk IO-intensive operation which will compare every block in each replicated disk, so schedule this for non-business hours. When you right-click on a VM that requires resynchronization and select Resume, it'll give you the option to schedule the resynchronization, as shown in Figure 4.
 [Click on image for larger view.]
Figure 4. Scheduling Replica resynchronization.
Also be aware that each replication relationship is on a per-VM basis. You could have three different VMs on a host, all being replicated to different replica hosts, alongside two less important VMs that aren't replicated at all.
My final tip is appropriate for small businesses: make sure you profile the IO load of your VMs (preferably using the Capacity Planner) prior to implementing Hyper-V Replica. If your WAN and/or Internet connection doesn't have the bandwidth, consider implementing a second connection just for replication traffic. Otherwise you may end up like one of my clients where the replication traffic of a single SBS 2011 VM over an ADSL 2 link killed their normal internet traffic.