How-To
Hands-On with WSL: Executing Daily Tasks
The second of a five-part series on Microsoft's Windows Subsystem for Linux (WSL), now a fully supported feature of Windows 10.
This article is part two of a five-part series in which I discuss various aspects and functions of the Windows Subsystem for Linux (WSL). In part one, I provided a brief overview of what WSL is, and outlined steps you can take to have a fully functional Linux console -- which looked and behaved like a standard Ubuntu system -- running on Windows 10 in less than five minutes.
I began this series in follow up to three articles about WSL I had previously written back before it was a supported feature in Windows 10. In the first article, I explained how to enable the beta version of WSL on Windows 10. In the second article, I covered some of the features you can take advantage of after WSL has been installed. In the final article, I discussed my experiences using graphical programs with WSL, something that WSL wasn't designed to carry out or support. I would recommend visiting these articles first if you would like to get a better general understanding of WSL, its features, and some of its limitations.
In this article, I'll be demonstrating how to use WSL to carry out daily tasks, including installing Ubuntu packages on WSL, setting up an SSH server and running cron jobs.
Installing Other Ubuntu Packages
The Ubuntu distribution that I downloaded from the Windows Store uses a fairly standard Ubuntu 16.04 distribution, and dpkg --list showed that 437 packages were installed. Although these packages should provide a good basis for most casual users, many users will undoubtedly want to extend the capabilities of Ubuntu, which they can accomplish by adding additional packages to their environment.
Before I dive into this part of this article, a little background on packages is in order because Ubuntu applications are distributed and installed using packages. Ubuntu provides various tools for installing, upgrading, configuring, and removing packages, and these tools can also be used to resolve dependence issues and to check for updates to packages. The main tools for package management in Ubuntu are dpkg, Apt and Aptitude.
The first tool you should be aware of is dpkg, which is used to list, install and remove packages that are already on your system. However, it cannot download packages or resolve package dependences, but Ubuntu provides other tools to do these tasks. Following are a few of the more common dpkg commands; however, if you'd like to find all the switches that can be used with dpkg, type in man dpkg:
To list the packages on your system: dpkg --list.
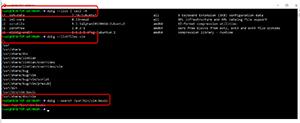
To find the files installed by a package, the --listfile switch is used. In the example in Figure 1, the files in vim (an editor) are listed by typing: dpkg --listfiles vim.
To find out which package installed a particular file, the --search switch is used. For example, to see which package installed /usr/bin/vim.basic, type: dpkg --search /usr/bin/vim.basic, also shown in Figure 1.
 [Click on image for larger view.]
Figure 1. The dpkg commands.
[Click on image for larger view.]
Figure 1. The dpkg commands.
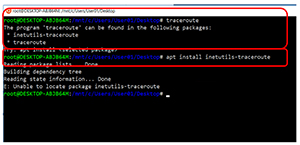
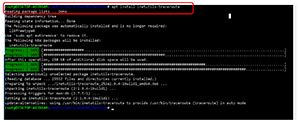
Dpkg is useful for rudimentary tasks, but the full power of packages on Ubuntu comes with the ability to download them from an external repository and install them on your system, which can be accomplished using the Ubuntu Advanced Package Tool (apt). To see all the switches that can be used with apt, type: man apt. You can find a list of packages currently available for Ubuntu online. In many cases, if you try and run a command and it isn't installed, Ubuntu will tell you which package needs to be installed in order for it to run. For example, by typing in traceroute (a common TCP packet tracing utility), it lets me know the package that needs to be installed, as shown in Figure 2.
 [Click on image for larger view.]
Figure 2. Apt install.
[Click on image for larger view.]
Figure 2. Apt install.
Packages often depend on other packages, and one neat feature of apt is that it can resolve these dependences by automatically downloading and installing the other packages upon which your package is dependent.
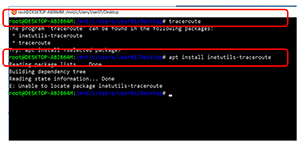
Because root privileges are required to run many of the apt commands, I find it useful to use Sudo to bash before running these commands. When I tried to run traceroute, Ubuntu informed me that it was part of the inetutils-traceroute package, so in order to use traceroute I needed to download inetutils-traceroute from an external repository and install it. To do this I ran apt install inetutils-traceroute.
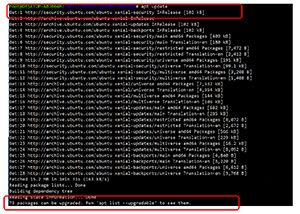
But, after running apt install inetutils-traceroute, I received a message back stating that the package was not available (Figure 3). However, after running apt update (Figure 4), which updates the package repository, I was able to install the package (Figure 5) and I was then able to run the traceroute command successfully (Figure 6).
 [Click on image for larger view.]
Figure 3. The message received after running apt install inetutils-traceroute.
[Click on image for larger view.]
Figure 3. The message received after running apt install inetutils-traceroute.
 [Click on image for larger view.]
Figure 4. Running Apt update to update the package respository.
[Click on image for larger view.]
Figure 4. Running Apt update to update the package respository.
 [Click on image for larger view.]
Figure 5. Installing the inetutils-traceroute package.
[Click on image for larger view.]
Figure 5. Installing the inetutils-traceroute package.
 [Click on image for larger view.]
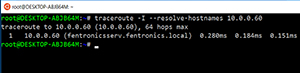
Figure 6. Successfully running the traceroute command.
[Click on image for larger view.]
Figure 6. Successfully running the traceroute command.
Setting up an SSH Server
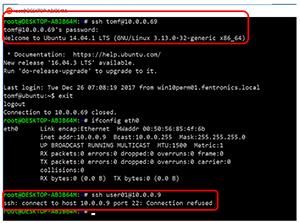
Although I was able to SSH out of my WSL Ubuntu session, I was unable to SSH into it (Figure 7).
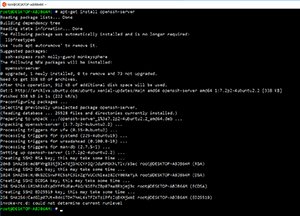
Despite the fact that WSL comes with the OpenSSH package, it's only a minimal package. As such, it will need to be uninstalled, and the full OpenSSH server will then need to be installed and configured. I ran the following commands to remove it (Figure 8): #sudo apt-get remove openssh-server.
And then I reinstalled it (Figure 9) running: #sudo apt-get install openssh-server.
 [Click on image for larger view.]
Figure 7. Unable to SSH into the WSL Ubuntu session.
[Click on image for larger view.]
Figure 7. Unable to SSH into the WSL Ubuntu session.
 [Click on image for larger view.]
Figure 8. Removing the SSH server.
[Click on image for larger view.]
Figure 8. Removing the SSH server.
 [Click on image for larger view.]
Figure 9. Installing the SSH server.
[Click on image for larger view.]
Figure 9. Installing the SSH server.
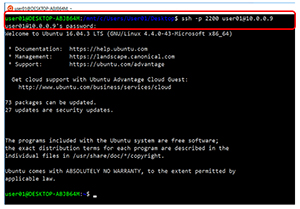
Windows 10 comes with an SSH server that can be enabled. In order to remove any port conflicts, I chose to use port 2200 for WSL SSH. The port, along with a few other parameters, needed to be changed in the OpenSSH configuration file. The following are the changes that I made to /etc/ssh/sshd_config:
Change - PermitRootLogin no
Add - AllowUsers yourusername
Change - PasswordAuthentication yes
Add - UsePrivilegeSeparation no
Change - ListenAddress 0.0.0.0
Change - Port 2200
After these changes had been made, the SSH service needed to be restarted by running the command: service ssh --full-restart.
The firewalls running on the Windows side will need to be configured to allow TCP traffic through on port 2200.
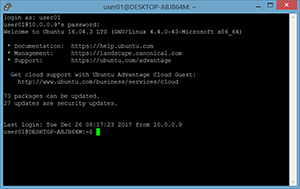
Figure 10 shows the process of connecting to the WSL SSH server directly from WSL back to the WSL session. I also used PuTTY to connect to WSL from a Windows 8.1 desktop (Figure 11).
 [Click on image for larger view.]
Figure 10. Using SSH to connect from WSL to WSL.
[Click on image for larger view.]
Figure 10. Using SSH to connect from WSL to WSL.
 [Click on image for larger view.]
Figure 11. Using SSH to connect to WSL with PuTTY.
[Click on image for larger view.]
Figure 11. Using SSH to connect to WSL with PuTTY.
Running Cron Jobs
If you need to run the same script or program at the same time every day, Ubuntu provides the cron command. To learn more about the cron command, type in cron –help.
Cron isn't currently well-supported within WSL because it's a background service, and WSL is only designed to run programs that are associated with a terminal window. Hence, when you close your WSL Ubuntu window, all Linux processes, including the cron daemon, will be closed. That said, as long as you have your windows open or minimized, your cron jobs will continue to run.
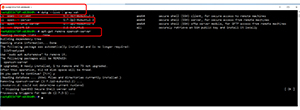
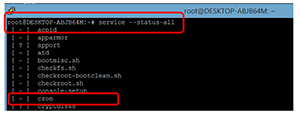
I first checked to see if the cron service was running by typing in service --status-all. This showed cron had a dash ("-") in front of it, indicating that it wasn't running (Figure 12).
 [Click on image for larger view.]
Figure 12. Cron status.
[Click on image for larger view.]
Figure 12. Cron status.
I then started the cron and the atd services by typing in: service cron start and service atd start.
To test the cron command, I created a file named MyDate.sh that had the following two lines in it:
#! /bin/bash
date >> /tmp/MyDate.txt
The first line tells Ubuntu to run the command using the Bash shell, and the second writes the current day and time to file called /tmp/MyDate.txt.
I then ran chmod 755 MyDate.sh to allow the program to be executable.
Next, I added an entry in cron to run by running crontab –e and added the following line to the crontab:
40,45,50 * * * * /home/user01/MyDate.sh
This line tells cron to run MyDate.sh at 40, 45 and 50 minutes of every hour of every day.
After waiting an hour I looked at the /tmp/MyDate.txt file and I saw that the MyDate.sh did run at the designated times (Figure 13). The first two entries were from the two times that I manually ran the program.
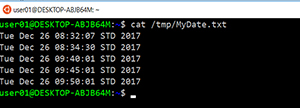 [Click on image for larger view.]
Figure 13. The cron job output.
[Click on image for larger view.]
Figure 13. The cron job output.
Wrapping Up
In this article, I showed you how I use WSL for some of the daily tasks I perform, which included installing other applications on Ubuntu via packages, connecting to the system by enabling the SSH service, and finally using cron to have the system automatically run jobs for me at a specific time. In my next article in this WSL series, I'll discuss the ability to install other Linux distributions, including both those found and not found in the Windows Store, and how that feature has worked out for me. In the fourth article, I'll cover ways in which you can configure WSL to do things it wasn't designed for, such as running a graphics interface (this is an update to the article that I wrote with the preproduction version of WSL). Finally, I'll wrap this series of articles by looking at some additional applications that have been built for WSL.
About the Author
Tom Fenton has a wealth of hands-on IT experience gained over the past 30 years in a variety of technologies, with the past 20 years focusing on virtualization and storage. He previously worked as a Technical Marketing Manager for ControlUp. He also previously worked at VMware in Staff and Senior level positions. He has also worked as a Senior Validation Engineer with The Taneja Group, where he headed the Validation Service Lab and was instrumental in starting up its vSphere Virtual Volumes practice. He's on X @vDoppler.