How-To
Installing Ubuntu on Windows 10 -- on vSphere
A step-by-step guide to running Linux in a Windows 10 virtual machine.
When the Windows 10 Anniversary Update was announced, there was one feature that got me excited: support for the Linux Bash shell. I grew up using Unix shell commands and was always frustrated by the lack of a proper shell in the various versions of Windows. Yes, there were workarounds and replacements like Cygwin, but although they were useful they were no substitute for having a powerful built-in shell.
With this in mind, I decided to create a Windows 10 release virtual machine (VM) and install the Bash shell on it to see how well it works. I split my experience installing and using the Linux Bash shell into three separate articles. This article will focus on enabling Linux on Windows on vSphere.
What Is the Windows Subsystem of Linux?
Before I dive into my experience installing it and using the Linux Bash shell, let's dive a little deeper into what it is and what it can provide. Windows Subsystem of Linux (WSL), also known as Bash on Ubuntu on Windows, was announced in early 2016 and included in the Windows 10 Insider Preview Build 14316. WSL enables running native Ubuntu user-mode console binaries in Windows 10.
WSL was designed and built by the Windows Kernel Team in partnership with Canonical (the company behind Ubuntu), to help developers use the Linux developer ecosystem and tools in Windows. WSL doesn't require the user to boot into another OS or VM. In theory, this means that all the command-line utilities, as well as many of the applications that run within a native Ubuntu environment, should run in WSL.
Microsoft makes it very clear that WSL does not aim to support GUI desktops or all applications, and it does not recommend WSL for server scenarios.
Although WSL was included for developers, I think many casual users will find it useful. WSL is only available on Windows 10; unfortunately, it's not available on server versions of Windows.
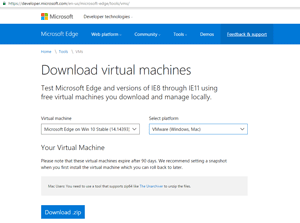 [Click on image for larger view.]
Figure 1. Downloading the Windows 10 virtual machine.
Obtaining WSL
I found the easiest way to get access to a version of Windows with WSL was to
download the Windows 10 VMs used to test Microsoft Edge. On the download page, select the Win 10 Stable executable for the VMware platform (
Figure 1). This VM will be active for 90 days, which is enough time to work with it and examine its functionality. The download is a 4GB .ZIP file, which extracts out to 16 files (
Figure 2 ).
 [Click on image for larger view.]
Figure 2. The extracted Windows 10 files.
Even though the VM Microsoft provides was designed to be deployed on VMware Fusion or Workstation, I installed the VM on my vSphere 5.5 system by using VMware Converter, which can be downloaded for free. To convert the Windows 10 Workstation VM, I pointed VMware Converter to the Windows 10 files I downloaded and the ESXi 5.5 server on which I'll install it. Because I'm using an ESXi 5.5 server, I needed to use hardware version 8 during the conversion.
Figure 3 shows VMware Converter. It took 10 minutes to convert the machine and transfer it to my host. As this VM was going to run on ESXi 5.5, which doesn't support a Windows 10 guest, I needed to go to "Edit Settings" and change my "Guest Operating System" to Microsoft Windows Server 2008 R2 (64-bit), as shown in Figure 4. An ESXi 6.x system will work fine without making these changes, because Windows 10 can be selected as guest OS.
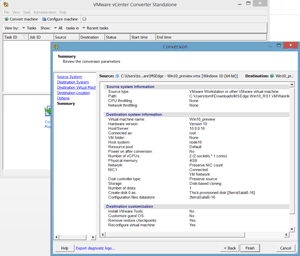 [Click on image for larger view.]
Figure 3. Using VMware Converter.
After installing and powering on the Windows 10 VM and logging in (username is IEUser; password is Passw0rd!), it needs to be updated to version 1607 or later to get a build that supports WSL. This was done using Windows Update, found in the Settings app.
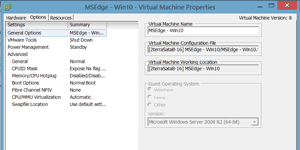 [Click on image for larger view.]
Figure 4. The guest operating system.
WSL can be enabled by going into the Settings app, selecting "For developers," then selecting "Developer Mode" and finally rebooting the VM (Figure 5). After the system rebooted, I took the opportunity to use the VMware client to update the VMware tools on the VM.
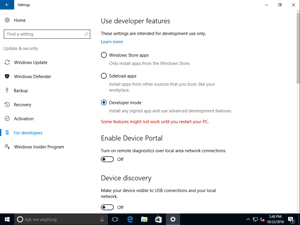 [Click on image for larger view.]
Figure 5. Enabling developer mode.
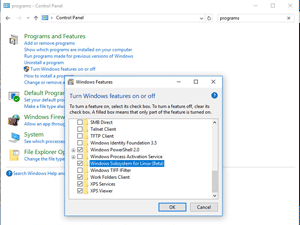
After rebooting the system, I brought up the Windows 10 Control Panel and navigated to the "Turn Windows features on or off" dialog, enabled Windows subsystem for Linux (Figure 6) and rebooted the system again.
 [Click on image for larger view.]
Figure 6. Enabling the Linux subsystem.
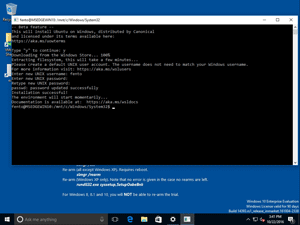
After the system started up I went to the Start menu and typed in "Bash"; an Ubuntu on Windows command window appeared. On my first entry into the Bash shell, I was prompted to install Ubuntu (Linux) and create a username and password (Figure 7).
 [Click on image for larger view.]
Figure 7. The Bash window.
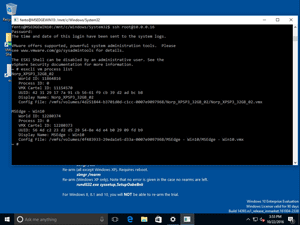
After Ubuntu was installed, I ran a few common Linux commands to prove that it was working as expected: "ps –elf," "ls –lh," "set –o vi," "man apt-get," and "dpkg –l" were successful. As a final test, I used ssh to access the ESXi host on which the VM was running (Figure 8).
(Side note: one of the things that has always annoyed me about Windows shell windows is that you can't click a corner of them to resize; the Bash shell allows this.)
 [Click on image for larger view.]
Figure 8. Using ssh to access an ESXi host.
It took me a little more than an hour to install, update and configure Linux on Windows on vSphere. In the next article, I'll demonstrate how to use some of the features of WSL running as a guest on ESXi.
About the Author
Tom Fenton has a wealth of hands-on IT experience gained over the past 30 years in a variety of technologies, with the past 20 years focusing on virtualization and storage. He previously worked as a Technical Marketing Manager for ControlUp. He also previously worked at VMware in Staff and Senior level positions. He has also worked as a Senior Validation Engineer with The Taneja Group, where he headed the Validation Service Lab and was instrumental in starting up its vSphere Virtual Volumes practice. He's on X @vDoppler.