How-To
Learn How to Bash: Using the Windows Subsystem for Linux
The WSL, also known as "Bash," can add a lot of functionality to your environment.
Microsoft, with the release of the Windows 10 anniversary update, gave their users a gift: the ability to run Linux (Ubuntu) on it. In a previous article, I explained how to enable Linux on Windows running on vSphere. But after you've installed it, what exactly can you do with it?
If you're new to Linux, a whole new world has been opened up; you can now work with some very powerful tools. If you're an old hat with Unix or Linux and now work with Windows, your life may have just gotten a bit easer; many of the tools you're familiar with can now be accessed on Windows 10, one of the most popular OSes currently in use. I was able to go through the whole process of installing Windows 10 on my ESXi system and enabling the Windows Subsystem for Linux (WSL) in less than an hour.
Once you've configured your system to run WSL (i.e., Bash on Ubuntu on Windows), access it by clicking the Bash on Ubuntu on Windows icon (Figure 1), which will launch you into a Bash console (Figure 2).
The remainder of this article will show some of the interesting things you can do using the WSL. (Side note: Linux is a clone of Unix and Ubuntu is distribution of Linux (like Red Hat or SUSE), and Bash is a shell and command language used by Unix and Linux).
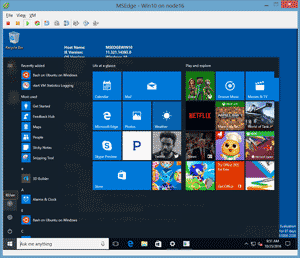 [Click on image for larger view.]
Figure 1. Accessing the Bash shell.
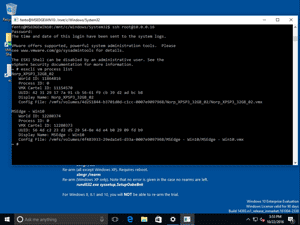 [Click on image for larger view.]
Figure 2. The Bash shell.
Common Bash Commands
For the uninitiated, or those steeped in Microsoft command-line dogma, the Bash line can be an intimidating creature. Table 1 lists some common commands, along with their equivalent Linux counterpart for reference. There are switches that can be used with these commands; by using the main page or the "--help" switch you can find more details on their usage. It's important to note that Bash commands and Linux filenames are case sensitive.
|
Function |
Bash |
Windows |
Bash sample usage |
Manuals |
man |
|
Man ping |
Directory separator |
/ |
\ |
|
Change directory |
cd |
cd or chdir |
cd tomf/docs |
List contents of Directory |
ls |
dir |
ls |
Move or rename a file |
mv |
move / rename |
mv OldFileName NewFileName |
Copy a file |
cp |
copy |
cp OldFile NewFile |
Remove a file |
rm |
del or erase |
rm FileName |
Editor |
vi or nano or pico |
edit |
vi FileName |
Running process |
ps |
wmic process list |
|
More Common Bash Commands
Here are some of the Bash commands I frequently use but may need a bit more explaining than the ones mentioned above.
To see system information such as what kernel you're running:
# uname -a
Using WSL with Secure Shell (SSH). If you want to connect to an ESXi host, and have SSH access enabled on it, you can access it like this:
# ssh [email protected]
To transfer a file from two systems running SSH, use secure copy (SCP). In the example here, the file "MyLocalFile" will be transferred to the server 10.0.0.16 and renamed to TransFile:
#scp MyLocalFile [email protected]:/TransFile
If you find yourself typing in the same command over and over again, such as to transfer a file from one server to another, create an alias for it so you only need to type in the alias:
# alias MyTran =' scp MyLocalFile [email protected]:/TransFile '
If you need to get a file or webpage from the Web, curl can be used:
#curl –G https://virtualizationreview.com/Home.aspx > output.txt
Installing Additional Software
Not all -- in fact, very few -- applications are included with WSL; however, it does include various tools to download and install packages on your system from the Internet that contain applications. Here are some of the commands used to install and manipulate packages. For security reasons, you'll need to run these commands with root privileges by prepending
sudo to them. Some packages use features that haven't been implemented yet, and trying to use these features will cause errors to be generated.
To list the packages already installed on your system:
#sudo dpkg –-list
To upgrade all the packages installed on your system to their latest versions:
#sudo apt-get upgrade
To update the list of available packages available to install on your system:
#sudo apt-get update
To search for a package to install, use apt-cache and search, because not all packages have friendly names. In this case I'm searching for a Pascal compiler:
# sudo apt-cache search pascal
To download and install a package, use "install." For example, to install the "Free Pascal Compiler" in a package called "fp-compiler":
#sudo apt-get install fp-compiler
To remove a package once it's been installed:
#sudo apt-get remove fp-compiler
Developers should download the build-essential package and git:
# sudo apt-get install build-essential
# sudo apt-get install git
Windows Files
By design, your WSL and Windows files and directories are separated, but these two environments can access each other's files. Users should use extreme caution, however, when accessing the files in one environment from the other.
Accessing Linux Files from Windows
The Bash files are hidden from the regular Windows directory, but Windows users will be able to access them. The WSL root directory is under c:\Users\<UsersName>\AppData\Local\lxss. For example, the user fento home directory would be c:\Users\<UsersName>\AppData\Local\lxss\home\fento, as shown in Figure 3.
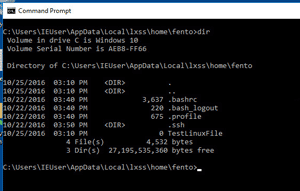 [Click on image for larger view.]
Figure 3. Linux files in Windows.
Accessing Windows Files from Linux
Bash automatically mounts the Windows drives on a system's /mnt directory. For example, to access the files on your Windows C drive, use the mount point /mnt/C. This is demonstrated in
Figure 4.
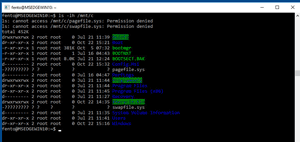 [Click on image for larger view.]
Figure 4. Windows files in Linux.
Using Bash in Windows Scripts
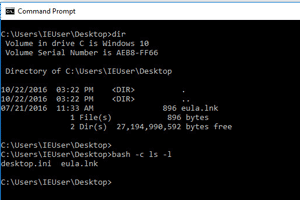
The Bash shell brings a powerful set of tools to your environment; the great thing is that you can incorporate them into your existing environment without having to launch the Bash shell. By using "bash –c" you can launch any Bash command on your Windows terminal. For example, to run the linux "ls –l" command from Windows, type the following at the command prompt:
C:\ bash –c ls –l
Figure 5 shows running the Windows "dir" command, then the Bash "ls –l" command from a Windows command window.
 [Click on image for larger view.]
Figure 5. Running Linux commands in Windows
Bash with Admin Privileges
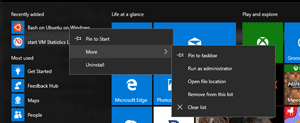
Some commands, such as ping, must be run from a Bash shell initiated with administrator privileges. To do this, right-click on the Bash icon, select "More," then select "Run as administrator" (
Figure 6).
 [Click on image for larger view.]
Figure 6. Bash, run with administrator privileges.
I touched on a few of the basic tasks that are supported and can be accomplished using WSL. One of the great things about this implementation of Linux is that WSL seems to be pretty standard; if you need support, there are many other Linux tutorials and how-to guides to get more information. Overall, I found WSL was robust; I didn't run into any issues using it.
My next article will touch on some tasks that Microsoft does not support, and does not recommend attempting with WSL, such as setting up an SSH server and using graphics applications with it.