How-To
Hands-On with WSL: Installation & New Features
The first of a five-part series on Microsoft's Windows Subsystem for Linux (WSL), which became a fully supported feature of the latest release of Windows 10.
With the release of the Windows 10 Fall Creators Update (FCU), version 1709, Microsoft's Windows Subsystem for Linux (WSL) became a fully supported feature of Windows 10. FCU is the fourth major version of Windows 10, and was released in September 2017. In this most recent release, WSL has noticeably matured and garnered new functionality in comparing it to its first Technical Preview release. In this article, I'll first show you how to install WSL, and then I'll discuss its new features.
Last year I wrote three articles about WSL. They dealt with WSL before it was a supported feature in Windows 10. In the first article, I explained how to enable the beta version of WSL on Windows 10. In the second article, I covered some of the features you can take advantage of after WSL has been installed. In the final article, I discussed my experiences using graphical programs with WSL, something that WSL wasn't designed to carry out or support. Now that WSL is a fully supported feature on Windows 10, however, I thought that it would be worthwhile to go back and revisit WSL and how to install it.
For those unfamiliar with what WSL is and what it can provide, a brief refresher is in order. To put it as simply as possible, WSL enables a user to run a native Linux user-mode console and its associated binaries on Windows 10. WSL was first announced in early 2016 and it was included in the Windows 10 Insider Preview build 14316. It was designed and built by the Windows Kernel Team in partnership with Canonical (the company behind Ubuntu) to help developers use the Linux developer ecosystem and tools within a Windows environment without requiring the user to boot into another OS or VM. In theory, this means that all the command-line utilities, as well as many of the applications that run within a native Linux environment, should run in WSL from your Windows 10 desktop. If you want to get a better understanding of WSL, its features, and some of its limitations, I recommend you read my first three articles listed and linked to in the previous paragraph.
Installation
Before installing WSL, I checked the version of Windows that I was running by running "winver" from the Windows Start prompt. The output indicated that I was indeed running Windows 10 Pro version 1709 build 16299, a version of Windows that includes WSL as a feature.
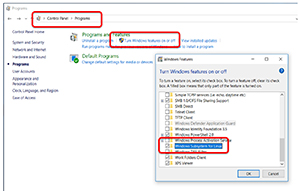
Next, I enabled WSL. To do this, I brought up the Windows Features wizard by going to the Control Panel, selecting Programs | Programs and Features | Turn Windows features on or off. You can also access this wizard directly by typing "optionalFeatures" from the Windows Start prompt. From the wizard, I selected the checkbox for Windows Subsystem for Linux and then OK (see Figure 1). After WSL was enabled, a system reboot was required.
 [Click on image for larger view.]
Figure 1. Installing Windows Subsystem for Linux.
[Click on image for larger view.]
Figure 1. Installing Windows Subsystem for Linux.
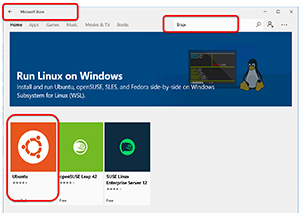
After the system reboot was complete, I then needed to install Linux on Windows. By searching for "Linux" in the Windows Store, I was somewhat surprised to find that there are now three, rather than one, Linux distributions from which to choose: Ubuntu, OpenSUSE and SUSE Linux Enterprise server, as shown in Figure 2. I selected Ubuntu, and it took a few minutes to download and complete the initial installation.
 [Click on image for larger view.]
Figure 2. Searching the Microsoft Store for the Linux distribution to install.
[Click on image for larger view.]
Figure 2. Searching the Microsoft Store for the Linux distribution to install.
Once downloaded, I pinned Ubuntu to the start bar and launched it, which then brought up an Ubuntu console displaying a message that it would take a few minutes to finish installing. After this was done, I was prompted to enter a new Unix username (I entered user01/password), and was then presented with an Ubuntu Bash command console. One of the nice things about this console is that it can be resized by simply dragging the corners or sides.
WSL Networking
When I first installed the pre-production version of WSL, I noticed that it had some networking issues, so I was excited to test networking to look for improvements with the production version. To test it, I ran some common Linux networking commands from the WSL console, such as vi, ifconfig, ping, scp, and ssh, and in doing so I did not encounter any issues (Figure 3).
 [Click on image for larger view.]
Figure 3. Testing the Windows Subsystem for Linux networking.
[Click on image for larger view.]
Figure 3. Testing the Windows Subsystem for Linux networking.
I did a quick search to see if the standard networking configuration files (such as /etc/hosts and /etc/network/interfaces) existed, and they did. In fact, Ubuntu under WSL looks like a standard Ubuntu installation.
Linux Commands
To see what version of Ubuntu I was running, I ran "lsb_release –a," which indicated that I was running 16.04.3 LTS. "Sudo dpkg –list | wc -l" indicated that 437 packages were installed. I also ran "curl" to download a webpage, "awk" to preform string manipulation, and "ftp" to get and put a file on an ftp server. These commands performed as expected.
Windows and WSL
Once I satisfied myself that WSL acted and behaved correctly, I was interested to dive a little deeper to see how it interacted with the Windows 10 system. More specifically, I wanted to see the files and the processes that it was using.
I found that that the Windows 10 local drives were mounted under the /mnt folder. For example, your C: drive is mounted as /mnt/c:. From this mount point, I could view the Windows 10 files.
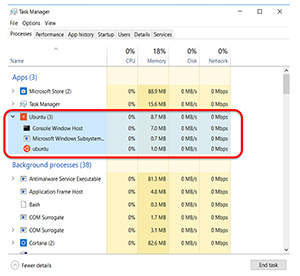
I used Windows 10 Task Manager to see what processes and resources WSL was using, and I found three—Console Window Host, Microsoft Windows Subsystem for Linux and Ubuntu—all of which are low resource processes, consuming less than 9MB of RAM and using very low levels of CPU (see Figure 4).
 [Click on image for larger view.]
Figure 4. The Windows Subsystem for Linux resources and processes.
[Click on image for larger view.]
Figure 4. The Windows Subsystem for Linux resources and processes.
Wrapping It Up
It took me less than five minutes to enable WSL and install a Linux distribution (Ubuntu) on my Windows 10 system. It looks and behaves like a standard Ubuntu installation, and did not consume a lot of resources while resting. Overall, I would say it's a no-brainer to install it on your system if you need or want access to a lightweight Linux distribution.
In the next article of this series, I'll be looking at using WSL to carry out daily tasks, including installing other Ubuntu packages on WSL, setting up an SSH server, and running cron jobs. In my following article, I will discuss how to install other distributions on WSL, including distributions both from the Windows Store and those not found in the store. In my fourth article, I'll explain ways in which you can configure WSL to do things it wasn't designed for, such as using WSL to run a graphics interface, which will be an update of the previous article that I wrote on the pre-production version of WSL. In my final article, I'll give an overview of some of the additional applications that have been written specifically for WSL.
About the Author
Tom Fenton has a wealth of hands-on IT experience gained over the past 30 years in a variety of technologies, with the past 20 years focusing on virtualization and storage. He previously worked as a Technical Marketing Manager for ControlUp. He also previously worked at VMware in Staff and Senior level positions. He has also worked as a Senior Validation Engineer with The Taneja Group, where he headed the Validation Service Lab and was instrumental in starting up its vSphere Virtual Volumes practice. He's on X @vDoppler.