In-Depth
How To Install Ubuntu 16.04 Desktop on vSphere
A relatively simple process, provided you know how to work around some of the "gothcas."
Installing Ubuntu 16.04 as a virtual machine (VM) on ESXi is a relatively simple process, provided you know how to work around some of the "gothcas" that can complicate the process. In this article, I'll show you how I installed Ubuntu 16.04.3 LTS Desktop on an ESXi host in my VMware vSphere 6.5 environment. I specifically chose the desktop version of Ubuntu because in a future article I'll be using this same Linux VM as a basis for a virtual desktop using VMware instant clone technology.
My vSphere 6.5 environment consists of a single ESXi host coupled with a vCenter Server Appliance (VCSA). The ESXi host is a dual proc (Intel E5-2640) Dell R620 server with 98GB of RAM. The back-end storage is provided by two 800GB Micron 9100 PRO Enterprise NVMe drives.
I downloaded the Ubuntu 16.04.3 LTS ISO image from here and then transferred it to a datastore on my ESXi host by using WinSCP. I created a new VM by using the vSphere Web client, and specified the VM to have 2 CPUs, 2GB of RAM, 32MB of video memory, a 32GB hard drive backed by the NVMe drives. I also configured the Ubuntu ISO I downloaded to connect as a CD/DVD when the VM booted up (Figure 1).
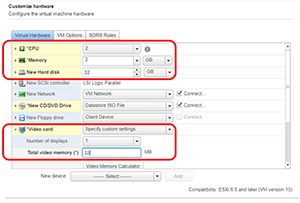 [Click on image for larger view.]
Figure 1. The virtual machine hardware settings.
[Click on image for larger view.]
Figure 1. The virtual machine hardware settings.
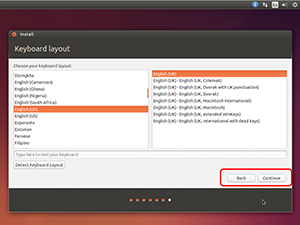
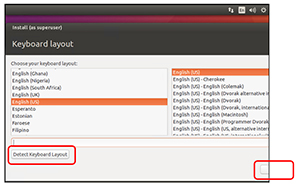
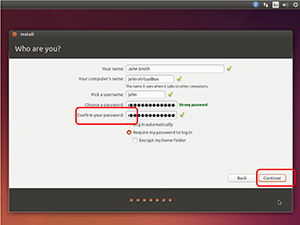
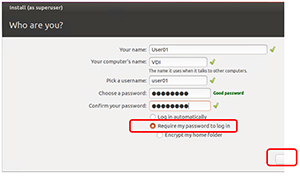
Next, I started the VM and opened a console to the VM. From the install wizard, I selected "Install Ubuntu," and allowed it to download updates and to install third-party software. I accepted all other defaults until I hit the first issue; due to the small screen size (800x640), the wizard wasn't displaying as it normally should (see Figure 2 for an example of how it should be displaying), and the Continue button was also hidden (Figure 3). In order to access the Continue button, I had to use the tab key to go to the Detect Keyboard Layout button, press the tab key twice and then press enter to go to the next installation screen. After I specified the username and password, I found the same issue of the screen not displaying correctly (Figure 4), so I had to use the tab key to go to the hidden continue button (Figure 5).
 [Click on image for larger view.]
Figure 2. The full keyboard console.
[Click on image for larger view.]
Figure 2. The full keyboard console.
 [Click on image for larger view.]
Figure 3. The keyboard console in vSphere.
[Click on image for larger view.]
Figure 3. The keyboard console in vSphere.
 [Click on image for larger view.]
Figure 4. The correctly displayed user ID.
[Click on image for larger view.]
Figure 4. The correctly displayed user ID.
 [Click on image for larger view.]
Figure 5. The user ID screen in vSphere.
[Click on image for larger view.]
Figure 5. The user ID screen in vSphere.
After Ubuntu was installed, I detached the ISO image and rebooted the system. After the reboot was complete, I logged in under the username I created; however, after logging in I was unable to click on any of the icons on the left of the screen due to the small screen size (Figure 6).
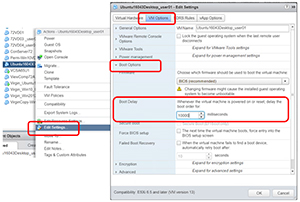
To fix this problem, I needed to change the screen resolution in the boot loader (GRUB). To do this I powered down the Ubuntu VM using the vSphere client and then edited the VM setting to change the boot delay to 10 seconds (10,000 milliseconds) (Figure 7).
 [Click on image for larger view.]
Figure 7. Changing the boot options.
[Click on image for larger view.]
Figure 7. Changing the boot options.
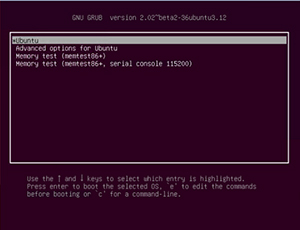
I powered on the VM again and quickly went back to its console; while it was booting, I pressed the right Shift key to enter the GRUB menu, and then pressed the 'E' key while the *Ubuntu line was highlighted (Figure 8).
 [Click on image for larger view.]
Figure 8. The GRUB menu.
[Click on image for larger view.]
Figure 8. The GRUB menu.
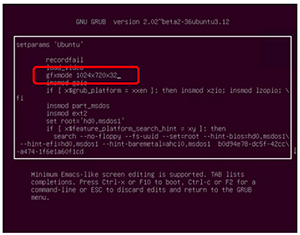
I changed the GFXmode entry from its default setting $linux_gfx_mode (Figure 9) to 1024x720x32 (Figure 10). Next, I pressed F10 to boot the system, and then I needed to reboot the system one more time.
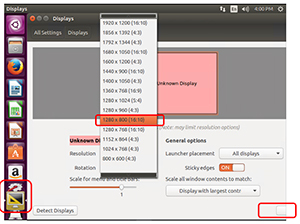
After the system rebooted, I was able to log in and to select Setting | Displays in order to change the screen resolution to 1024 x 800, but I needed to use the tab key to select the Apply button (Figure 11).
 [Click on image for larger view.]
Figure 9. The gfxmode default.
[Click on image for larger view.]
Figure 9. The gfxmode default.
 [Click on image for larger view.]
Figure 10. Changing the gfxmode to 1024 x 720.
[Click on image for larger view.]
Figure 10. Changing the gfxmode to 1024 x 720.
 [Click on image for larger view.]
Figure 11. Changing display settings.
[Click on image for larger view.]
Figure 11. Changing display settings.
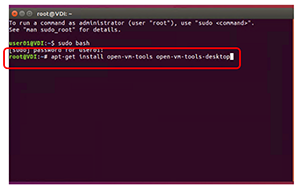
After the system was successfully installed, I updated the packages on it by entering sudo apt-get update and then, in order to optimize the system for ESXi, I needed to install VMware tools. To install VMware tools, I opened a terminal window on the Ubuntu system and entered sudo apt-get install open-vm-tools open-vm-tools-desktop and accepted all of the defaults when it installed (Figure 12). I then rebooted my Ubuntu system and logged back in to it.
 [Click on image for larger view.]
Figure 12. Installing the VMware tools.
[Click on image for larger view.]
Figure 12. Installing the VMware tools.
Because I wanted to access this system using SSH, I installed openSSH server by entering sudo apt-get install openssh-server.
A few other parameters needed to be changed in the OpenSSH configuration file; I made the following changes and additions to /etc/ssh/sshd_config:
- Changed: PermitRootLogin no
- Added: AllowUsers yourusername
- Changed: PasswordAuthentication yes
- Added: UsePrivilegeSeparation no
After these changes and additions were made, I restarted the SSH service by running service ssh restart and I was then able to access the system using SSH from a remote system.
Wrapping Up
Linux is a popular OS and by following the instructions here to avoid the installation issues, you should be able to successfully install Ubuntu 16.04 desktop on your vSphere system. Although these instructions were written for vSphere 6.5 and Ubuntu 16.04, you should be able to use the other versions of vSphere and Ubuntu with only a minimal amount of changes. In my next article, I'll show you how I used this VM as a virtual desktop using the VMware Horizon connection broker.
About the Author
Tom Fenton has a wealth of hands-on IT experience gained over the past 30 years in a variety of technologies, with the past 20 years focusing on virtualization and storage. He previously worked as a Technical Marketing Manager for ControlUp. He also previously worked at VMware in Staff and Senior level positions. He has also worked as a Senior Validation Engineer with The Taneja Group, where he headed the Validation Service Lab and was instrumental in starting up its vSphere Virtual Volumes practice. He's on X @vDoppler.