How-To
Installing Ubuntu Using Hyper-V Quick Create
In this article, I'll walk you through my experience installing and using Quick Create to install Ubuntu on my Windows 10 system.

I've been using the Microsoft Window Subsystem for Linux (WSL) on my Windows 10 system for the last year or so and have found it very useful. If you haven't used WSL, you should look at it as it allows you to run a Linux Bash shell on your Windows system. For more information on WSL you can read some of my past articles here. Although I've found WSL useful, it is limited as it runs as a process on Windows and doesn't have all the features of a full distribution, it lacks a GUI and its networking is a little wonky. Although I could've installed a full Linux distro on my Windows 10 system using VMware Workstation, Oracle VirtualBox, or Microsoft Hyper-V, I didn't want to spend the time setting up a virtual machine (VM), finding and downloading an image and configuring all the settings. Microsoft, however, has just solved this issue, making it really easy to install a full Ubuntu distribution on Windows 10 by using the Hyper-V Quick Create mechanism; in fact, Microsoft states that all you need to do to initiate the installation process is type "Hyper-V Quick Create" in your Start menu. In this article, I'll walk you through my experience installing and using Quick Create to install Ubuntu on my Windows 10 system.
If you're unfamiliar with and haven't used WSL in the past, you should definitely consider doing so as it allows you to run a Linux Bash shell on your Windows system. I highly recommend you look more into WSL, and my articles are a great place to start.
Using Quick Create
In order to use Hyper-V Quick Create, you'll first need to have the Windows 10 Fall Creators Update installed, and you'll also need to install and enable Hyper-V and Hyper-V Manager on your Windows system, something that I hadn't done. I'll show you how to install Hyper-V on a physical system directly. If you're running Hyper-V as a VM on ESXi, I'll show you how I modified my Windows 10 VM to enable Hyper-V to run on it in another article.
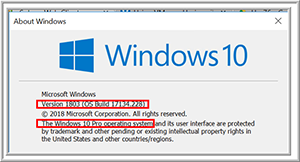
You can enable Hyper-V from the Control Panel or by using PowerShell; I chose to enable Hyper-V using the Control panel. To use Hyper-V you'll need a 64-bit version of Windows 10 with a Pro or Enterprise license running on a modern CPU with BIOS-level hardware virtualization support. I verified the version of my Windows 10 system by entering winver at the start prompt. It verified that I was running Windows 10 Pro edition and had been updated to version 1803 (Figure 1).
 [Click on image for larger view.]
Figure 1. Verifying the Windows version running.
[Click on image for larger view.]
Figure 1. Verifying the Windows version running.
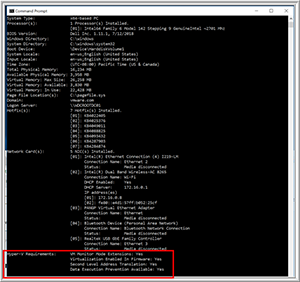
I then verified that I had hardware virtualization turned on in my system's BIOS by entering systeminfo in the command prompt and then by looking for the Hyper-V Requirements section (Figure 2), which confirmed that the CPU running on my system would support Hyper-V.
 [Click on image for larger view.]
Figure 2. Systeminfo confirming support of Hyper-V on my system.
[Click on image for larger view.]
Figure 2. Systeminfo confirming support of Hyper-V on my system.
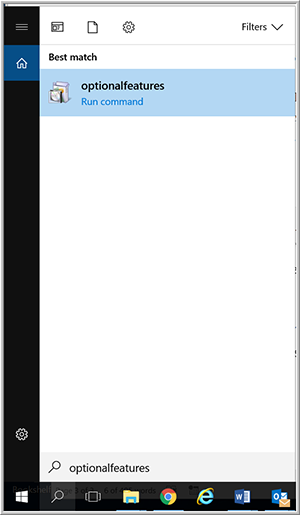
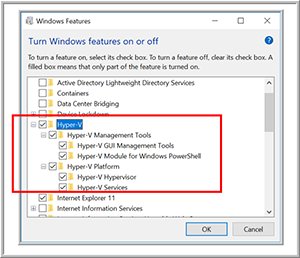
I then installed Hyper-V by entering optionalfeatures at the Start search and selecting Run command when it appeared (Figure 3). From the Windows Features window that it led me to, I selected the Hyper-V checkboxes and selected OK (Figure 4).
 [Click on image for larger view.]
Figure 3. Optionalfeatures.
[Click on image for larger view.]
Figure 3. Optionalfeatures.
 [Click on image for larger view.]
Figure 4. Turning on Hyper-V.
[Click on image for larger view.]
Figure 4. Turning on Hyper-V.
After the Hyper-V features had installed, I rebooted my system.
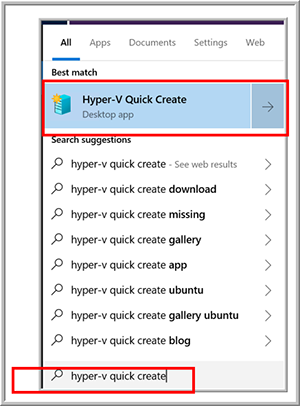
Once the system reboot completed, I entered Hyper-V quick create at the Start search and followed the link to the app (Figure 5), and then clicked YES to allow it to run.
 [Click on image for larger view.]
Figure 5. Hyper-V Quick Create.
[Click on image for larger view.]
Figure 5. Hyper-V Quick Create.
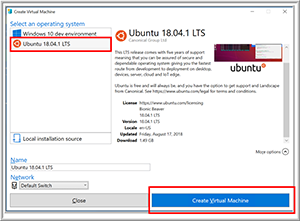
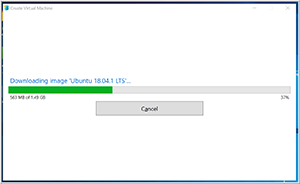
I was then given the option to create a Windows 10 or Ubuntu VM. I selected Ubuntu and Create Virtual Machine (Figure 6). The Ubuntu image downloaded (Figure 7), and then a VM was automatically created from the Ubuntu image.
 [Click on image for larger view.]
Figure 6. Ubuntu Quick Create.
[Click on image for larger view.]
Figure 6. Ubuntu Quick Create.
 [Click on image for larger view.]
Figure 7. Downloading Ubuntu.
[Click on image for larger view.]
Figure 7. Downloading Ubuntu.
Using Ubuntu
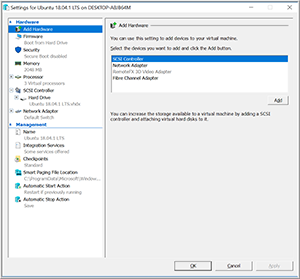
After I was notified that the VM was created successfully, I selected Edit settings and examined how the VM was configured (Figure 8). I then clicked Cancel, Connect and then Start.
 [Click on image for larger view.]
Figure 8. Ubuntu VM settings.
[Click on image for larger view.]
Figure 8. Ubuntu VM settings.
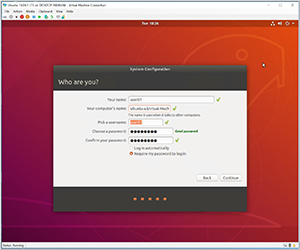
At this point, I walked through the standard Ubuntu configuration menu and accepted the defaults (Figure 9). It's worth noting that some people have reported issues when they selected the "log in automatically" function.
 [Click on image for larger view.]
Figure 9. Configuring Ubuntu settings.
[Click on image for larger view.]
Figure 9. Configuring Ubuntu settings.
I then configured the size of the Ubuntu console and connected to the Ubuntu system. At this time, an XRDP login dialog appeared, and I logged in using the user I had configured for the system; I then had access to a fully functional Ubuntu system that I successfully used to install other applications, such as Chrome, and navigated the Ubuntu system without any issues (Figure 10).
 [Click on image for larger view.]
Figure 10. The Ubuntu VM running successfully.
[Click on image for larger view.]
Figure 10. The Ubuntu VM running successfully.
Wrapping Up
Even though I had to install Hyper-V on my Windows 10 system before I could run "Hyper-V Quick Create" to create my Ubuntu VM, I found the process straightforward, easy and fast—it took me less than half an hour to get the Ubuntu VM up and running. I hope that Microsoft adds additional images to the Quick Create gallery soon, and I think that adding some of its past OSes would be a great boon to developers who need to test their code against older versions of Windows.
As mentioned earlier, I've used WSL for the past year on my system and have found it useful. Even though WSL doesn't present a full Linux environment, it's integrated into the Windows filesystem; on the other hand, a full Ubuntu VM provides a full Linux distribution and a GUI, but it doesn't allow you to access the underlying filesystem. As such, each of these two ways to run Ubuntu on your system has its place on your system.
About the Author
Tom Fenton has a wealth of hands-on IT experience gained over the past 30 years in a variety of technologies, with the past 20 years focusing on virtualization and storage. He previously worked as a Technical Marketing Manager for ControlUp. He also previously worked at VMware in Staff and Senior level positions. He has also worked as a Senior Validation Engineer with The Taneja Group, where he headed the Validation Service Lab and was instrumental in starting up its vSphere Virtual Volumes practice. He's on X @vDoppler.