How-To
A Total Beginner's Guide to macOS X on AWS, Part 1: Dedicated Hosts and Quotas
Brien Posey explains the need for a dedicated host, quotas and more in this first installment.
Recently Amazon introduced the ability to create macOS virtual machine instances in the AWS cloud. Although the server market continues to be dominated by Windows and Linux servers, macOS is gaining ground so it's important to be familiar with AWS's ability to host macOS servers.
Being that there are probably a lot of admins who have never worked with a macOS server before, and because the process of setting up a macOS instance is different from that of other instance types, I decided to write this three-part, total beginner's guide.
Allocating a Dedicated Host
One of the things that makes creating a macOS instance so much different from setting up other types of EC2 instances is that macOS instances have to run on a dedicated host. This means that there will be hardware in the Amazon datacenter that is being dedicated to your exclusive use. Normally, when you deploy an EC2 instance, that instance is running on shared hardware that is being used by you and by other AWS subscribers. Needless to say, using a dedicated host costs significantly more than creating an instance on a shared host.
The process for allocating a dedicated host is relatively easy. However, it may not be something that you can do right away. Amazon places a number of quota limits on AWS accounts. By default, the quota limit for dedicated hosts is 0, meaning that unless you request a quota increase, you won't be able to allocate a dedicated host.
Before I show you how to request this quota increase, there is something extremely important that you need to know. As it stands right now, Mac hardware in only available in the US-West-2 (Oregon) datacenter. When you request a quota increase, you have to tell Amazon which region you want to change the quota in. You will need to make sure that you request the quota increase in a region that supports macOS hardware.
To get started, log into your AWS account through the usual web portal. As I'm sure you probably know, the portal displays your account name in the upper right corner of the screen, alongside a few other menu options. Click on your account name and a menu will appear beneath it. One of those menu options is My Service Quotas. Go ahead and click on the My Service Quotas option, which you can see in Figure 1.
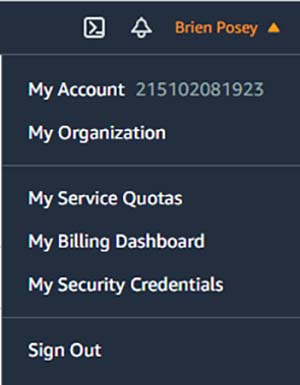 Figure 1: Click on the My Service Quotas option.
At this point, you will be taken into the Service Quotas dashboard. This dashboard lists some of the general areas of service. There are typically multiple quotas in place for each service. If you look at Figure 2 for example, you can see that there are 89 quotas pertaining to Amazon Elastic Compute Cloud (Amazon EC2). It's possible however, that you might have a different number of quotas, which is fine.
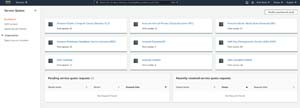 [Click on image for larger view.]Figure 2: Click on the My Service Quotas option.
This is what the Service Quotas dashboard looks like.
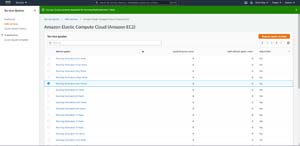
Go ahead and click on the Amazon Elastic Compute Cloud (Amazon EC2) link, and you will be taken to a screen that lists all of the EC2-related quotas. As you can see in Figure 3, each quota is listed with its applied value (what the quota is currently set at), the default value, and an indication of whether or not the quota is adjustable.
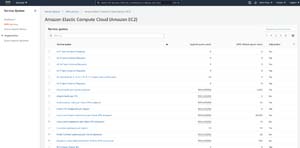 [Click on image for larger view.]Figure 3: These are the EC2 quotas.
Scroll through the list of quotas until you locate the quota named Running Dedicated Mac1 Hosts. If you have difficulty finding this quota, you can enter the word Mac into the search box as an alternative. Select the quota, and then click on the Request Quota Increase button, shown in Figure 4.
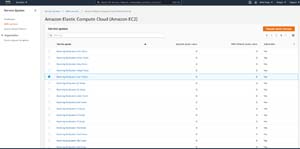 [Click on image for larger view.]Figure 4: Select the Running Dedicated mac1 Hosts quota and then click the Request Quota Increase button.
At this point, you will be taken to a screen that prompts you to enter the new quota value that you want to assign. In Figure 5 for instance, I am requesting a quota value of 1, indicating that I want to be able to run one dedicated macOS host. Remember, this value only serves to cap the maximum number of dedicated hosts that you will be able to provision, it does not actually allocate those hosts (I will show you how to do that later on). One thing to keep in mind however, is that each dedicated host can only accommodate a single macOS instance. Therefore, you will need to keep in mind how many instances you will need when figuring out how many hosts to request.
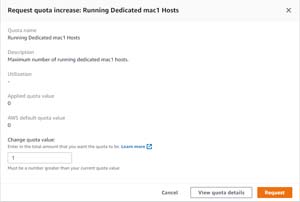 [Click on image for larger view.]Figure 5: Specify the maximum number of macOS hosts that you wish to run.
Click the Request button, and your quota increase request will be submitted. You should see a green banner indicating that your request has been submitted, as shown in Figure 6. It can take some time for your quota requests to be fulfilled, but you can check on the status of the request at any time by clicking on the Quota Request History link, shown in Figure 7.
 [Click on image for larger view.]Figure 6: You should see confirmation that your request was submitted.
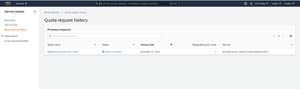 [Click on image for larger view.]Figure 7: You can check the status of your request by clicking on Quota Request History.
Once your quota request has been granted, you can move forward with provisioning a macOS instance. I will show you how to do that in Part 2.
About the Author
Brien Posey is a 22-time Microsoft MVP with decades of IT experience. As a freelance writer, Posey has written thousands of articles and contributed to several dozen books on a wide variety of IT topics. Prior to going freelance, Posey was a CIO for a national chain of hospitals and health care facilities. He has also served as a network administrator for some of the country's largest insurance companies and for the Department of Defense at Fort Knox. In addition to his continued work in IT, Posey has spent the last several years actively training as a commercial scientist-astronaut candidate in preparation to fly on a mission to study polar mesospheric clouds from space. You can follow his spaceflight training on his Web site.