How-To
A Total Beginner's Guide to macOS X on AWS Part 2: Provisioning Instances
After covering the need for dedicated hosts and how to handle quotas, Brien Posey walks you through the instance creation process.
Recently, Amazon introduced the ability to create macOS virtual machine instances in the AWS cloud. Although the server market continues to be dominated by Windows and Linux servers, macOS is gaining ground, so it's important to be familiar with AWS's ability to host macOS servers.
Being that there are probably a lot of admins who have never worked with a macOS server before, I decided to write this three-part, total beginner's guide as a way of helping those who find themselves tasked with deploying macOS instances (see part 1 here).
The process for creating a macOS instance is at least somewhat similar to that of creating a Windows or Linux instance, but there are several differences. As such, I want to begin by walking you through the instance creation process.
To create your first macOS instance, open the EC2 dashboard and click the Launch Instance button. When prompted, select one of the macOS AMIs, as shown in Figure 1. It is worth noting that unlike Windows and Linux, there are no free tier eligible macOS AMIs (at least not right now).
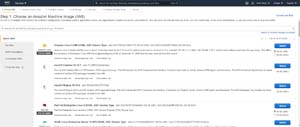 [Click on image for larger view.]Figure 1: Select one of the macOS machine images.
Click Next, and you will be taken to a screen that asks you to choose your instance type. Unlike Windows and Linux instances, there is only one instance type to choose from, as shown in Figure 2. Make your selection and click Next.
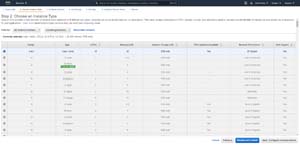 [Click on image for larger view.]Figure 2: There is only one instance type that you can choose.
The next screen that you will be taken to gives you the opportunity to configure the instance details. This screen, which is shown in Figure 3, is identical to the one used for setting up Windows and Linux instances. However, there is one very significant difference that you need to be aware of. The only way to deploy a macOS instance is to do so on a dedicated host. It is worth noting that using a dedicated host incurs a greater cost than deploying a virtual machine instance on a shared host (which is the usual way of doing things in AWS).
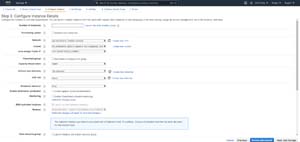 [Click on image for larger view.]Figure 3: This is the Configure Instance Details screen.
Assuming that you do not yet have a macOS dedicated host, you will need to scroll down to the bottom of the screen shown in the figure above. Next, locate the Host section and then click on the Allocate New Host button (unless you already have a dedicated host, in which case you can select it from the Host list). You can see the Allocate a New Host option in Figure 4.
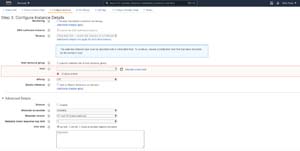 [Click on image for larger view.]Figure 4: You will need to allocate a new host if you do not already have a dedicated host set up.
Depending on how you plan to use the macOS instance, designating a host may be the only thing that you need to do on this screen, other than clicking Next. If you are planning on using the macOS instance in production however, then there are some additional configuration options that might be useful to you. For example, AWS gives you the option of selecting a network and a subnet. There is also an option to create multiple instances by specifying the number of instances that you want to create. This screen also gives you options for joining the machine to a directory and assigning an IAM role.
The process of allocating a host is relatively straightforward. You will need to assign a name to the host and choose the instance family that you want to use. Be sure to set the instance family to Mac1, as shown in Figure 5. You will also need to set the instance type to Mac1.metal. Finally, choose your availability zone and specify any other options that you want to use. When you are done, click Allocate.
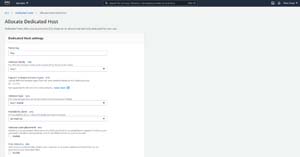 [Click on image for larger view.]Figure 5: Set the instance type to Mac1.metal.
When you finish configuring the instance details, click Next and you will be taken to the Add Storage screen. Accept the defaults and click Next: Add Tags. Apply any required tags and then click Next: Configure Security Group. Here you will need to either create a new security group or choose an existing one. When you are done, click Review and Launch and the new instance will be created.
Now that you have created a macOS instance, the next step in the process is to connect to the instance so that you can begin using it. I will show you how to connect to the instance in Part 3.
About the Author
Brien Posey is a 22-time Microsoft MVP with decades of IT experience. As a freelance writer, Posey has written thousands of articles and contributed to several dozen books on a wide variety of IT topics. Prior to going freelance, Posey was a CIO for a national chain of hospitals and health care facilities. He has also served as a network administrator for some of the country's largest insurance companies and for the Department of Defense at Fort Knox. In addition to his continued work in IT, Posey has spent the last several years actively training as a commercial scientist-astronaut candidate in preparation to fly on a mission to study polar mesospheric clouds from space. You can follow his spaceflight training on his Web site.