How-To
Migrating On-Premises Applications to AWS, Part 3: Replication, Testing & Final Cutover
Brien Posey completes his 3-part series, including an 18-hour server replication process.
In the previous blog post, I showed you how to deploy an agent onto the server that you are going to migrate. Once the agent has been installed, you will need to wait for the initial synchronization process to complete before you can attempt a migration. This synchronization happens automatically without you having to do anything. You can see what the initial sync looks like in Figure 1.
 [Click on image for larger view.] Figure 1: The initial synchronization can take a while to complete.
Once this initial synchronization completes, you should see a message like the one shown in Figure 2, indicating that the server is ready for testing. Notice in the figure that the replication process took 18 hours to complete, even though my test VM was only running a default Windows installation and nothing more. The reason why the process takes so long is because it replicates the entire hard disk (or virtual hard disk) including the blank space within it.
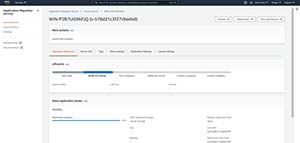 [Click on image for larger view.] Figure 2: The replication process is complete.
At this point, you can begin testing the instance by choosing the Launch Test Instance command from the Replication drop down menu. When you do, AWS will display a warning message indicating that you are about to launch a new instance. Just click the Launch button to create the instance. Upon doing so, AWS will launch an EC2 instance within which the virtual machine can be tested.
When you finish testing the virtual machine instance, select the Mark as Ready for Cutover command from the Test and Cutover menu, shown in Figure 3. When you do, AWS will display a message telling you that the test instance that you created will continue to accrue charges until you terminate the instance. This message gives you an option to go ahead and terminate the instance now, but you can opt to manually terminate the instance later on if you prefer. When you are done, the instance will be flagged as Ready for Cutover, as shown in Figure 4. If you accidentally mark an instance as being ready for cutover, you can use the Test and Cutover menu's Revert to Ready for Testing option.
 [Click on image for larger view.] Figure 3: When you finish testing the instance, mark it as Ready for Cutover.
 [Click on image for larger view.] Figure 4: The server is now ready for cutover.
If you are indeed ready to perform the final cutover then go ahead and select the Launch Cutover Instances option from the Test and Cutover menu. Once again, you will see a message indicating that an EC2 instance is about to be launched. Go ahead and click the Launch button to create the new instance. The Migration Lifecycle will now indicate that a cutover is in progress. You will also see a message at the top of the screen stating that a cutover instance is being launched. You can see what this looks like in Figure 5.
 [Click on image for larger view.] Figure 5: The cutover is in progress.
You can monitor the instance creation process by clicking on the source server or by launching the EC2 console. When the process eventually completes, the last step in the process is to finalize the cutover. To do so, just select the Finalize Cutover command from the Test and Cutover menu. At this point, you will see a warning message like the one that is shown in Figure 6 indicating that the process cannot be reversed and that all of the replicated data will be discarded. Assuming that you want to move forward with the process, click the Finalize button.
 [Click on image for larger view.] Figure 6: Click the Finalize button to complete the process.
You should now be able to verify that the cutover process is complete. At this point, the workload has been fully migrated to the AWS cloud.
 [Click on image for larger view.] Figure 7: The migration process is now complete.
It's worth noting that it can take quite a while for the server to show up in the list of EC2 instances once the cutover has been finalized. In my case, it took over half an hour. Eventually however, the server did show up, as shown below.
 [Click on image for larger view.] Figure 8: This is my migrated server.
About the Author
Brien Posey is a 22-time Microsoft MVP with decades of IT experience. As a freelance writer, Posey has written thousands of articles and contributed to several dozen books on a wide variety of IT topics. Prior to going freelance, Posey was a CIO for a national chain of hospitals and health care facilities. He has also served as a network administrator for some of the country's largest insurance companies and for the Department of Defense at Fort Knox. In addition to his continued work in IT, Posey has spent the last several years actively training as a commercial scientist-astronaut candidate in preparation to fly on a mission to study polar mesospheric clouds from space. You can follow his spaceflight training on his Web site.