How-To
Migrating On-Premises Applications to AWS, Part 2: A Sample App Migration
Brien Posey details how to set up a replication settings template, replication agent and more.
In the previous blog post in this series, I talked a bit about the new AWS Application Migration Service and how it works. Now I want to walk you through a sample application migration.
Begin the process by selecting the AWS Application Migration Service option from the list of services (it's located in the Migration and Transfer section). When you arrive at the AWS Application Migration screen, click the Get Started button.
At this point, you will be taken to a screen similar to the one shown in Figure 1, which walks you through the process of creating a replication settings template. The Application Migration Service requires the use of an EC2 instance that will act as a staging server. This instance is created from the Replication Settings Template.
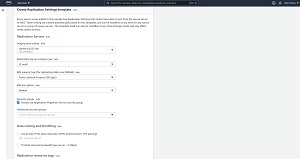 [Click on image for larger view.] Figure 1: You will need to create a Replication Settings Template
As you can see in the above graphic, the process of setting up a Replication Settings Template is relatively straightforward. You will need to decide which subnet you want to place the staging server into, and then choose the Replication Server instance size that you want to use. Incidentally, Amazon recommends using the T3.small instance type unless you have a compelling business reason to select a different instance type. Remember, the template will only apply to the staging server, not to the instance that will eventually accommodate your migrated workload, and even a T3.small server can handle the replication of up to 15 disks.
The next thing that you will need to select is an EBS volume that can be used by the staging server. This volume will only be used if you are going to be replicating disks that are over 500 GB in size.
Finally, there are options for specifying an encryption type, choosing a custom security groups, using a private IP address, and throttling network bandwidth. The default values should work well in most situations, but there are situations that may justify using a custom setting. For example, you may need to enable network throttling if you are working in a bandwidth constrained environment. Once you have selected the settings that you want to use within your template, click on the Create Template button.
Installing the AWS Replication Agent
Now that you have created a Replication Settings template, the next step in the process is to install the AWS Replication Agent onto the servers that you are planning to migrate. In order to do this, you are going to need to create a user account whose credentials the agent can use. You can use an existing account if you want, but the account must have programmatic access to the AWS cloud and it will also need to be assigned the AWSApplicationMigrationAgentPolicy policy. If you need help creating a user account that can be used in the migration process, see these instructions.
Regardless of whether you decide to create a new account or use an existing account, you will need to know the AWS Access Key ID, and the AWS Secret Access Key that is associated with the account. This information is only revealed when the account is initially created. You can't go back and look it up later on. Therefore, unless you already know an account's access key and a secret access key then you will need to create a new account.
Once you have an account ready for use, the next step in the process is to download an agent and install it onto the server that is to be replicated. The agent download and installation process varies depending on the OS that is running on the server that you are migrating. For the purposes of this blog series, I will be focusing on Windows servers, but here are instructions for Linux servers.
You will need to use the following URL to download the Windows agent:
https://aws-application-migration-service-us-east-1.s3.amazonaws.com/latest/windows/AwsReplicationWindowsInstaller.exe
Notice that the URL includes a reference to a region. You will need to restructure the URL to reference the region within which the Application Migration Service is running. For example, I am using the US-West-2 region, so I used this URL:
https://aws-application-migration-service-us-west-2.s3.amazonaws.com/latest/windows/AwsReplicationWindowsInstaller.exe
Once you have downloaded the agent, copy it to the server that is to be migrated (you can use the agent on multiple servers if you need to). Next, open an elevated PowerShell session, navigate to the folder containing the agent, and enter the following command: .\AWSReplicationWindowsInstaller.exe (be sure to enter the .\ at the beginning of the command). At this point, PowerShell will prompt you for the AWS region name, the AWS Access Key ID, and the AWS Secret Access Key that you want to use. It is worth noting that the cursor will not move and the text is not displayed when typing the secret key, making it appear as though nothing is happening.
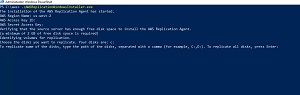 [Click on image for larger view.] Figure 2: Enter the required information and specify the disks that you want to migrate
Once you enter the required information, you will be prompted to specify the disks that you want to replicate. You can see what this looks like in Figure 2. Meanwhile, Figure 3 shows the agent deployment process in its entirety.
 [Click on image for larger view.] Figure 3: The agent deployment process in its entirety
Now that the agent is deployed, we can move on with the rest of the migration process. I will show you how it works in Part 3.
About the Author
Brien Posey is a 22-time Microsoft MVP with decades of IT experience. As a freelance writer, Posey has written thousands of articles and contributed to several dozen books on a wide variety of IT topics. Prior to going freelance, Posey was a CIO for a national chain of hospitals and health care facilities. He has also served as a network administrator for some of the country's largest insurance companies and for the Department of Defense at Fort Knox. In addition to his continued work in IT, Posey has spent the last several years actively training as a commercial scientist-astronaut candidate in preparation to fly on a mission to study polar mesospheric clouds from space. You can follow his spaceflight training on his Web site.