How-To
Modifying an EC2 Instance Type in AWS Cloud
The easiest way to adapt to evolving workload demands in EC2 is to change the instance type.
Workload demands inevitably change over time. A workload might for example, see increased demand, leading to the need for additional hardware. Similarly, workload usage can wane, presenting an opportunity to reduce costs by reclaiming some of its resources. The easiest way to adapt to evolving workload demands in EC2 is to change the instance type. In this blog post, I will show you how it's done.
Before I get started, there are two things that you need to know. First, I recommend Mmaking a backup of your EC2 instances before attempting to change the instance type. Changing the instance type should be a non-destructive operation, but it's always a good idea to make a backup any time that you are about to make a major modification.
The second thing that you need to know is that for the purposes of this blog post, I am assuming that the desired instance type is compatible with the instance's current configuration. I'm also assuming that the OS contains any device drivers that it will need in order to work with the new hardware configuration. If any drivers are missing, you will need to install them before continuing.
To get started, log into the EC2 console and go to the list of instances and locate the instance that you want to modify. Unfortunately, there isn't a way to change the instance type while the instance is running, so you will have to set the instance state to Stopped. Keep in mind that you will need to completely stop the instance. Simply allowing the instance to be placed into hibernation won't work.
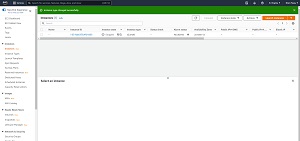
Once the instance has been stopped, refresh the console display, select the instance's checkbox, and then click on the Actions menu. You will need to choose Instance Settings from the menu, followed by Change Instance Type. You can see what these menu options look like in Figure 1.
 [Click on image for larger view.] Figure 1: Click on the Actions menu and choose Instance Settings, followed by Change Instance Type.
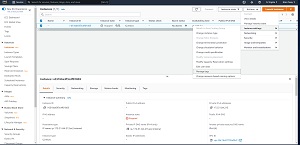
At this point, you will be taken to the Change Instance Type page, which you can see in Figure 2. As you can see in the figure, this screen displays the instance ID (so you can make sure that you are modifying the correct instance) along with the current instance type. Changing the instance type is simply a matter of choosing the desired instance type from the drop-down menu. It is worth noting that the options displayed on this menu tend to be somewhat limited. The reason why there are so few options is that only compatible instance types are listed among the choices. If you want to switch to a type that isn't on the list, then you will need to perform a migration instead. A migration involves creating a brand-new instance and then transferring the old instance's contents to the new instance.
 [Click on image for larger view.] Figure 2: The Change Instance Type screen makes it easy to pick a new instance type.
One more thing that you might have noticed in the figure above is the EBS Optimized checkbox. EBS refers to Elastic Block Storage. If the new instance type that you have chosen supports EBS optimization, then the EBS Optimized checkbox will be selected by default. You can deselect the checkbox if you want, but there is rarely a reason to do so. Of course not all instance types support EBS optimization. In the figure above, the EBS Optimized checkbox is grayed out and there is a message beneath it stating that the currently selected instance type does not support EBS optimization.
To complete the process, make sure that you have selected the desired instance type from the drop-down menu and then click the Apply button. When you do, you should see a message like the one shown in Figure 3 indicating that the instance type has been changed. In case you are wondering, changing the instance type only takes about 10 seconds.
 [Click on image for larger view.] Figure 3: The instance type has been changed.
The only thing left to do now is to refresh the display and then start the instance.
About the Author
Brien Posey is a 22-time Microsoft MVP with decades of IT experience. As a freelance writer, Posey has written thousands of articles and contributed to several dozen books on a wide variety of IT topics. Prior to going freelance, Posey was a CIO for a national chain of hospitals and health care facilities. He has also served as a network administrator for some of the country's largest insurance companies and for the Department of Defense at Fort Knox. In addition to his continued work in IT, Posey has spent the last several years actively training as a commercial scientist-astronaut candidate in preparation to fly on a mission to study polar mesospheric clouds from space. You can follow his spaceflight training on his Web site.