How-To
Testing AWS Network Communications with the VPC Reachability Analyzer
The resources that you create in the AWS cloud use software-defined networking (SDN) to communicate with one another. Initially, this network architecture is relatively simple, but it can quickly become complex as you create more and more resources. As that complexity increases, you may find that you have difficulty getting some resources to communicate with others. Fortunately, Amazon provides a tool called the VPC Reachability Analyzer.
The Reachability Analyzer is a simple tool that tests to see whether or not traffic is able to flow from a particular source resource to a specific destination resource. If the test fails, then you can use information provided by the tool to help narrow down the cause of the problem.
To perform a reachability test, begin by selecting the VPC option from the AWS list of services. This will launch the VPC console. Next, locate the Network Analysis section in the tree display on the left side of the screen and then click on the Reachability Analyzer option. This will cause AWS to launch the Reachability Analyzer console.
Click the Create and Analyze Path button, and you will be taken to the Create and Analyze Path screen, shown in Figure 1.
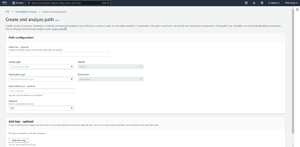 [Click on image for larger view.] Figure 1: This is the screen used to specify the path that you want to analyze.
As you can see in the figure above, the first thing that you will need to do is to provide a name tag. Technically, the process of entering a name tag is optional, but it's a good idea to go ahead and use a tag because doing so can help you to keep track of which analytical job was which.
The next thing that you will have to do is to specify the source and destination that you want to use. As previously noted, the whole purpose behind the Reachability Analyzer is to test whether or not traffic is able to flow between various resources. As such, the source is the origination point for the test packets and the destination is the place where those packets are going to.
AWS gives you the ability to specify both a source type and a destination type. Source and destination types can consist of transit gateways, VPN gateways, instances, network interfaces, Internet gateways, VPC endpoints, and VPC peering connections. You can see the full list of source types in Figure 2.
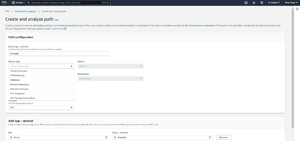 [Click on image for larger view.] Figure 2: You will need to choose a source type and a destination type.
Just as you will need to specify a source and destination type, you will also need to specify the actual source and destination that you want to use. Suppose for example, that you wanted to find out whether or not traffic could flow between two EC2 instances. To do so, you would have to set both the source type and the destination type to Instances. You would then have to specify the source instance and the destination instance that you want to use. Incidentally, Amazon makes this step easy on you by allowing you to choose the instance from a drop down menu rather than requiring you to type an instance ID. You can see what this looks like in Figure 3.
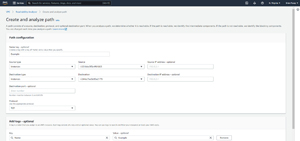 [Click on image for larger view.] Figure 3: I have set up a test to determine whether two instances can communicate with one another.
In addition to specifying the source and destination, there are several optional parameters that you can include. You can for instance specify a source and destination IP address, a port number, and a protocol (TCP or UDP). You also have an option of applying one or more tags to the analytics job that you are creating.
When you are done setting up the test, click the Create and Analyze Path button, found at the bottom of the screen. When you do, you will be returned to the Reachability Analyzer screen. You should see a message telling you that the request to run an analysis was successful. This message does not mean that the test was successful, but rather that the test was successfully created.
 [Click on image for larger view.] Figure 4: The test has been set up.
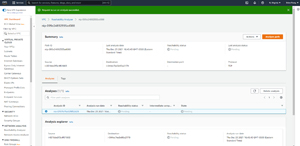
The next step in the process is to refresh your screen and then take a look at the Analysis section. If you look at Figure 5, you can see that there is one analysis listed and the Reachability Status column displays a status of Reachable. Had the test failed, the reachability status would instead be listed as Not Reachable. If you find that the test fails, then you can use the information presented in the Analysis Explorer section to try to figure out the root cause of the problem. You can rerun the test at any time by clicking on the Analyze Path button, shown in the figure.
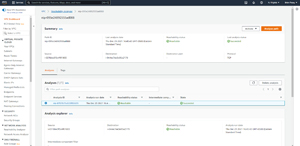 [Click on image for larger view.] Figure 5: The reachability test has succeeded and the job indicates a reachability status of Reachable.
About the Author
Brien Posey is a 22-time Microsoft MVP with decades of IT experience. As a freelance writer, Posey has written thousands of articles and contributed to several dozen books on a wide variety of IT topics. Prior to going freelance, Posey was a CIO for a national chain of hospitals and health care facilities. He has also served as a network administrator for some of the country's largest insurance companies and for the Department of Defense at Fort Knox. In addition to his continued work in IT, Posey has spent the last several years actively training as a commercial scientist-astronaut candidate in preparation to fly on a mission to study polar mesospheric clouds from space. You can follow his spaceflight training on his Web site.