How-To
Using Amazon's New Backup Capabilities for S3, Part 2: Backup Plan
Brien shows how to create a backup plan after previously creating an on-demand backup of an S3 bucket.
In the previous article in this series, I explained that Amazon has recently given AWS Backup the ability to back up data stored in S3 buckets, so long as those buckets have versioning enabled. In that article, I also showed you how to create an on-demand backup.
In the real world however, on-demand backups tend to be used for testing purposes or for one-off situations. Most backups are based on the use of a backup plan. As such, I wanted to show you how to create a backup plan that could be used to protect S3 data.
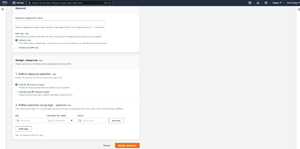
For those who might not be familiar with backup plans, a backup plan is the mechanism that defines the backup schedule, retention rules and lifecycle rules for a backup. To get started, go to the AWS Backup Dashboard screen and click the Create Backup Plan button. This will cause the console to display the screen shown in Figure 1.
 [Click on image for larger view.] Figure 1: S3 backups are not enabled by default.
When creating a backup plan, you can use a template or you can build a new plan from scratch using the GUI or a JSON file.
As you can see in the figure, Amazon gives you three options for creating a backup plan. You can create a plan from a template, you can build a new plan or you can define a plan using a JSON file. For the purposes of this article, let's create a new plan. Select the Build a New Plan option and then give your plan a name.
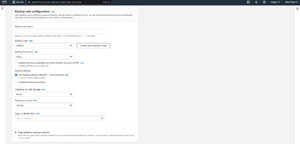
Scroll down and you will be taken to the Backup Rule Configuration section. The first thing that you will have to do within this section is to provide a backup rule name. Next, you will have to pick the backup vault that will store your backups, and you will need to tell AWS Backup how frequently backups should run. You also have the option of enabling continuous backups and of defining a custom backup window. However, Amazon recommends using the backup window defaults unless you have a compelling reason to change them.
 [Click on image for larger view.] Figure 2: This is the interface used to define a backup rule.
The lower half of the interface, which you can see in the figure above, gives you the option of transitioning the backup to cold storage. You can also define a retention period for the backup and you also have the option of enabling cross region redundancy if you like. Keep in mind that using the Copy to Destination option to copy your backup to another region can increase costs. It's also worth noting that this feature does not work with Amazon RDS or with continuous backups. When you are done populating the various fields, click the Create Plan button to create your backup plan.
Now that you have created a backup plan, you need to associate resources with the backup plan. This is how you tell AWS Backup what to back up. In this case, the goal is to back up an S3 bucket, so let's associate S3 with the newly created backup plan.
Select the Backup Plans tab and then click on the backup plan that you just created. When the backup plan opens, locate the Resource Assignments section and then click the Assign Resources button. This will take you to the Assign Resources screen, shown in Figure 3.
 [Click on image for larger view.] Figure 3: This is the interface used to assign resources to a backup plan.
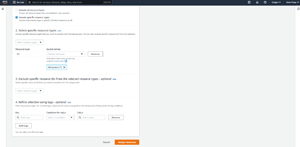
The first thing that you will need to do on this screen is to provide a name for the resource assignment and to specify the IAM role that you want to use for access to the specified resource. It's a good idea to use a descriptive name for the resource assignment.
The next thing that you will have to do is to tell AWS whether you want to include all resource types of specific resource types. Since we are talking about S3 buckets, choose the Include Specific Resource Types option and then choose S3. At this point, all you have to do is choose the buckets that you want to back up, or tell AWS hat you want to back up all of your buckets. Notice in Figure 4 that there are options for excluding buckets from the backup. You can also refine your selection using tags if you wish. When you are done, click the Assign Resources button.
 [Click on image for larger view.] Figure 4: This is the interface used to assign resources to a backup plan.
You can choose the buckets that you want to back up or you can back up all of your buckets.
If you try to backup specific buckets, but do not see those buckets listed then make sure that the backup plan exists in the same region as the buckets and that versioning is enabled for the buckets.
About the Author
Brien Posey is a 22-time Microsoft MVP with decades of IT experience. As a freelance writer, Posey has written thousands of articles and contributed to several dozen books on a wide variety of IT topics. Prior to going freelance, Posey was a CIO for a national chain of hospitals and health care facilities. He has also served as a network administrator for some of the country's largest insurance companies and for the Department of Defense at Fort Knox. In addition to his continued work in IT, Posey has spent the last several years actively training as a commercial scientist-astronaut candidate in preparation to fly on a mission to study polar mesospheric clouds from space. You can follow his spaceflight training on his Web site.