How-To
How to Be Notified When Someone Logs In with Your AWS Root Account
Amazon has long recommended that you use your AWS root account as seldom as possible, using instead an IAM account. The main reason for this recommendation is of course, that the root account is sensitive and using it could potentially increase the odds of the account being compromised. But how can you tell if your root account has already been compromised? One option is to make it so that Amazon notifies you any time that someone logs in using the root account.
The process of setting up a logon notification is more involved than what you might reasonably expect. Even so, the process is not overly difficult, thanks to a template that Amazon has created.
If you want to be notified when someone logs in using your root account, the first thing that you will need to do is to copy the template and paste its contents into your favorite text editor. Upon doing so, you will need to save the template to a file, using the YAML extension. You can get the template's text directly from Amazon, but I have included it here for your convenience:
# Copyright 2019 Amazon.com, Inc. or its affiliates. All Rights Reserved.
# Permission is hereby granted, free of charge, to any person obtaining a copy of this
# software and associated documentation files (the "Software"), to deal in the Software
# without restriction, including without limitation the rights to use, copy, modify,
# merge, publish, distribute, sublicense, and/or sell copies of the Software, and to
# permit persons to whom the Software is furnished to do so.
#
# THE SOFTWARE IS PROVIDED "AS IS", WITHOUT WARRANTY OF ANY KIND, EXPRESS OR IMPLIED,
# INCLUDING BUT NOT LIMITED TO THE WARRANTIES OF MERCHANTABILITY, FITNESS FOR A
# PARTICULAR PURPOSE AND NONINFRINGEMENT. IN NO EVENT SHALL THE AUTHORS OR COPYRIGHT
# HOLDERS BE LIABLE FOR ANY CLAIM, DAMAGES OR OTHER LIABILITY, WHETHER IN AN ACTION
# OF CONTRACT, TORT OR OTHERWISE, ARISING FROM, OUT OF OR IN CONNECTION WITH THE
# SOFTWARE OR THE USE OR OTHER DEALINGS IN THE SOFTWARE.

AWSTemplateFormatVersion: '2010-09-09'
Description: ROOT-AWS-Console-Sign-In-via-CloudTrail
Metadata:
  AWS::CloudFormation::Interface:
    ParameterGroups:
    - Label:
        default: Amazon SNS parameters
      Parameters:
      - Email Address
Parameters:
  EmailAddress:
    Type: String
    ConstraintDescription: Email address required.
    Description: Enter an email address you want to subscribe to the Amazon SNS topic
      that will send notifications if your account's AWS root user logs in.
Resources:
  RootActivitySNSTopic:
    Type: AWS::SNS::Topic
    Properties:
      DisplayName: ROOT-AWS-Console-Sign-In-via-CloudTrail
      Subscription:
      - Endpoint:
          Ref: EmailAddress
        Protocol: email
      TopicName: ROOT-AWS-Console-Sign-In-via-CloudTrail
  EventsRule:
    Type: AWS::Events::Rule
    Properties:
      Description: Events rule for monitoring root AWS Console Sign In activity
      EventPattern:
        detail-type:
        - AWS Console Sign In via CloudTrail
        detail:
          userIdentity:
            type:
            - Root
      Name:
        Fn::Sub: "${AWS::StackName}-RootActivityRule"
      State: ENABLED
      Targets:
      - Arn:
          Ref: RootActivitySNSTopic
        Id: RootActivitySNSTopic
    DependsOn:
    - RootActivitySNSTopic
  RootPolicyDocument:
    Type: AWS::SNS::TopicPolicy
    Properties:
      PolicyDocument:
        Id: RootPolicyDocument
        Version: '2012-10-17'
        Statement:
        - Sid: RootPolicyDocument
          Effect: Allow
          Principal:
            Service: events.amazonaws.com
          Action: sns:Publish
          Resource:
          - Ref: RootActivitySNSTopic
      Topics:
      - Ref: RootActivitySNSTopic
Outputs:
  EventsRule:
    Value:
      Ref: EventsRule
    Export:
      Name:
        Fn::Sub: "${AWS::StackName}-RootAPIMonitorEventsRule"
    Description: Event Rule ID.
When you have created the YAML file, the next thing that you will need to do is to sign into the AWS console and then open AWS CloudTrail. For the purposes of this article, I am going to assume that you have not yet created a trail. If you do have a trail, you can edit it instead of creating a new trail.
To create a trail, click on the Create a Trail button. When you do, you will be taken to a screen that asks you to provide a trail name and to specify a trail bucket and folder. Unless you have another trail already in place, you can accept the defaults by clicking on the Create Trail button, shown in Figure 1.
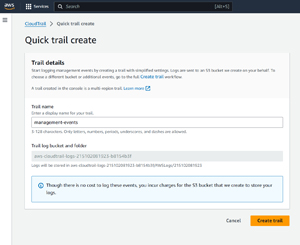 [Click on image for larger view.] Figure 1: Click the Create Trail button to accept the defaults.
Once the trail has been created, click on the trail name. This will take you to a page that allows you to edit the trail. Click the Edit button found in the Management Events section, and you will be taken to a screen that allows you to choose the types of events that will be logged. Make sure that the Management Events option is selected and make sure that at a minimum, the Write checkbox is selected (though you can log both read and write events).
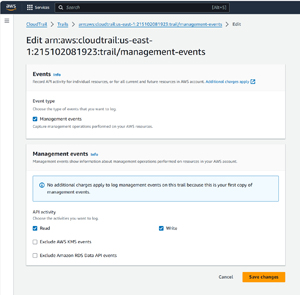 [Click on image for larger view.] Figure 2: Make sure that you are logging write events.
When you are done, save your changes and then open the CloudFormation console. According to the AWS documentation, you will need to be using the N. Virginia region.
Click the Create Stack button and then select the With New Resources (Standard) option. You will now be taken to the Create Stack page.
On this screen, you will need to select the Choose an Existing Template option, followed by the option to upload a template file. You will then need to click the Choose File button, and select the YAML file that you created earlier. You can see what this looks like in Figure 3.
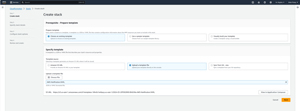 [Click on image for larger view.] Figure 3: You must upload the template file that you created earlier.
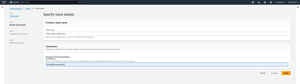
Click Next, and you will be taken to the Specify Stack Details screen, which is shown in Figure 4. Here, you will need to enter a stack name. My advice is to enter a name that reflects the stack's purpose. For example, you might call the stack Root-Logon-Notification, or something like that. You will also need to enter the email address where notifications should be delivered.
 [Click on image for larger view.] Figure 4: You must upload the template file that you created earlier.
Provide a name for the stack that you are creating and specify an email address to be used for notifications.
As you look at the figure above, you will notice that I have entered my own email address. Keep in mind however, that I am working in a lab environment. In the real world, notifications could contain critical information, so it's important to use an address where the notification can be immediately observed and acted on.
Click Next, and you will be taken to the Configure Stack Options screen, which you can see in Figure 5. Although there are quite a few options shown on this screen, you don't actually have to do anything on this screen. Just click the Next button to move on to the next screen.
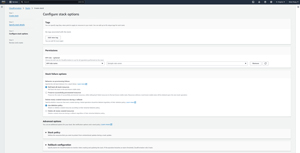 [Click on image for larger view.] Figure 5: Click Next to accept the default values.
At this point, you will be taken to the Review+Create screen. Take a moment to review the information shown on this screen. Assuming that everything appears to be correct, click Submit.
It takes a few minutes for AWS to create all of the necessary components and you may have to refresh your browser to see when the process has completed. At some point during the creation process, AWS will send a confirmation email to the address that you specified as the notification destination. Click on the Confirm Subscription link within this email, as shown in Figure 6.
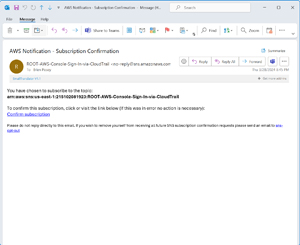 [Click on image for larger view.] Figure 6: Click the Confirm Subscription link within the email message that you receive.
You can test the notification service by simply logging into your AWS account using the root user account. The notification email contains some potentially sensitive information, so I don't want to show the entire message. However, you can see a redacted version of the message in Figure 7. Incidentally, from the time that I logged on to my account, it took about a minute for me to receive the notification.
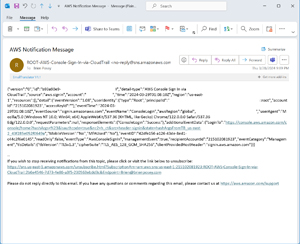 [Click on image for larger view.] Figure 7: This is what the notification message looks like.
About the Author
Brien Posey is a 22-time Microsoft MVP with decades of IT experience. As a freelance writer, Posey has written thousands of articles and contributed to several dozen books on a wide variety of IT topics. Prior to going freelance, Posey was a CIO for a national chain of hospitals and health care facilities. He has also served as a network administrator for some of the country's largest insurance companies and for the Department of Defense at Fort Knox. In addition to his continued work in IT, Posey has spent the last several years actively training as a commercial scientist-astronaut candidate in preparation to fly on a mission to study polar mesospheric clouds from space. You can follow his spaceflight training on his Web site.