How-To
Creating an AWS Route 53 DNS Firewall
Brien Posey provides step-by-step instructions for creating a firewall to prevent or allow specific DNS queries.
The AWS Route 53 service allows you to create a DNS firewall that you can use to prevent or allow specific DNS queries. For example, if you know that the resources within a particular VPC are only ever going to be communicating with your organization's own internal domains, then you could create a collection of firewall rules that allows DNS queries for those specific domains, but blocks all others. Likewise, you could create a firewall rule that blocks DNS queries for domains that are known to be associated with malware.
To get started, log into AWS and open Route 53. When the console opens, click on the DNS Firewall option, found in the console tree.
As you configure the DNS firewall, all of the rules that you create will be contained within a rule group. As such, the first thing that you will need to do is to create a rule group. Select the Rule Groups tab (if it isn't already selected) and click the Create Rule Group button. When prompted, enter a name for the rule group that you are creating, as shown in Figure 1, and then click the Add Rule Group button.
 [Click on image for larger view.] Figure 1: Enter a rule group name and then click Add Rule Group.
Now that the rule group has been created, you will be taken to a details page for the rule group. You can see what this looks like in Figure 2. Notice that there are not currently any rules associated with the rule group.
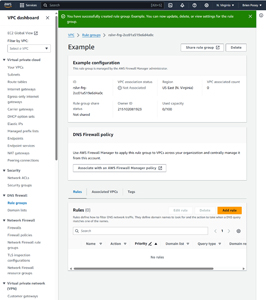 [Click on image for larger view.] Figure 2: The rule group has been created.
The next step in the process is to create one or more rules. The actual rules that you will need to create are going to be specific to your own organization. Even so, I will walk you through the creation of an example rule. Click the Add Rule button and you will be taken to the Add Rule screen, shown in Figure 3.
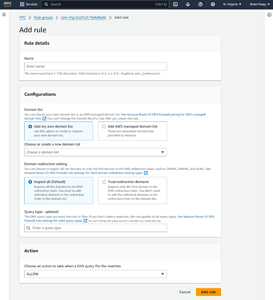 [Click on image for larger view.] Figure 3: This is the interface used for creating DNS firewall rules.
As you can see in the above figure, the first thing that you will have to do is to provide a name for the rule that you are creating. As a general rule, the name should be something descriptive that reflects the rule's purpose.
The next step in the process is to choose either to use an AWS managed domain list or to choose your own domain list. Amazon maintains several domain lists, including a list of known malware domains. If you choose to use your own domain, you will have the option of creating your list at that time (you can also upload a list).
Once you have chosen the domain list that you want to use, you must decide whether you want to inspect all of the domains within the DNS redirection chain, or if you want to trust redirection domains. By default, AWS will inspect all domains.
You can enter a query type if you want the rule to apply to a specific type of DNS query. In most cases however, it's probably going to be better to leave the Query Type field blank so that the rule will apply to all queries, regardless of type.
The last thing that you need to do is to choose the action that occurs if a domain on your list is queried. If for example, you are using a list of domains that are known to be used for malware, then you would typically block the query. Conversely, if the list of domains contained the domain names that your organization uses internally, then you would want to allow the query. When your new rule is properly configured, click the Add Rule button to create the rule. You can see what a completed rule looks like in Figure 4.
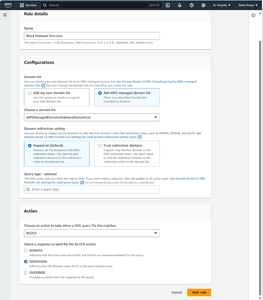 [Click on image for larger view.] Figure 4: I have created a rule to block queries to domains associated with malware.
As it stands right now, you have created a rule group and one or more rules. However, those rules do not yet do anything. In order to enable the rules that you have created, you will need to associate the rule group with a VPC. From the rule group screen (shown in Figure 2), select the Associated VPC tab and then click the Associate VPC button, shown in Figure 5. Now, just select your VPC and click the Associate button.
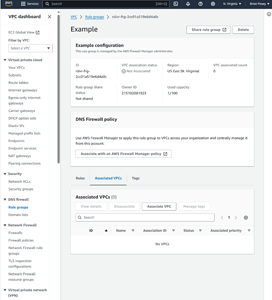 [Click on image for larger view.] Figure 5: Select the Associated VPCs tab and click the Associate VPC button.
About the Author
Brien Posey is a 22-time Microsoft MVP with decades of IT experience. As a freelance writer, Posey has written thousands of articles and contributed to several dozen books on a wide variety of IT topics. Prior to going freelance, Posey was a CIO for a national chain of hospitals and health care facilities. He has also served as a network administrator for some of the country's largest insurance companies and for the Department of Defense at Fort Knox. In addition to his continued work in IT, Posey has spent the last several years actively training as a commercial scientist-astronaut candidate in preparation to fly on a mission to study polar mesospheric clouds from space. You can follow his spaceflight training on his Web site.