How-To
Creating VMs on a Raspberry Pi 5 Running ESXi
In the past few articles on ESXi on a Raspberry Pi (located here, here and here), I discussed ESXi 8 on ARM Fling and how to install it on a Pi 5.
While some readers may only be interested in the setup process, most are eager to create and run virtual machines (VMs), which we'll cover in this article. This might be the least exciting part of the series, as VMware has made VM creation almost as simple as installing an OS on a physical machine. There are a few things to keep in mind, like using the right ISOs for ARM processors, but overall, setting up a VM on ESXi with a Pi is straightforward.
I will provide step-by-step instructions for creating a VM from different Linux distributions and discuss issues with running Windows on it. First, I will give an overview of VMware Tools, including what they are and why they are important, and how to ensure they are running on a VM.
VMware Tools
VMware Tools is a set of utilities that increases a VM's performance and gives the ESXi Host Client and vSphere Client visibility into the VMs running on ESXi. Your VMs will function without VMware Tools, but the enhancements that the tools add make it worthwhile to make sure they are installed on them.
VMware Tools provide the following features to the VM:
- Installer with interactive GUI and command line support
- 3D Graphics
- Multiple monitor
- Resizing fit to window
- Guest clock time synchronization
- Soft power operations
- Desktop events for user switching
- Drag and drop files between the host and guest
- Copy and paste of files and text between host and guest
- vmrun support for running guest operations
Not all these features may be available for ARM VMs.
Photon OS
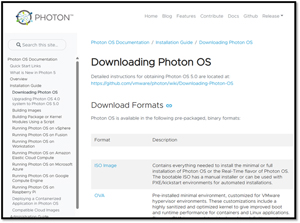
The first operating system I will install is Photon OS. Photon OS is a lightweight Linux distribution created and maintained by VMware. Photon OS has been optimized to run on VMware infrastructure and in public clouds; as such, it has been stripped down and includes only the drivers necessary to run on a VMware hypervisor (ESXi, Workstation, and Fusion) or in supported public cloud. Many VMware components, such as the vCenter Server Appliance (VCSA), utilize it as their base operating system.
Photon OS is freely available and easy to install on vSphere as it has an ARM-compatible ISO. It should be noted that my original intent was to install it using the OVA file but could not do so as there was a virtual hardware mismatch so I installed it from the ISO.
To install Photon OS, go to the Photon OS GitHub page and click ISO Image.
 [Click on image for larger view.]
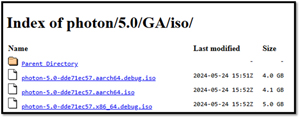
On this page, select the file that ends with aarch64.ova.
 [Click on image for larger view.]
Uploading ISO Files to ESXi Storage
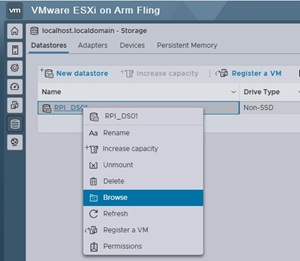
To upload the ISO image, log in to the ESXi Host Client and perform the following tasks:
- Select the Storage (Disk icon) in the left navigation pane
- Click Datastores in the top ribbon
- Right-click the datastore that you want to upload the ISO to and select Browse
 [Click on image for larger view.]
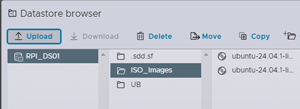
- Click Create directory and create a directory named ISO_Images under the root directory
- Select the new directory, and in the top ribbon, click Upload
 [Click on image for larger view.]
- Navigate to the location on your Windows machine and select the ISO you have downloaded
- In the Recent task pane, you watch the progress of the upload
Creating a Photon OS VM
To create a Photon OS from the ISO image that you uploaded, perform the following task from the ESXi Host Client:
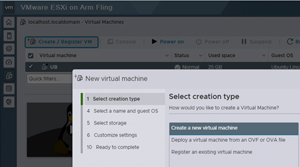
- In the Navigator, select Virtual Machines and then click Create / Register VM from the top ribbon
- In the New Virtual Machine wizard, select Create a new virtual machine, and click Next
 [Click on image for larger view.]
- In the Name text box, enter PhotonOS_A
- From the Guest OS family drop-down menu, select Linux. In the Guest OS version drop-down menu, select Photon OS (64-Bit) and click Next
- Select the datastore that you want to use, click Next
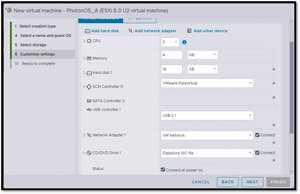
- Set the virtual hardware to have three CPUs and 4GB of memory (you can lower this later, but it speeds up the initial installation and configuration)
- Expand CD/DVD Drive 1, select Datastore ISO file, and select your Ubuntu ISO image. Verify that Connect at power on is selected. Click Next
 [Click on image for larger view.]
- Verify your settings and click Finish
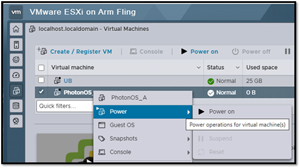
- Right-click the new VM and select Power > Power On
 [Click on image for larger view.]
Once the system is powered on, you must go through the installation process.
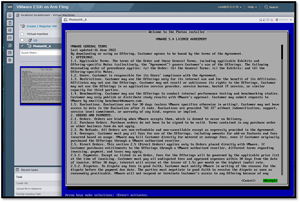
- Click the VM display to bring up the console window on the VM
- Follow the prompts to install Photon OS, accept all the default settings, or modify them to suit your environment
 [Click on image for larger view.]
- The OS takes a few minutes to install. I find it useful to monitor the Elapsed time to see how long it takes. It took me 94 seconds to install it.
- When the installation has been completed, select Reboot Now
Using Photon OS
The in-depth usage of Photon OS is beyond the scope of this article, but I will show you some basic commands to verify that it is working. For more detail about using Photon OS, see my article here.
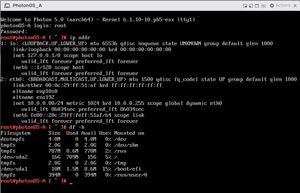
After logging into the VM as root using the password, you set when you installed it. You can check its IP address by entering ip addr.
You can check how much free disk space you have by entering df -h.
 [Click on image for larger view.]
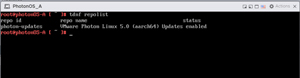
Photon OS uses the tdnf package manager. To list the packages that are installed enter tdnf list.
To see the package repository being used enter tdnf repolist.
 [Click on image for larger view.]
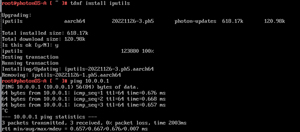
The ping command is not installed by default. To install the package with the ping command, enter tdnf install iputils. After doing so, I could use the ping command.
 [Click on image for larger view.]
After verifying that the VM was operational, I powered it down by entering init 0 and closed the console window.
Editing a VM's Settings
To speed up the installation process, I gave the VM 3 vCPUs and 4GB of RAM. Photon is a highly lightweight OS, and as I am NOT running any workloads on it, I set it to 1 vCPU and 1 GB of RAM, and it still powered up and ran without any issues.
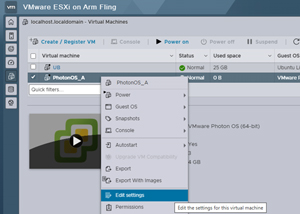
To edit the VMs setting, perform the following task from the ESXi Host Client:
-
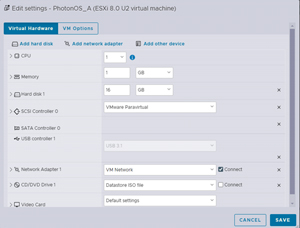
Right-click the VM and select Edit Settings
 [Click on image for larger view.]
-
Set the CPU to 1 and the Memory to 1 GB
 [Click on image for larger view.]
- Click Save
- Click Refresh on the top ribbon
- The new VM settings will be displayed in the center pane
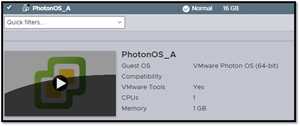 [Click on image for larger view.]
From this screen, we can also see that VMware Tools were installed.
Create an ARM Ubuntu VM
Photon OS is more of a niche OS than a distribution like Ubuntu so in this section will show how I installed Ubuntu for ARM on the Pi.
I downloaded the Ubuntu ARM ISO from Ubuntu and uploaded it to the datastore, just as I did with the Photon OS ISO.
The download site for the ARM Ubuntu images is here.
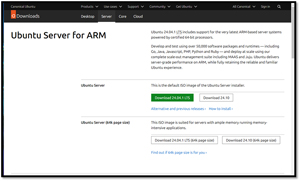 [Click on image for larger view.]
To create an Ubuntu VM from the ISO image, perform the following task using the ESXi Host Client:
- In the Navigator, select Virtual Machines and then click Create / Register VM from the top ribbon
- In the New Virtual Machine wizard, select Create a new virtual machine, and click Next
- In the Name text box, enter Ubuntu22_A. From the Guest OS family drop-down menu, select Linux. In the Guest OS version drop-down menu, select Ubuntu Linux (64-bit) and click Next.
- Select the datastore that you want to use and click Next
- Set the virtual hardware to three CPUs and 4GB of memory (You can lower this later, but it speeds up the initial installation and configuration)
- Expand CD/DVD Drive 1, select Datastore ISO file, and select your Ubuntu ISO image. Verify that Connect at power on is selected. Click Next.
- Verify your settings and click Finish
- Right-click the new VM and select Power > Power On
Once the system is powered on, you must go through the installation process.
Click the VM display; this will bring up the console window on the VM.
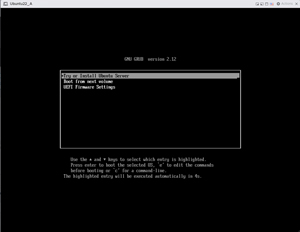 [Click on image for larger view.]
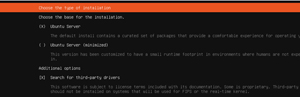
- Click Try or Install Ubuntu Server
- Follow the prompts to install Ubuntu, accept the default settings, or modify them to suit your environment
-
I suggest that you install third-party drivers and OpenSSH server
 [Click on image for larger view.]
- The OS took about five minutes to install
- When the installation has been completed, it will be indicated on the top orange ribbon
-
Select Reboot Now
 [Click on image for larger view.]
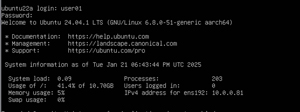
You can now login to the Ubuntu VM as the user with the password you created when installing it.
 [Click on image for larger view.]
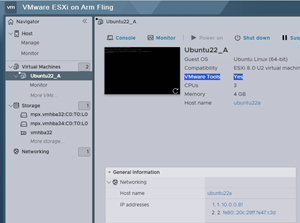
VMware Tools on Ubuntu
VMware tools are installed by default on Ubuntu. This is shown in the middle pane of the ESXi Host client when you select a VM.
 [Click on image for larger view.]
This screen shows that VM tools are installed on the VM.
You can verify they are installed from the VM by entering apt list—installed |grep open-vm from the VM's command line. Open-vm-tools is the package used to install them.
 [Click on image for larger view.]
Post Configuration of Ubuntu VM
Unless you only plan on running an actually workload on the VM, you will want to reduce the resources used by your Ubuntu VM.
To change the vCPU and RAM used by the VM do the following:
- Power down the VM
- From the ESXi Host Client, right-click the VM and select Edit Settings
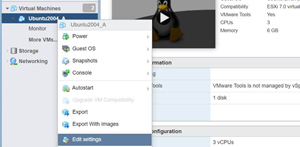 [Click on image for larger view.]
- Change the vCPU count to 2 and the RAM to 2GB
- Click SAVE
- Power on the VM
Monitoring VMs
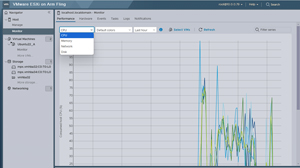
The ESXi Host Client has tools for monitoring the performance of your VMs and the ESXi host.
To see the resources the entire ESXi host consumes, click Host and navigate to Monitor.
Clicking the
performance tab will show the CPU, memory, network, and disk usage. It is limited to showing the last hour.
 [Click on image for larger view.]
To see the resources that an individual VM consumes, select the VM in the navigator, expand it, and select Monitor.
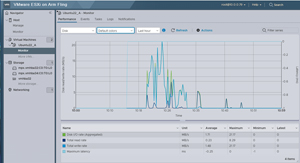 [Click on image for larger view.]
This will display the same resource usage metrics as those shown for the host but only for the VM.
Windows VMs
Because the Pi has an ARM processor, software and OSes compiled for x64 systems will not run on it. Fortunately, all the major Linux distributions have ARM versions readily available, and they run well as VMs (even with a limited amount of memory and CPU cycles).
Microsoft is another story. Although Microsoft has had an ARM version of Windows since 2011, and its first Surface device, the Surface RT, was powered by an Nvidia ARM processor, Microsoft has announced a version of Windows for the ARM more recently, and its recently announced Surface Pro X also runs it. Microsoft has even announced that it has an ARM-based server running Windows in its cloud, but they also stated that it is doubtful that we will see this version made available to the public soon.
Some people have reported that they got ARM versions of Windows to run on a Pi 5 running ESXi on ARM, but it is not easy or well-supported due to compatibility issues. So, at this time, unless you really want to start digging down that rabbit hole, it is best to stick with running Linux VMs on your ESXi ARM system.
My Final Thoughts on VM's ESXi on Pi 5
I was happy how easy it was to install ESXi 8 on the Pi 5 and run Linux-based VMs on it. I can see it being an excellent tool for educational purposes, as it makes a low cost platform for them and they are so small students can take their "ESXi server" home with them and plug it into a TV or monitor, and get to work.
So far, its performance seems considerably better than the Pi 4. As I have and still use my Pi 4s, I hope to run a few performance tests on them to see how much more performant the Pi 5 is compared to the 4. In particular, I would like to see how well the dual 5 GB USB port performs compared to the Pi 4's split 5 GB USB ports.
All technology is built on the shoulders of others, and I need to give a big shout-out to the Pi and VMware communities for their work on running ESXi on the Pi. Through these articles, I hope to give back and add a little bit to this body of knowledge to this great community.