Sean's Virtual Desktop
How To Install the Root Self-Signed Certificate from vCenter 6.0
SSL certificates have changed in the latest vCenter edition. Here's how to install a new certificate.
SSL certificates took on an important role in vSphere 5.1, and managing the certificates that the vSphere environment required became another challenge that vSphere administrators needed to tackle.
Although vSphere 5.5 simplified the process and third-party tools such as Derek Seaman's vSphere Toolkit took much of the pain out of it, certificate management was still one of those things that many administrators avoided -- especially if they were using the Linux-based vCenter Server virtual appliance.
In vSphere 6.0, VMware tried to address SSL certificates in a different manner. It introduced a new component called the "Platform Services Controller." The Platform Services Controller includes a fully-functional certificate authority, called the VMware Certification Authority (VMCA), that automatically manages the certificates used in vCenter and the ESXi hosts.
This certificate authority can also be configured as an Intermediate certificate authority (CA) if you have an existing enterprise CA environment, or bypassed completely if your security policy doesn't allow certificates from an untrusted CA (be aware that this option increases the complexity of managing the environment.)
If you choose to use the default VMCA certificates, you'll need to retrieve the root certificate and deploy it as a trusted root certificate. If you don't do this, you'll get the untrusted security notices when you attempt to access the vCenter Web Client.
Note: These directions assume you're using Microsoft Windows in an Active Directory domain. They also assume you're using a browser that uses the Windows Certificate Store such as Internet Explorer or Chrome. These directions will not work for Firefox, as it has its own certificate store.
There are two steps to complete. First, you need to retrieve the root certificate from vCenter and convert it into something usable. Once you've done that, you need to deploy it as a Trusted Root Certificate. The easiest way to do this with multiple computers is to use Group Policy. Here are the steps to retrieve the certificate:
1. Open your Web browser.
2. Navigate to https://<fqdn of vcenter>
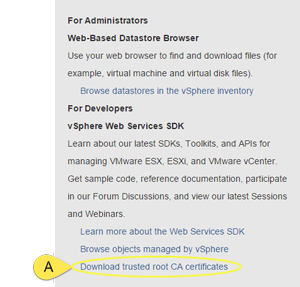
3. In the lower right-hand corner, click the Download Trusted Root CA link (the "A" pointer in Figure 1). This will download a zip file containing the CA certificate and the certificate revocation list.
 [Click on image for larger view.]
Figure 1. Downloading the certificate.
[Click on image for larger view.]
Figure 1. Downloading the certificate.
4. Open the zip file. There will be a folder called certs. On opening the certs folder, you'll see two files. The file that ends with a .0 is a PEM-encoded certificate file. The file that ends with the .r0 is the certificate revocation list.
 [Click on image for larger view.]
Figure 2. The PEM-encoded certificate file to open.
[Click on image for larger view.]
Figure 2. The PEM-encoded certificate file to open.
5. Extract the file that ends with a .0, as shown in Figure 2.
6. Rename the .0 file to .cer (Figure 3).
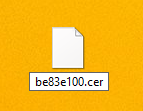 Figure 3. Rename the .0 file to .cer.
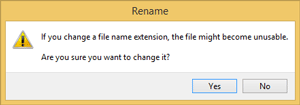
7. If you receive a message that says changing the file extension could make the file unstable, click Yes, as Figure 4 shows.
 [Click on image for larger view.]
Figure 4. Click Yes here.
[Click on image for larger view.]
Figure 4. Click Yes here.
8. Open the Group Policy Management Console.
9. Select a GPO to edit, or create a new GPO to deploy the certificate.
10. Navigate to Computer Configuration -> Policies -> Windows Settings -> Security Settings -> Public Key Policies -> Trusted Root Certification Authorities
11. Right-click on Trusted Root Certification Authorities and select Import.
12. Click Next.
13. Select the root certificate and click Next.
14. Verify that the certificate is being placed into the Trusted Root Certification Authorities certificate store and click Next.
15. Review the settings and click Finish.
16. You should see a message box if the certificate import was successful.
17. Open a command prompt and type
GPUpdate –force.
This will update all group policies on the computer.
18. Once the group policy update has completed, open up your Web browser and navigate to https://<fqdn of vcenter>. You should no longer receive an error that the certificate is not trusted.
About the Author
Sean Massey is a systems administrator from Appleton, Wisc. He blogs about VDI, Windows PowerShell, and automation at http://seanmassey.net, and is active on Twitter as @seanpmassey.