In-Depth
How To Use VMware Instant Clone, Part 1: Setup and Installation
Horizon 7 includes Instant Clones, which allow virtual desktops to be created in moments. Learn how to get it set up in this first installment.
Click here for Part 2
In a recent article, I discussed several key features I found most appealing in Horizon 7, VMware's latest virtual desktop infrastructure (VDI) offering. At the top of the list was Instant Clones. After having the chance to install Horizon 7 and work with it, I wanted to share my experience creating Instant Clone desktop pools and working with Instant Clone desktops.
An Introduction to Instant Clones
VMware announced the technology behind Instant Clones (Fargo/VMFork) during a keynote speech at VMworld 2014. VMFork allows a running virtual machine (VM) to be forked to a child clone. This child clone initially uses the same real memory and disk space as its parent; then, when a write to the memory or disk occurs, it stores this data in a delta space. Because it forks a running VM, the clones can be created very quickly; as quick as one or two seconds.
Horizon 7 is the first VMware product to use VMFork. The ability to spin up new desktops using Instant Clone in seconds translates into some interesting business offerings, such as just-in-time (JIT) and "disposable" virtual desktops. JIT clones negate the need to have a virtual desktop on standby in order to satisfy the needs of users as they log into their desktops, since desktops can be instantiated in seconds rather than minutes. By doing this, resources such as CPU cycles, RAM and disk space don't need to be unnecessarily consumed, allowing them to be conserved for more productive purposes. The disposable designation occurs every time a user logs off the desktop and the current desktop is destroyed; a fresh, new desktop is created next time they log on.
Creating a Master Image
The requirements for an Instant Clone parent image are few and straightforward: Windows 7 or Windows 10 as the base image, HW version 11 for the virtual desktop, VMXNET3 for the NIC, and the Instant Clone agent installed on the base image (see
Figure 1). A snapshot is taken once the master image has been created, and this snapshot is what the clones will be based on.
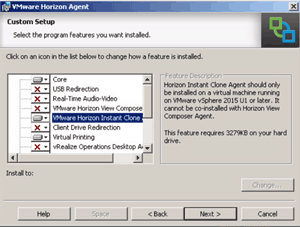 [Click on image for larger view.]
Figure 1. Setup parameters for Instant Clone.
Creating an Instant Clone Pool
[Click on image for larger view.]
Figure 1. Setup parameters for Instant Clone.
Creating an Instant Clone Pool
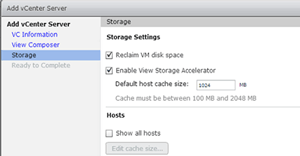
The initial release of Instant Clone only supports shared datastores (VMFS or VSAN) in a clustered environment. The ESXi servers must be running vSphere v6 Update 1, and View Storage Accelerator must be enabled on the vCenter. View Storage Accelerator can be enabled when a vCenter Server is associated with the View Connection server (see
Figure 2).
 [Click on image for larger view.]
Figure 2. Enabling View Storage Accelerator.
[Click on image for larger view.]
Figure 2. Enabling View Storage Accelerator.
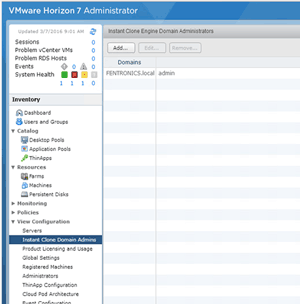
Instant Clone uses an "Instant Clone Domain Administrator" to handle the Active Directory's needs for the cloned desktops. The Instant Clone Domain Administrator is set up through the View Administrator portal, as shown in
Figure 3.
 [Click on image for larger view.]
Figure 3. The View Administrator portal.
[Click on image for larger view.]
Figure 3. The View Administrator portal.
The creation of an Instant Clone desktop pool roughly follows the same workflow as creating a linked clone desktop pool, and is executed via the View administrator portal. After a master VM has been created, and a snapshot has been taken of it, the administrator selects the "Add" tab from the desktop pool window. As only automated desktop pools are supported, this type of pool needs to be selected. Floating user assignments should be selected because dedicated user assignments are not supported. The vCenter Server tab will allow you to select Instant Clones only for the machine type (see Figure 4).
 [Click on image for larger view.]
Figure 4. Not all features are supported with Instant Clone. They're outlined here.
[Click on image for larger view.]
Figure 4. Not all features are supported with Instant Clone. They're outlined here.
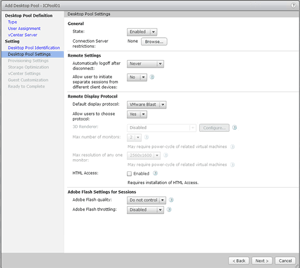
The desktop pool identifier follows the same rules as for a linked clone pool. The desktop pool settings in Figure 5 have many video options grayed out because only two monitors with 2560 x 1800 resolution are supported, and 3D rendering must be disabled.
 [Click on image for larger view.]
Figure 5. Instant Clone desktop pools don't allow 3D rendering, and a maximum of two monitors is supported.
[Click on image for larger view.]
Figure 5. Instant Clone desktop pools don't allow 3D rendering, and a maximum of two monitors is supported.
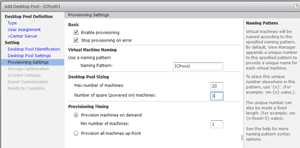
Under the provisioning settings, you must set the naming pattern for the pool and how you want the Instant Clone virtual desktops to be deployed. Every virtual desktop can be provisioned at once by selecting "Provision all machines up-front," or you can have them provisioned as needed by selecting "Provision machines on demand" and specifying the minimum number of virtual desktops you would ever need to have running.
Regardless of whether you provision the desktops up front or as needed, this is where you specify the maximum number of virtual desktops you would like to have. If you opt to have the machines created on demand, you can also specify the number of spare machines to have on standby. These standby machines will be fully created and ready to go. If you anticipate hundreds of users logging on at once it's most efficient to have them created in advance, even though it takes only a few seconds to create an Instant Clone virtual desktop. The provision settings dialog window is shown in Figure 6.
 [Click on image for larger view.]
Figure 6. The Provision Settings dialog.
[Click on image for larger view.]
Figure 6. The Provision Settings dialog.
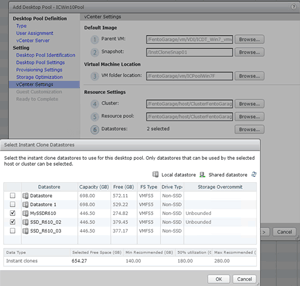
The master image and the snapshot you'll be using for the virtual desktops can be specified in the vCenter settings dialog. This dialog also lets you select settings, such as the folder in which to store the virtual desktops (this folder must be pre-created via the vSphere Web portal), the cluster that the desktops will run on (I used a single node cluster in my testing), the resource pool that the virtual desktops will pull from, and the shared datastores that will be used by the virtual desktops. Figure 7 shows the settings I used for my virtual desktops.
 [Click on image for larger view.]
Figure 7. Some possible settings for the Instant Clone datastores.
[Click on image for larger view.]
Figure 7. Some possible settings for the Instant Clone datastores.
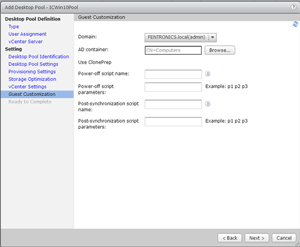
View also allows you to specify the domain, AD container for the virtual desktops, and scripts that can be used to further customize the virtual desktops as they're being created or destroyed. The dialog box is shown in Figure 8.
 [Click on image for larger view.]
Figure 8. Customizing virtual desktops.
[Click on image for larger view.]
Figure 8. Customizing virtual desktops.
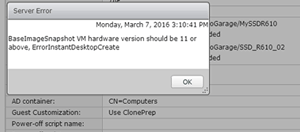
When I clicked "Next" on the guest customization dialog, I received an error message (Figure 9) indicating that my master VM did not have the correct HW version on it; I needed to go back to the vCenter administrator, update the hardware version, then create a new snapshot. After taking the snapshot, I had to go back to the View vCenter settings dialog and specify the new snapshot.
 [Click on image for larger view.]
Figure 9. The master virtual machine needs to have the correct hardware version; in this case, version 11 or higher.
[Click on image for larger view.]
Figure 9. The master virtual machine needs to have the correct hardware version; in this case, version 11 or higher.
After the desktop pool wizard is finished, it displays the selections you made and allows you to finish the creation of the pool. Once I clicked "Finish," it took less than 10 minutes for the virtual desktops in my Instant Clone pool to be created with an SSD-based datastore for storage. In comparison, it took a little over 15 minutes to create the same number of Instant Clone virtual desktops when I used an HDD-based datastore.
In Part 2 of this tutorial, I'll walk through the process of deploying an Instant Clone desktop, as well as my first impressions of how well it works, as well as its strengths and weaknesses.
About the Author
Tom Fenton has a wealth of hands-on IT experience gained over the past 30 years in a variety of technologies, with the past 20 years focusing on virtualization and storage. He previously worked as a Technical Marketing Manager for ControlUp. He also previously worked at VMware in Staff and Senior level positions. He has also worked as a Senior Validation Engineer with The Taneja Group, where he headed the Validation Service Lab and was instrumental in starting up its vSphere Virtual Volumes practice. He's on X @vDoppler.