How-To
How To Use VMware's DRS Doctor Fling
It's not the most user-friendly tool, although it's extremely useful.
VMware has released a new Fling call DRS Doctor that's a command-line tool intended to give the user insight into the actions of the Distributed Resource Scheduler (DRS). DRS has always been extremely helpful, but it's also been a bit opaque in terms of the decision making. Without being an expert in manually parsing DRS logs, it's a bit tough to tell why DRS made the decisions that it did.
To date, even with the Fling, you still can't see the reasons for DRS decision-making from the UI. But I would expect that that's the end-game, and this Fling is going to be the secret sauce behind populating the front-end elements. So before digging into how to set up and use DRS Doctor, consider these reasons why using it might be worth your time:
- The UI doesn't report the reasons for every DRS move (it only posts the number of migrations initiated by DRS).
- The UI doesn't provide a summary of cluster operations in the last DRS interval. The list of operations, along with reasons for DRS moves, can provide useful correlations to help understand DRS moves better
- The UI doesn't provide the distribution of host/VM resource entitlement across the cluster. This is needed for estimating VM happiness.
- Additionally, in the UI it's not immediately obvious as to what advanced DRS options are set in a cluster, or what special cluster configuration is enabled. These options/configurations can influence DRS behavior, so we need to be aware of them.
Prerequisites
To use the DRS Doctor Fling, a few items need to be taken care of beforehand. First of all, the tool is made of a handful of Python scripts. So the machine the script will be run from needs to have an updated version of Python (see below). Secondly, a few additional modules need to be installed (also shown below).
- Python 2.7.6 or higher
- Additional modules: pyyaml and pyvmomi
I tried configuring and testing this Fling on OS X (El Capitan). It was a miserable failure, and I believe that to be due to the system version of Python that El Capitan ships with conflicting with my attempts to load another version using pyenv. In the end, I tried completing the setup and running the tool from Windows and it turned out to be a cinch. At this point, I'd recommend using Windows or Linux to deploy DRS Doctor, unless you happen to be well-versed in both Python and OS X.
Python Version
Step 1 is to make sure the system is running a proper version of Python for running these scripts. The Flings notes say that a version greater than 2.7.6 is required. I tried with a version of Python 3.x and seemed to have some issues, so I'm going to be showing how to use the latest 2.x version.
Download and install (by running the executable) Python 2.7.12 from the official release download page. While stepping through the install wizard, be sure to select the option (which is not selected by default) to "Add python.exe to Path." This will allow you to run Python scripts from the command line without having to be in the Python executable's directory. Although it's selected by default, also be sure that the option to install "pip" is selected, as that tool will be used next.
Additional Python Modules
With the Python install out of the way, installing the additional Python modules is simple. The Python installer came bundled with
pip which is a package manager that can install the required Python modules easily. Run these two additional commands to prepare the prerequisites to run the DRS Doctor Fling:
# Just to be sure 'pip' is  up to date

  > pip install pip  –upgrade

  # Install pyYAML module

  > pip install pyyaml

  # Install vSphere Python  SDK

  > pip install pyvmomi
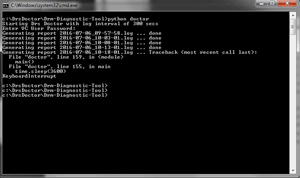
The first is a module to help with formatting YAML data, and the second is the VMware vSphere Python SDK which will allow interaction with the vSphere environment. Figure 1 shows the Python version being used and the installation of these dependencies.
 [Click on image for larger view.]
Figure 1. Installing dependencies with pip.
Configuring the Fling
[Click on image for larger view.]
Figure 1. Installing dependencies with pip.
Configuring the Fling
Before running the tool for the first time, the configuration file needs to be updated with connection information to be able to interact with vCenter Server. The completed configuration file (which can be modified at conf/testbed.conf) looks like this:
# IP address or Hostname  of vCenter to connect, Eg: 'xx.xx.xx.xxx', Hostname should be specified instaed  of IP if SSL certficate validtion is required

  vcip     : '172.16.10.4'

  # Login username for the  vCenter

  vc_usr   : 'james'

  # Name of the cluster to  monitor, Eg: 'My cluster', 'cluster23-1'

  cluster  : 'atm-vsan-01'

  # Log interval in secs.  Eg. 180, 300, 600 etc. Resource usage information is collected for every  'Log_interval' secs and a new log will be generated.

  # Since resource data  collection for the whole inventory is heavy on VC, Minimum allowed log interval  is 120 secs. Default is 300

  log_interval : 300

  # CA pem file location,  comment this out if SSL certificate verfication of VC is not required

  # ca_certs : ''
Note that besides filling in the values with respect to my environment, I've commented out the 'ca_certs' line to allow the tool to proceed without verifying that the vCenter Server's certificate is trusted by the system running the script. It would be good practice to actually leverage certificate checking in production, and the requirements for doing that can be found in the Fling's readme.txt file.
Also note that the tool can only be run against one cluster. If you require the ability to monitor multiple clusters, all that needs to be done is copy the folder and run a separate instance of the tool against a different configuration file that specifies the other cluster(s) to monitor. My assumption is that this is an API limitation, and in the future one tool might be able to monitor an entire vCenter inventory if desired.
Once the configuration file is updated and saved, the tool can finally be run.
Running DRS Doctor
From within the directory containing the Fling's files, all that's required to run the tool once setup's complete is to run the command 'python doctor.' Keep in mind that this is on Windows; on another system you might specify the path differently, like 'python ./doctor,' for example.
As the tool begins to run, it creates a series of log files. It might seem odd that the longer it runs, the more log files it generates, rather than just spitting out a single log file for you to use. This behavior actually makes perfect sense; a new log file is being generated for each time that DRS runs. That tasks happens to take place every five minutes, which means that for every five minutes you leave the tool running, a log file will be generated.
(By the way, I'm not sure if there's a more graceful way to stop this thing, but since I couldn't find one, I've just been using Ctrl + C to interrupt it. In the case of this example, I let it sit for about 20 minutes and a total of four log files were generated. Figure 2 shows the output of running the tool.)
 [Click on image for larger view.]
Figure 2. The output from running DRS Doctor.
[Click on image for larger view.]
Figure 2. The output from running DRS Doctor.
Thankfully, you don't have to open and review each individual log file yourself. If you left the tool running for a few days to gather data on an odd DRS behavior you were experiencing, you'd be looking at tens or hundreds of logs.
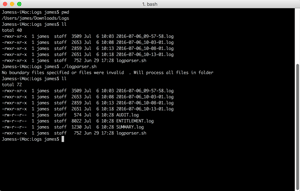
Fortunately, there's a script included with the Fling that rolls up all the generated log files into one meaningful "master" log. One problem for Windows users is that the script is written for Unix-like systems, and can't actually be run on Windows without some help. If you're totally bound to Windows, you could try a virtual environment like Cygwin.
 [Click on image for larger view.]
Figure 3. Running the log parser script
[Click on image for larger view.]
Figure 3. Running the log parser script
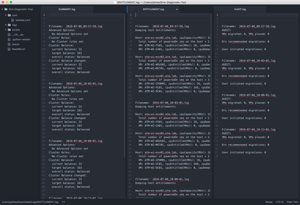
Since I'm on a Mac and only running Windows 7 in a VM because of the aforementioned Python issues, I opted to just pull the log files and shell script over to my Mac and run the parser there. Figure 3 shows the output of the parser, and Figure 4 shows the ever-so-helpful log summaries that it creates. Sadly, I didn't create enough additional load during my test to throw the cluster out of balance, so you don't actually see any of the balancing justification in my logs. For a great example, read the official VMware blog about the release.
 [Click on image for larger view.]
Figure 4. The output log summaries.
A Major Caveat
[Click on image for larger view.]
Figure 4. The output log summaries.
A Major Caveat
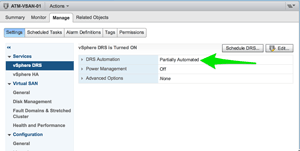
There's one major thing to watch out for when running this tool in production: DRS must be in partially automated mode in order for DRS Doctor to work. This is due to the fact that the API doesn't show the recommendations if the cluster is in Fully Automated mode. If your cluster is in fully automated mode, DRS Doctor will automatically change the mode to partially automated mode and apply the load balancing recommendations based on the threshold configured. (It will act just as it would in fully automated mode.)
The problem is that if you close DRS doctor, you'll need to ensure that the DRS automation settings get reverted to fully-automated mode. In my case, as you see in Figure 5, the cluster wasn't reverted to Fully Automated mode. I'm sure that the Fling creators are aware of this and are working on adding the ability to revert the cluster to its prior settings. From the sound of it, this API issue should change in the future, and DRS Doctor won't be required to set the cluster to Partially Automated.
 [Click on image for larger view.]
Figure 5. DRS left in Partially Automated mode.
[Click on image for larger view.]
Figure 5. DRS left in Partially Automated mode.
About the Author
vExpert James Green has roughly a decade of experience as an IT administrator, architect and consultant in a variety of organizations. He's highly certified, and continues to purse professional certifications to increase his breadth and depth of knowledge. He has always been passionate about writing and speaking, and discussing the marriage of cutting-edge technology and business is one of his favorite activities. He works for ActualTech Media, www.actualtech.io.